¶ Creality Ender 3 V3 KE KCM Set Setup Guide
| Image | Information |
|---|---|
 |
Welcome to the installation page for Creality Ender 3 V3 KE with KCM Set. This guide provides step-by-step instructions for updating your printer’s firmware to be compatible with KCMSet, downloading STL files for mechanical setup, completing the mechanical assembly, and configuring Klipper settings.. |
¶ 1) Mechanical Setup of KCM Set on Creality Ender 3 V3 KE
Before starting the KCM Set installation on your Creality Ender 3 V3 KE, you need to 3D print some parts for the ChromaHead and CX-I Extruder assembly.
¶ - Downloadable parts required for the installation
You can download the required STL files below.
| Part Name | Quantity | Links |
|---|---|---|
| ChromaHead Adapter Part | 1x | Download |
| CX-I Extruder Block | 1x | Download |
| CX-I Extruder Block Holder | 1x | Download |
| Belt Holder | 2x | Download |
| Card Holder | 1x | Download |
¶ 1.1) Mechanical Setup
¶ A. Removing the Stock Print Head
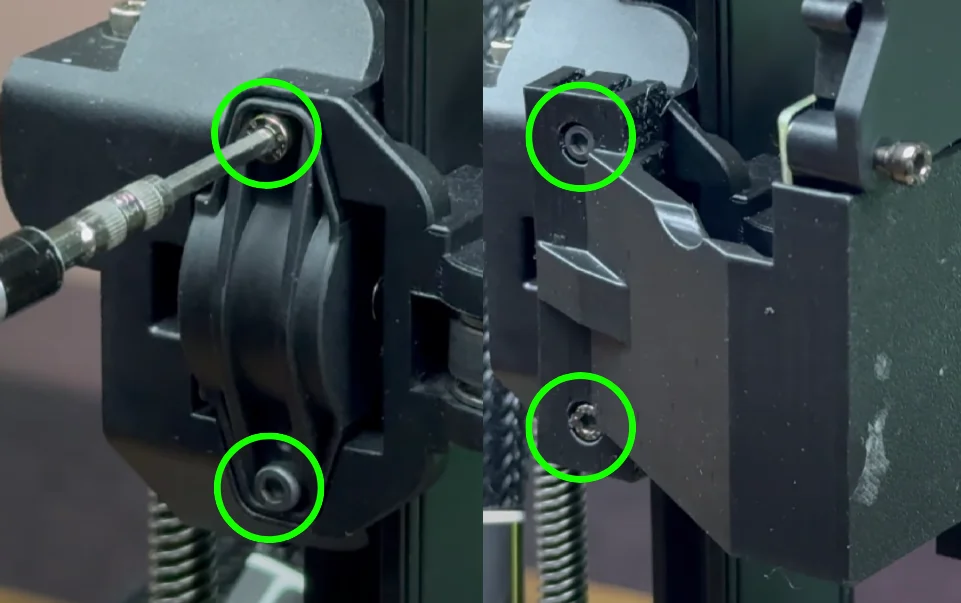
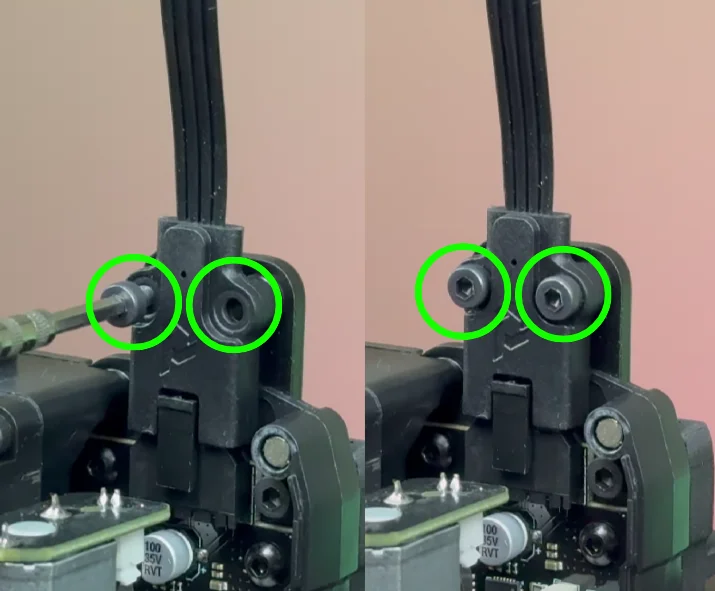
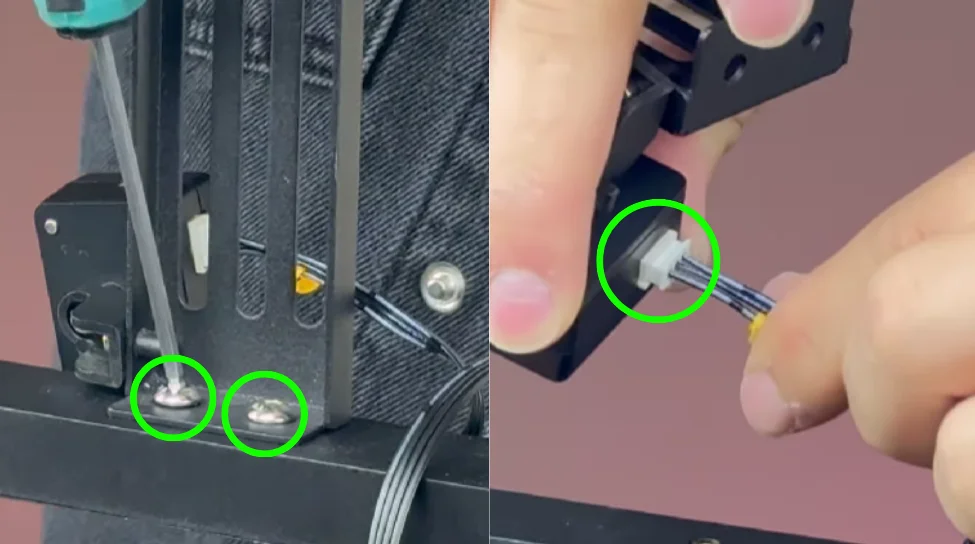
- Remove the head section by unscrewing the two screws on the left and right.
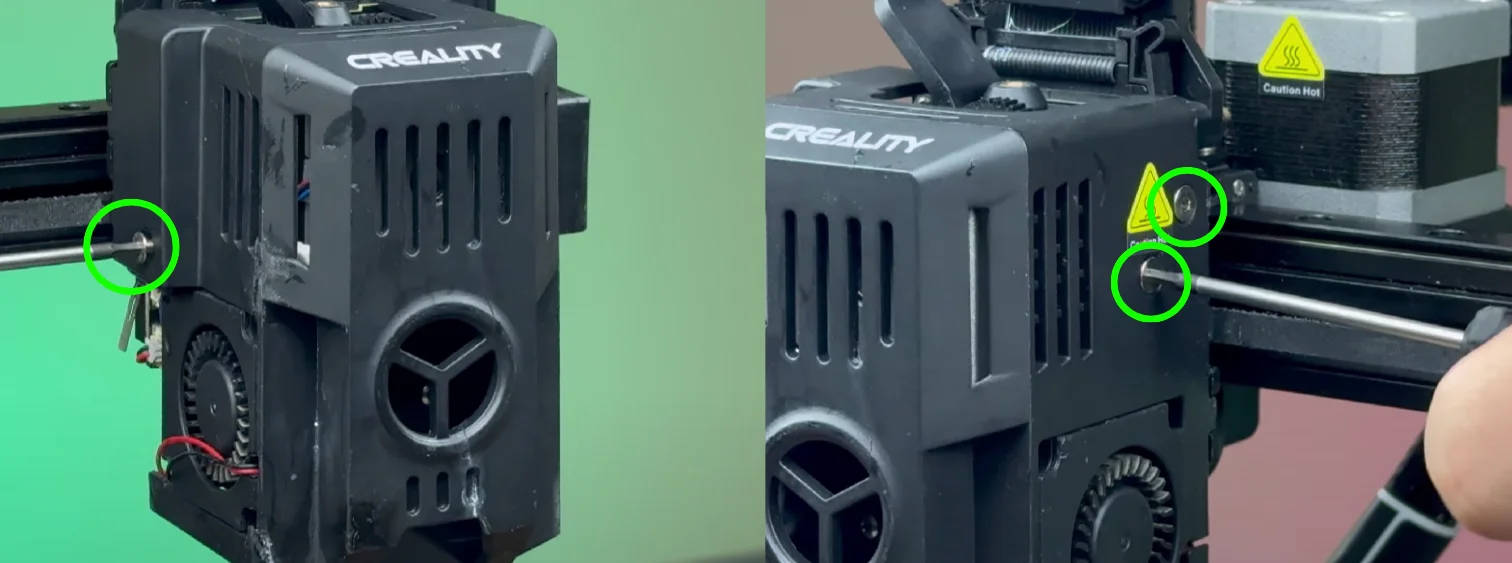
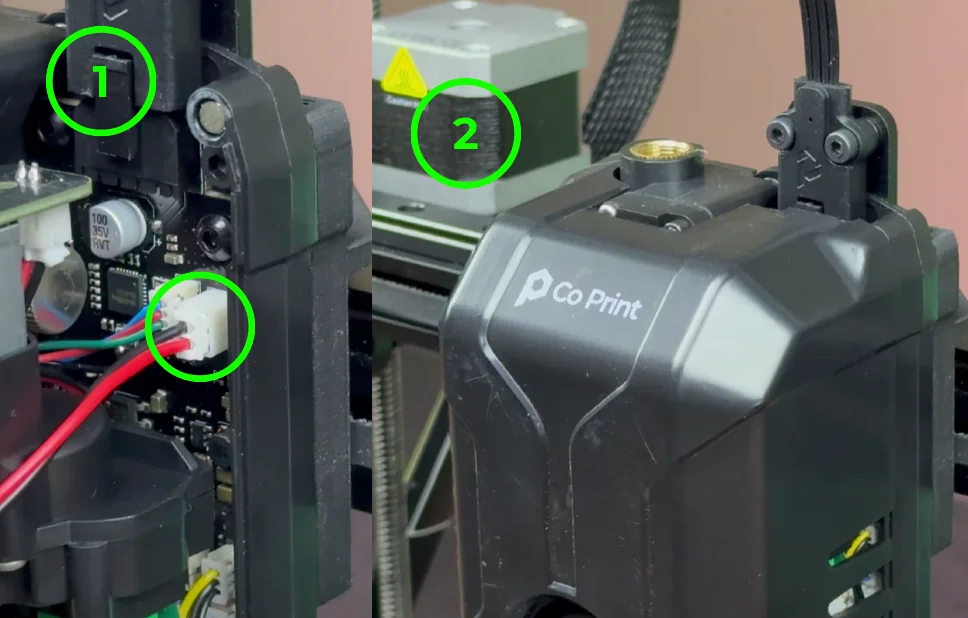
- Then remove the outer cover and disconnect the fan cables.
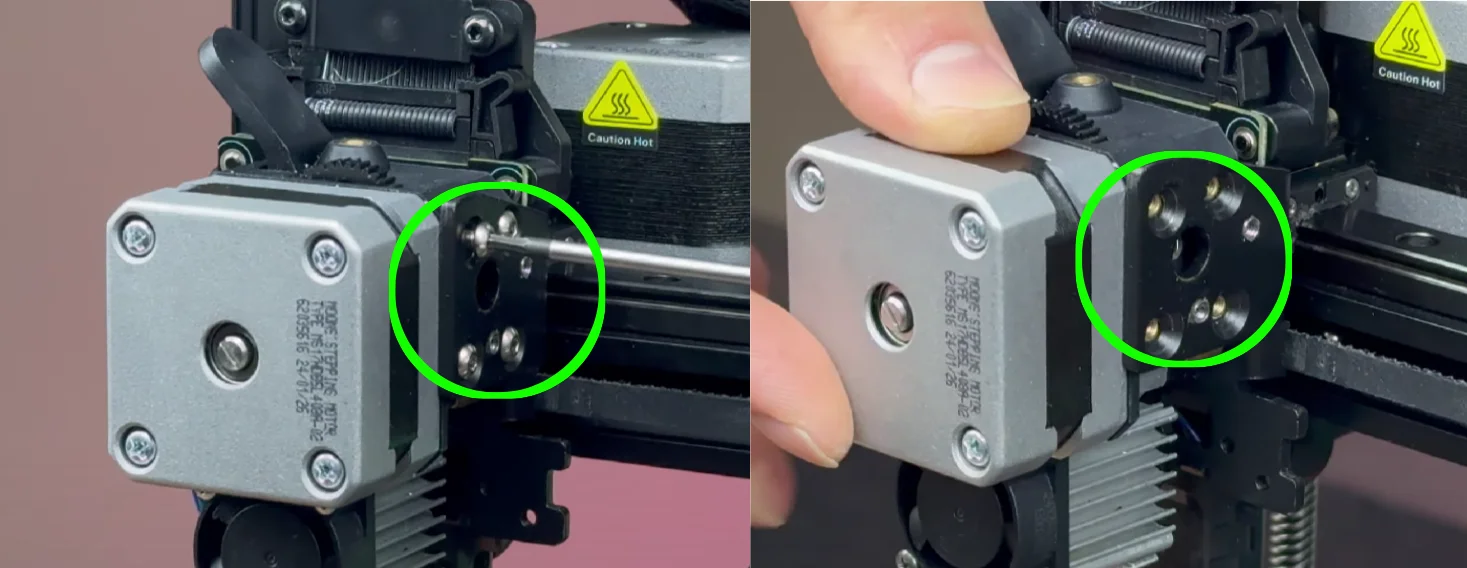
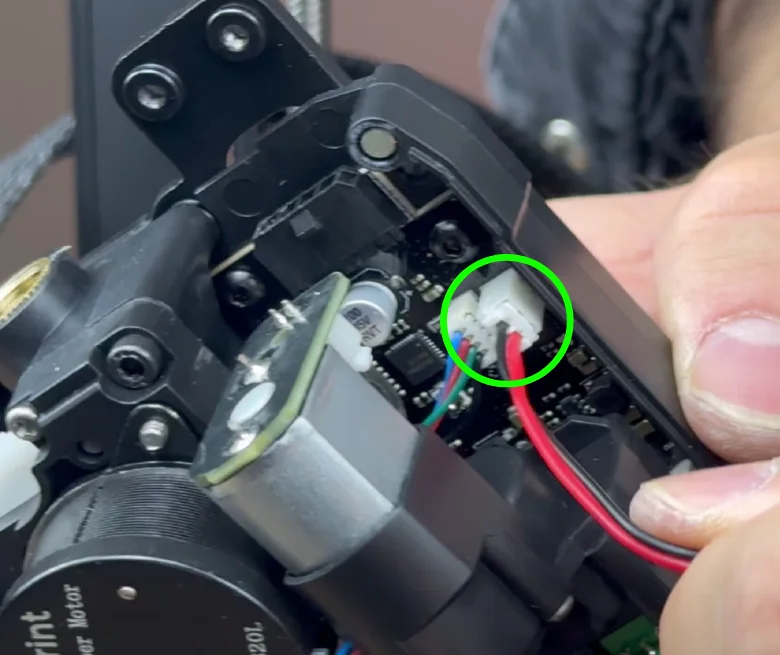
- Remove the motor by unscrewing the 4 screws on the right and disconnect the motor cable. Pull the motor upwards to remove it.
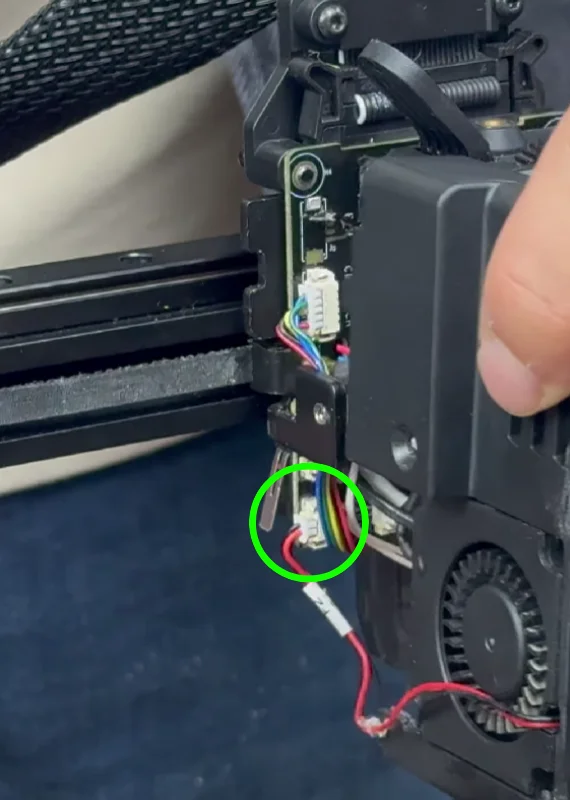
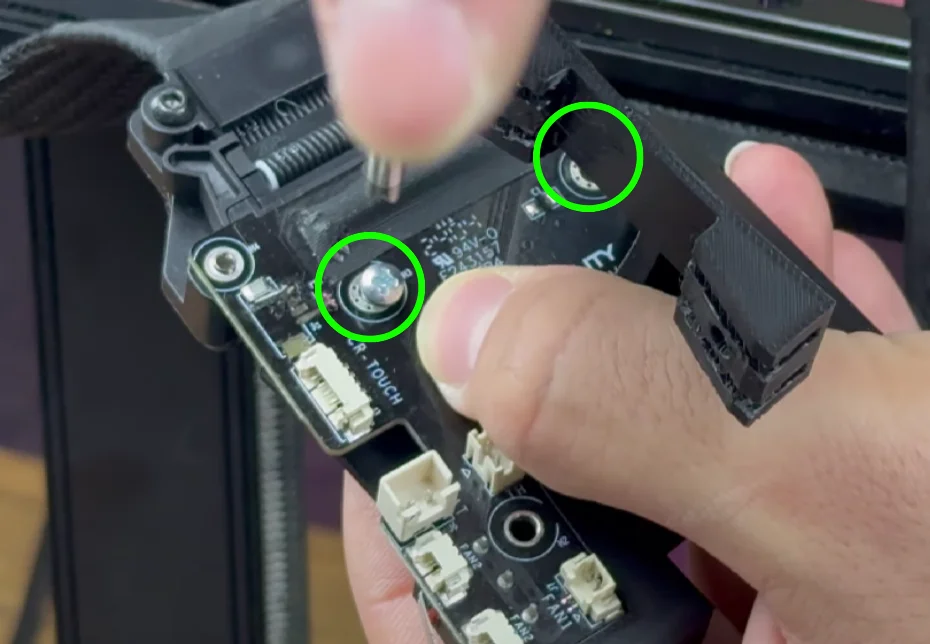
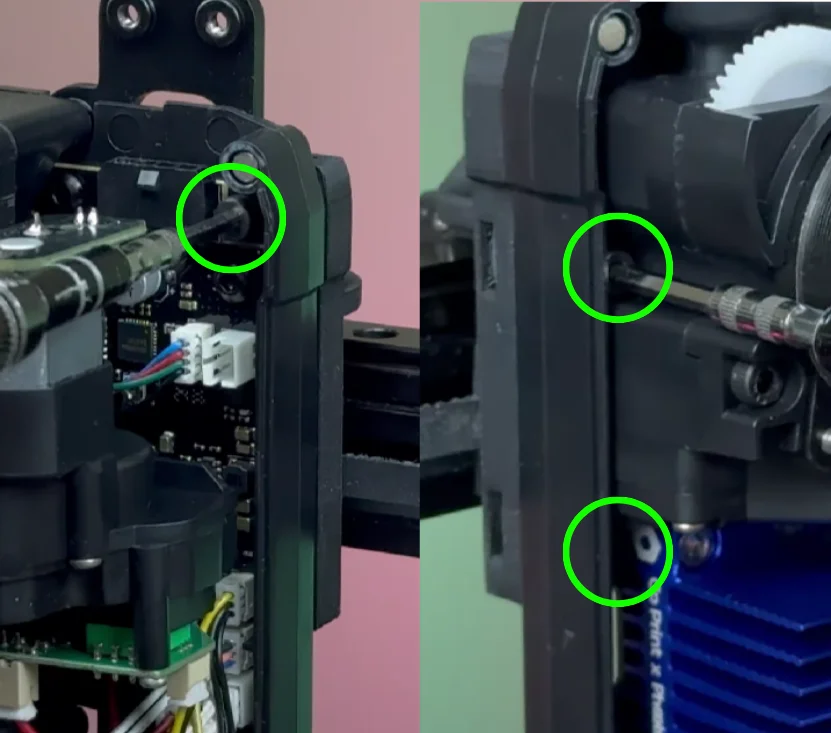
- Remove the 2 screws on the board and the 2 screws holding the hotend.
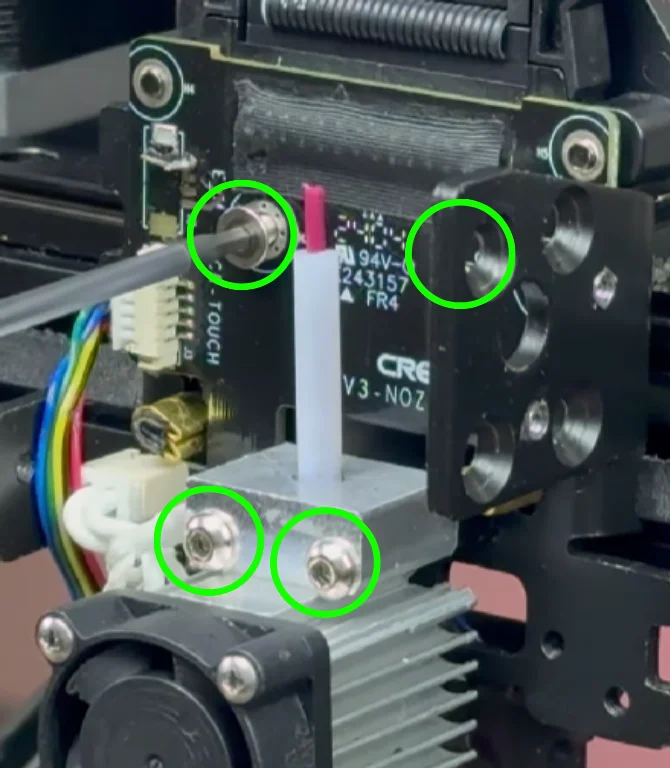
- Then disconnect the heater and thermistor cables.

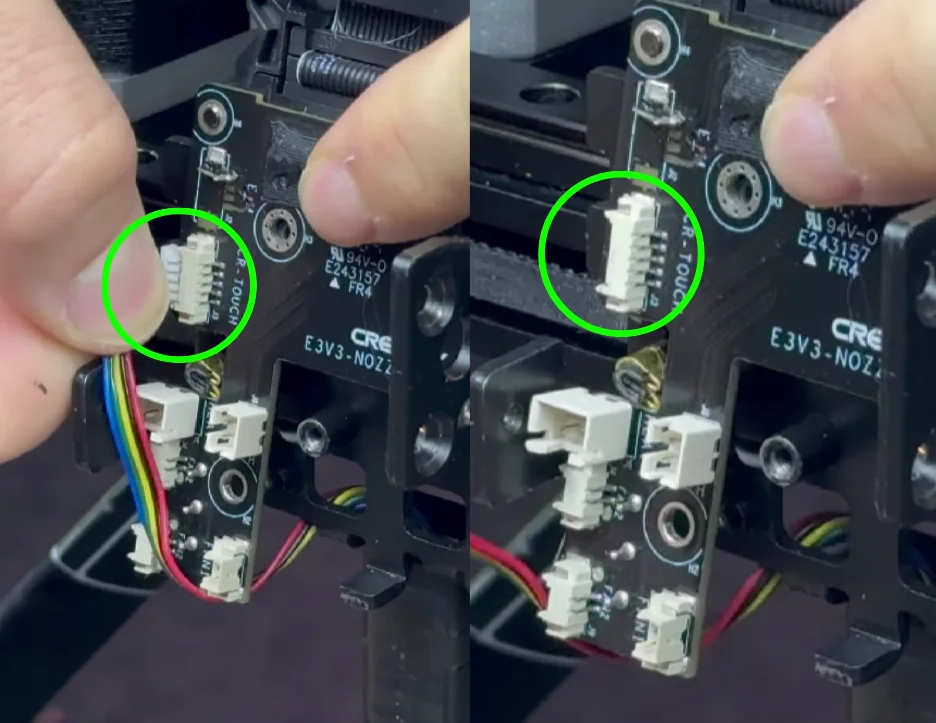
- Disconnect the CR Touch cable from the board and set the board aside.
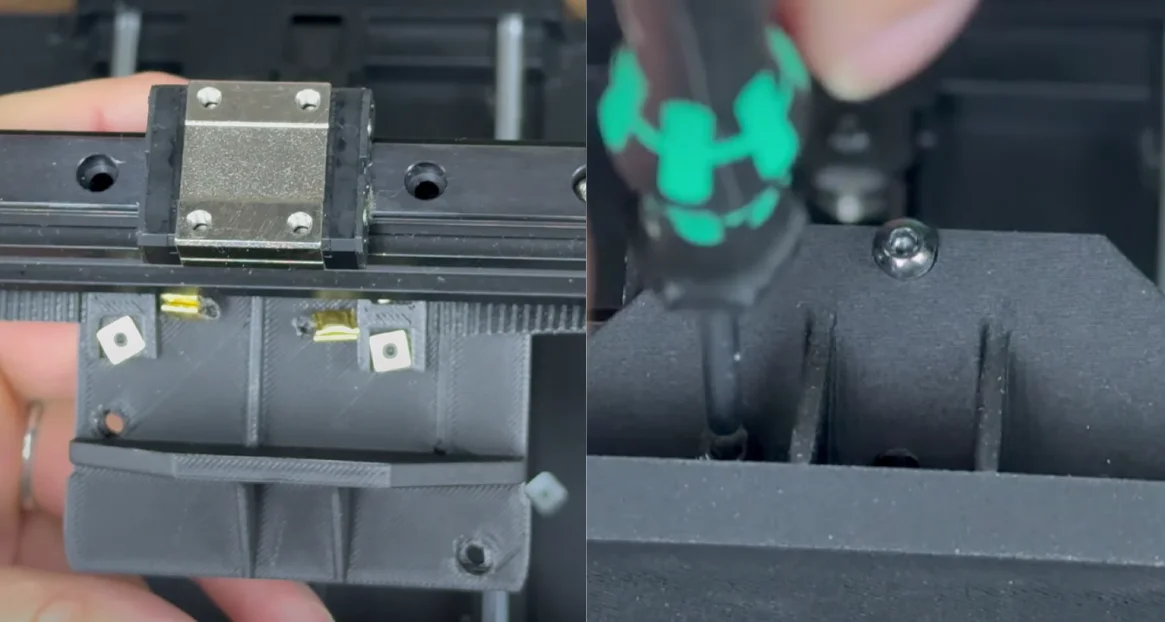
- Remove the head bracket on the linear rail by unscrewing the 4 screws.

- Loosen the belt tensioner on the right side of the printer.
- Remove the belts from the metal part and take it off.
- Attach the printed ChromaHead mount and belt holders. First, screw the 4 screws on the belt holders. Place the belts and secure them with square nuts.
- Mount the ChromaHead bracket using the 4 previously removed screws.
- Tighten the belts.
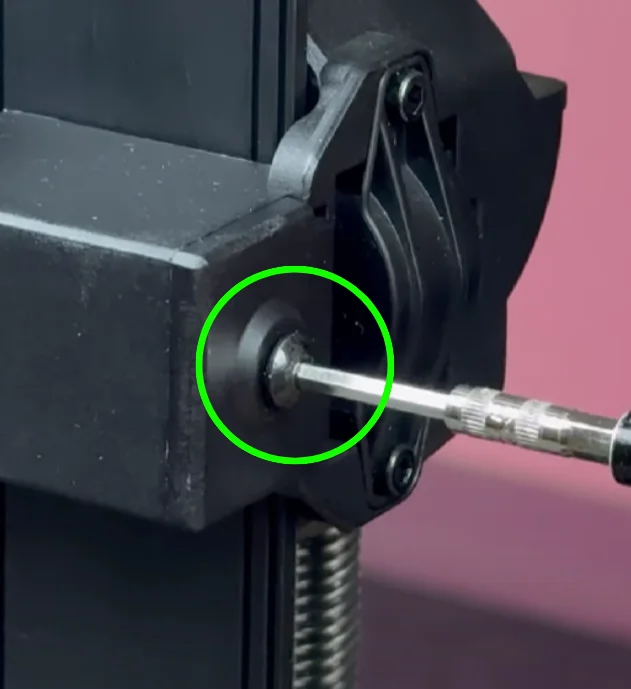
- Mount the board holder to the left side of the printer by removing the screw on the wheel cover and using the same screw.
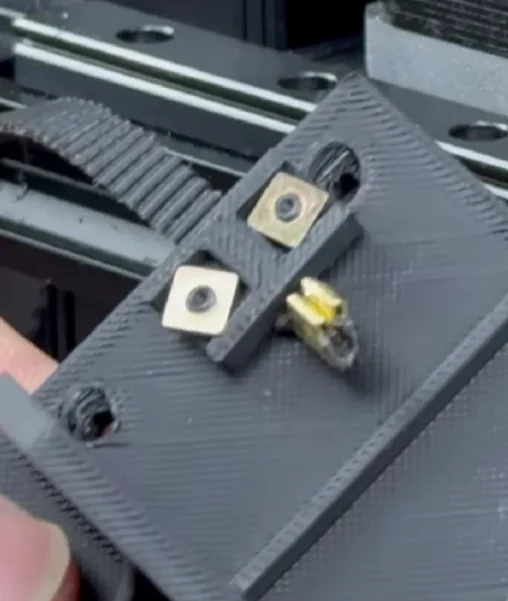
- Insert 3 square nuts into the ChromaHead mount for the upcoming installation.

¶ B. ChromaHead Installation
- Remove the front cover of ChromaHead and unplug the fan cable.
- Mount ChromaHead using 3 M3x10 screws and the square nuts.
- Connect and screw in the ChromaHead connector cable.
- Reconnect the fan cable and reattach the front cover.
- Install the 8in1 connector.
¶ C. Mounting the CX-I Extruders
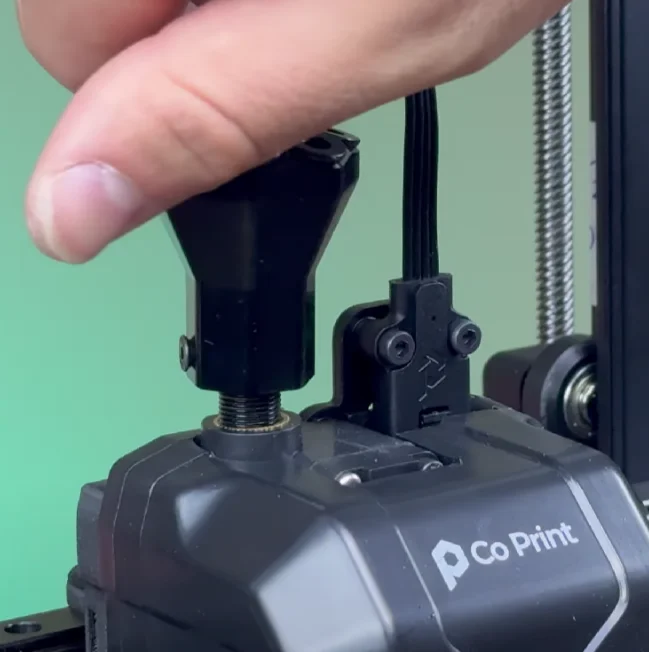
- Remove the filament sensor and filament holder from the top of the printer.
- Mount the extruders to the printed block and attach the CX-I holder.Install the assembled part onto the printer.
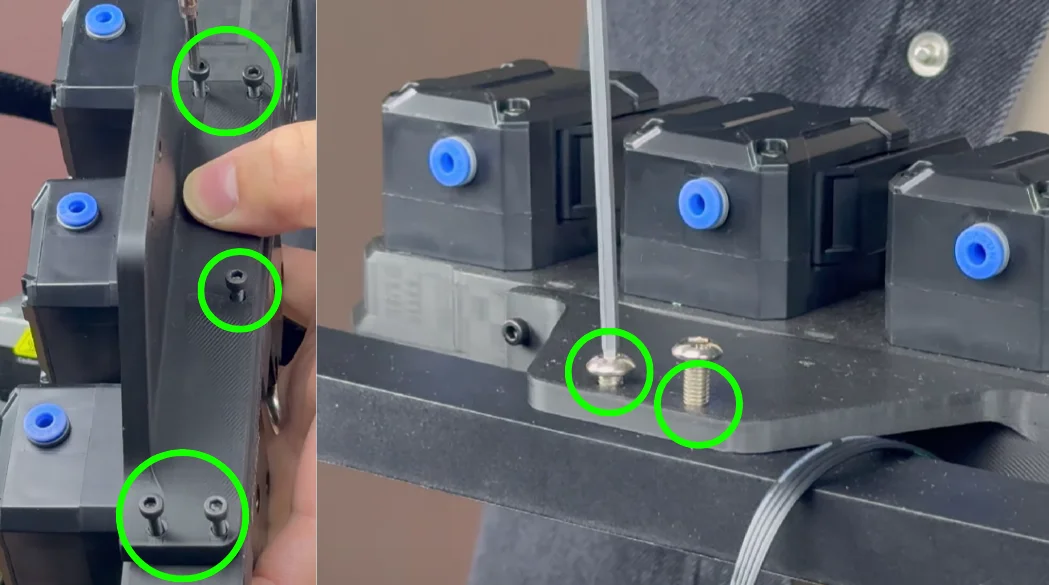
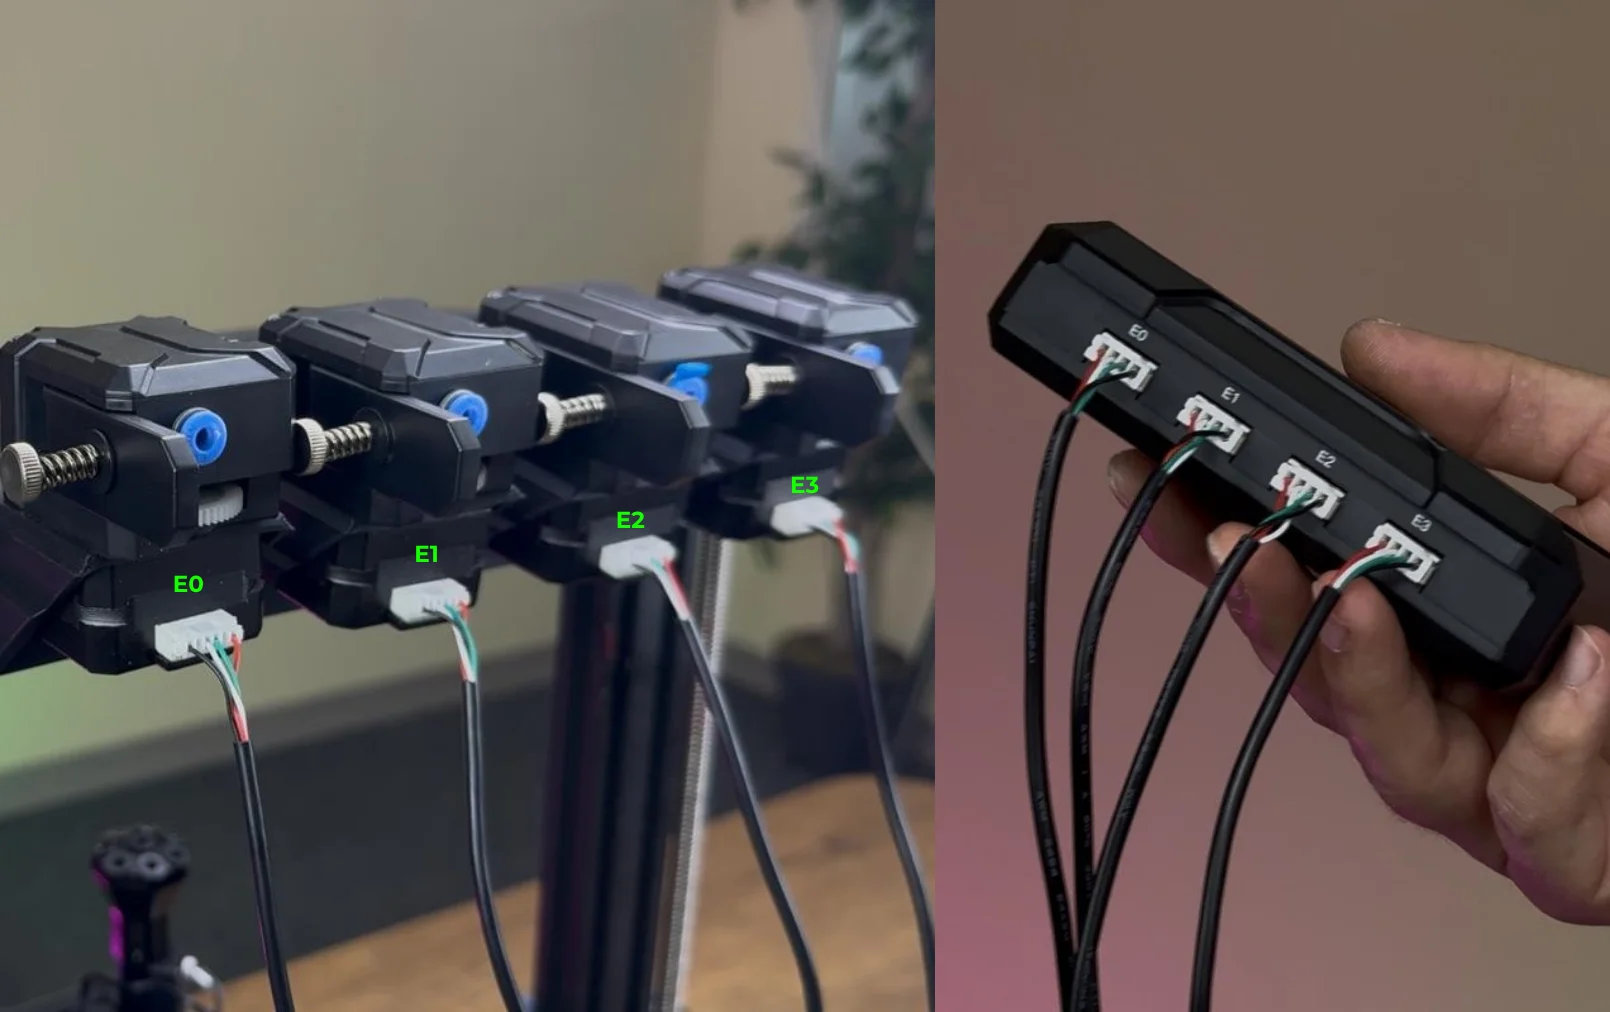
- Connect the CX-I cables and attach them to KCM starting from E0 in sequence.
¶ D. Cable Connections
- Connect the ChromaHead cable to the KCM.
- Connect the KCM USB cable to the printer and power it on.
¶ 2) Software Setup of KCM Set on Ender 3 V3 KE
After completing the mechanical installation, an error message may appear on the printer’s display. This is expected behavior and does not indicate a malfunction.
If the printer's IP address is already known, you can proceed directly to the software configuration phase.
If the IP address is unknown, ensure that an Ethernet cable is properly connected to the printer. On the error screen, press the "Back" button to retrieve the printer’s IP address.
Once the IP address has been obtained, you may continue with the following software setup steps.
Before performing these steps, make sure to back up your configuration files.
- Open cmd (Command Prompt) or Putty on your computer.
- Enable root access and establish SSH connection to the printer.
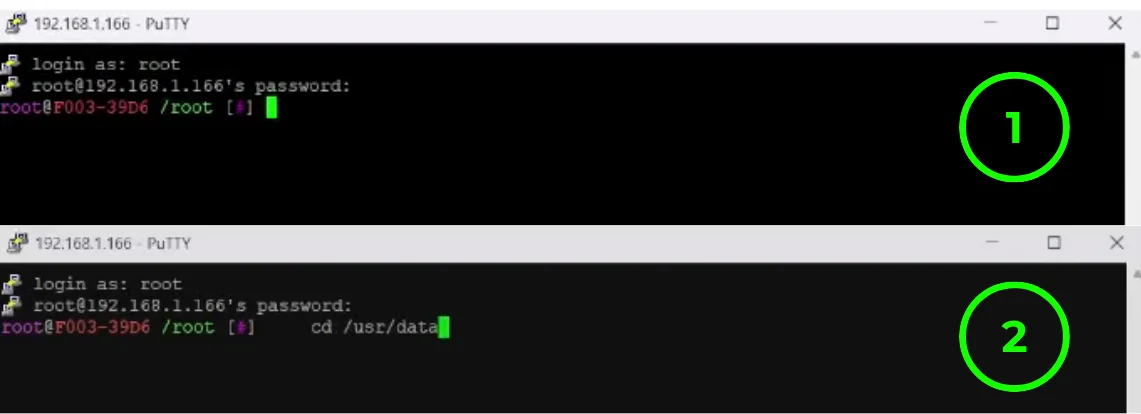
- Connect via cmd using the IP address. Username: root, Password: Creality2023
- Command: ssh root@

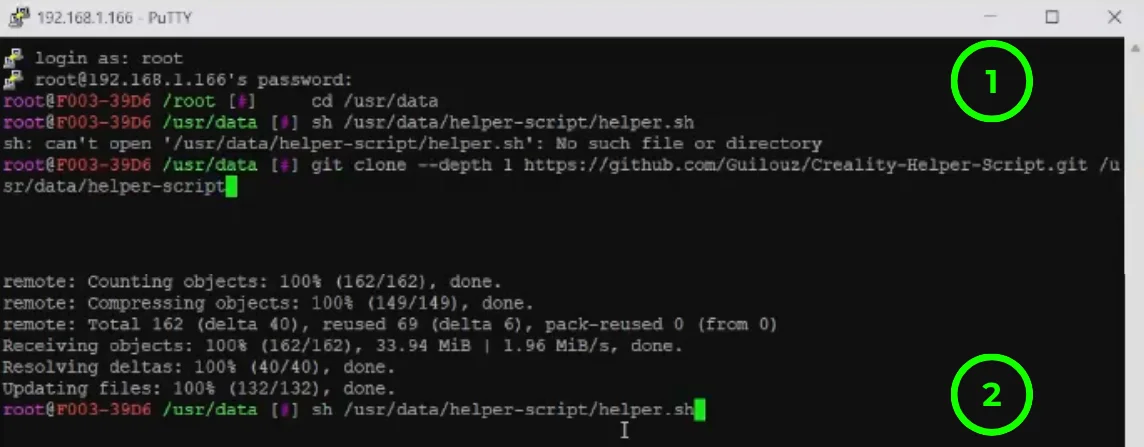
- Type cd /usr/data and press enter.
- Download the helper script.
-
git clone --depth 1 https://github.com/Guilouz/Creality-Helper-Script.git /usr/data/helper-script
- Run the script.
sh /usr/data/helper-script/helper.sh
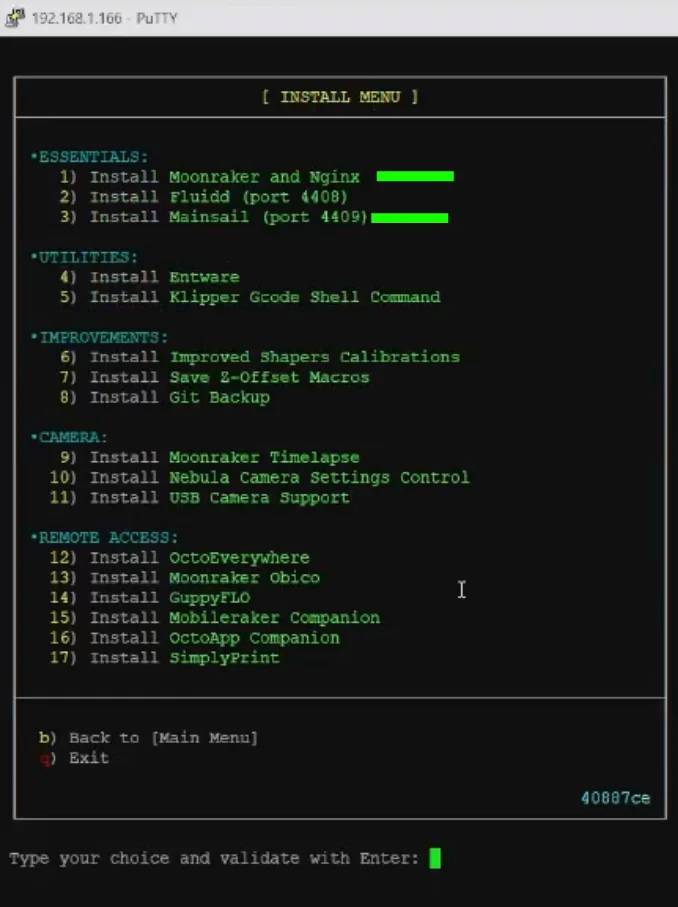
- Press 1 and hit enter to start Install.

-
To install Moonraker, press 1.
-
After installation, press 3 to install Mainsail. Exit with Q.
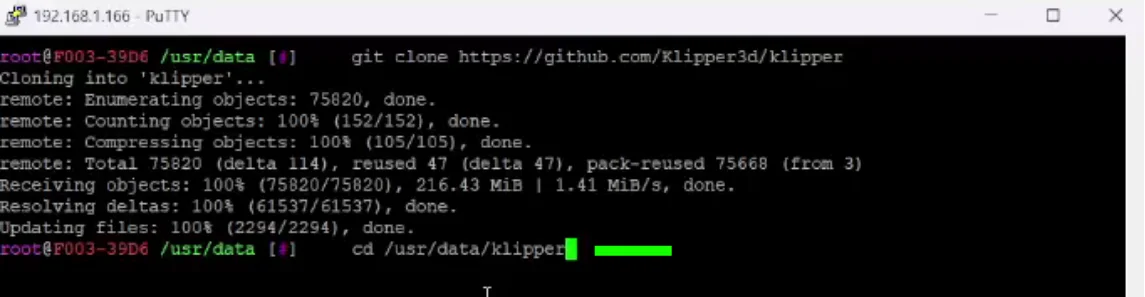
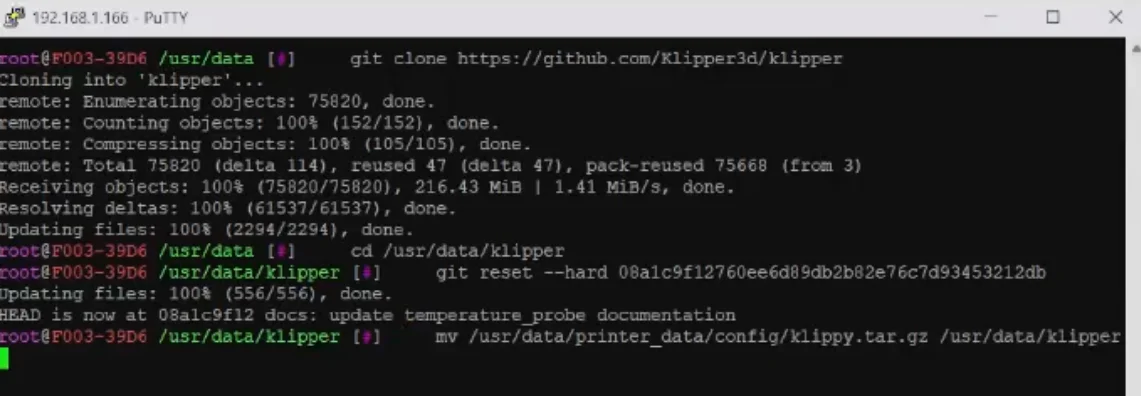
- Clone Klipper repository.
- git clone https://github.com/Klipper3d/klipper

- Enter: cd /usr/data/klipper
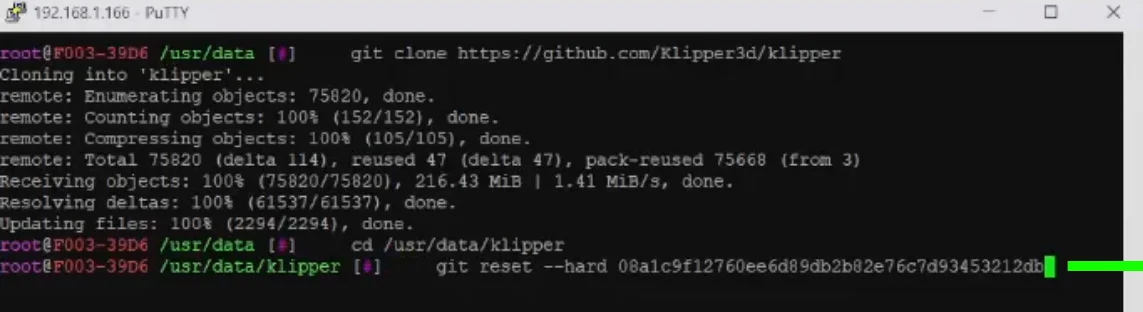
- Reset Klipper to specific commit.
- git reset --hard 08a1c9f12760ee6d89db2b82e76c7d93453212db
- Download klippy.tar.gz from the link.
- Access Mainsailvia IP:4409 and upload the file.
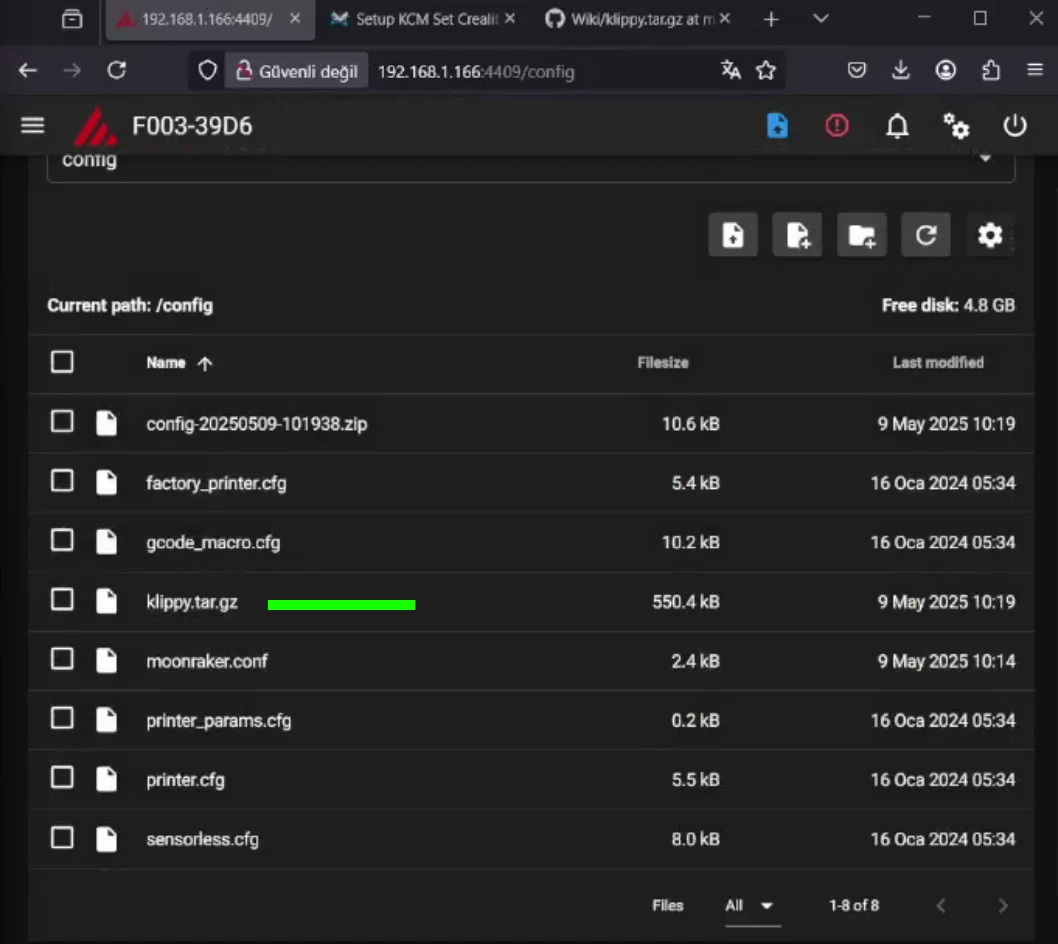
- Move the file to the Klipper directory
- mv /usr/data/printer_data/config/klippy.tar.gz /usr/data/klipper
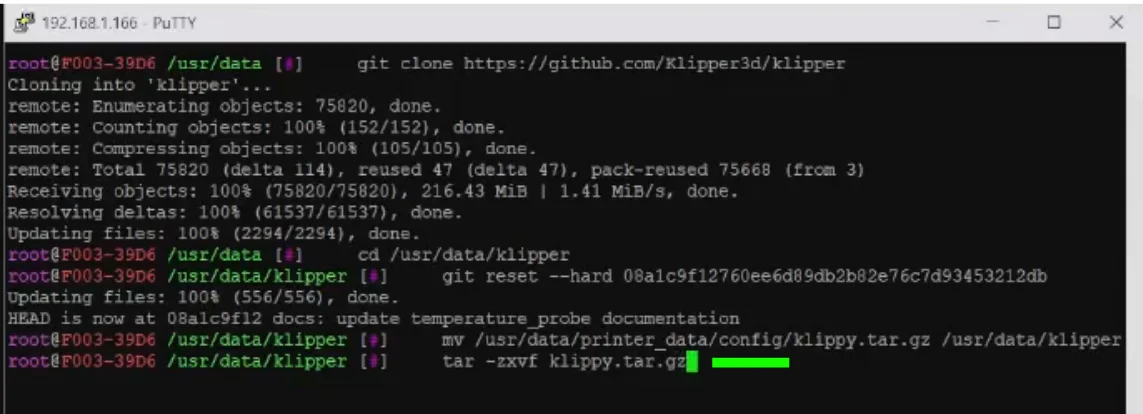
- Extract the file.
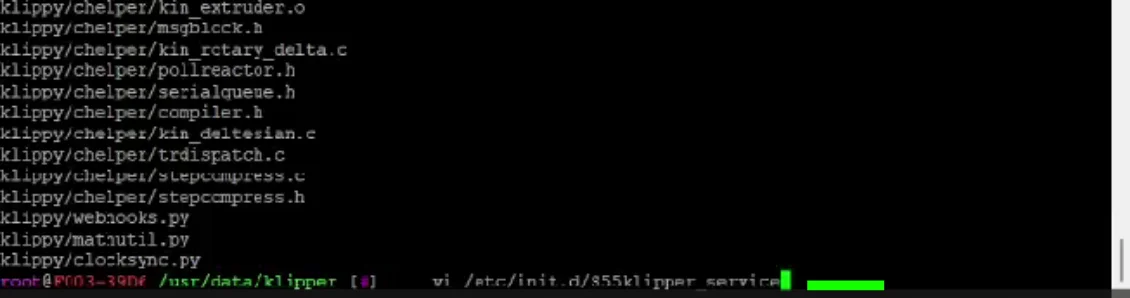
- tar -zxvf klippy.tar.gz
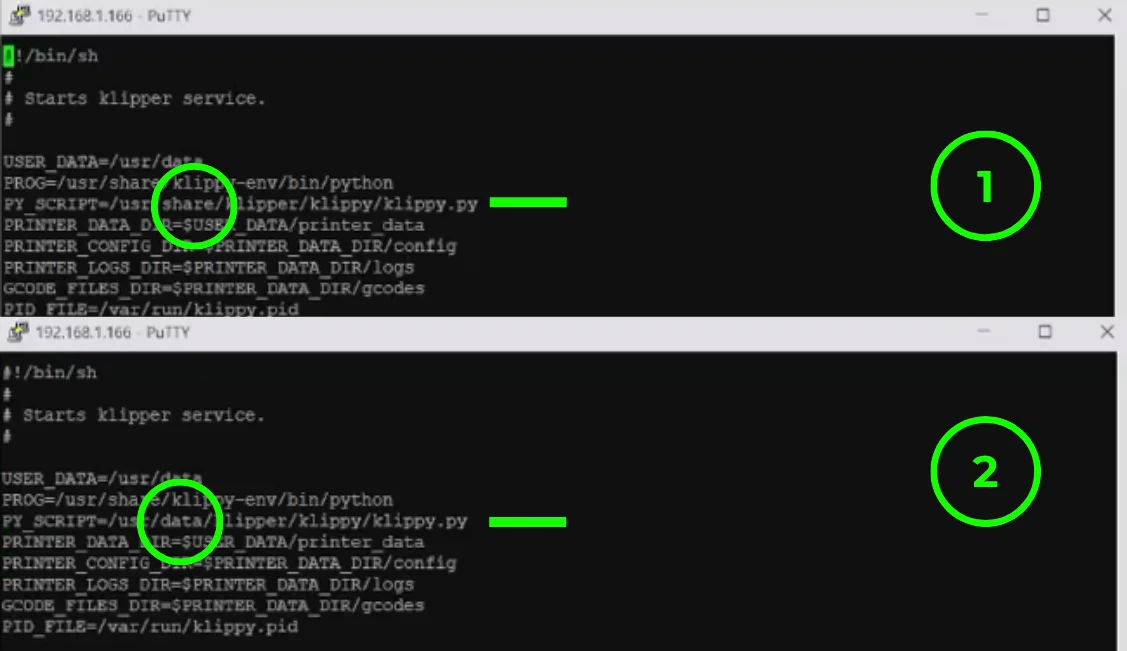
- Open the init file using vi.
- vi /etc/init.d/S55klipper_service
Press "i" to edit the text
- Change 'usr/share' to 'usr/data'
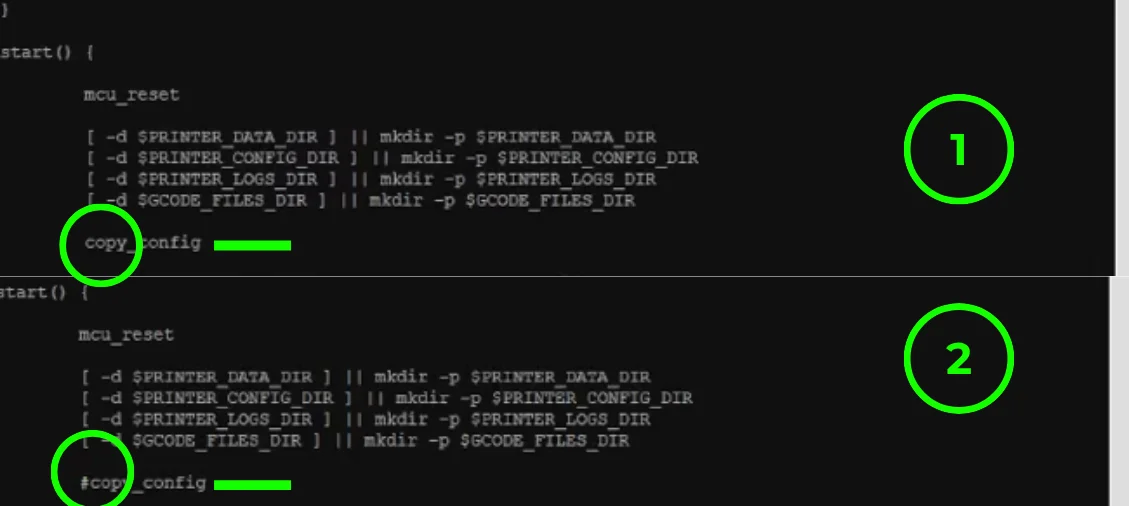
- Put # at the beginning of the copy_config line, save and exit with esc :wq.
- Restart the service.
- /etc/init.d/S55klipper_service restart

¶ 3) Editing Configuration Files and Setting Up Serial Paths
After successfully completing the Software-side Setup, the next step is to edit the configuration files and set up the serial paths for the ChromaHead and KCM module included in the KCM Set.
¶ 3.1) Editing Configuration Files
To access the configuration files we have published for the Ender 3 V3 KE, please use the link below.
Creality Ender 3 V3 KE Config Files - Download
At this stage, you may encounter errors in the Mainsail interface. Please ignore these errors and continue following the setup steps.
- To edit the configuration files, first enter the printer’s IP address into your web browser to access the Mainsail control interface.
- In the left menu, click on the "MACHINE" section.
- In the "Config Files" section under "MACHINE", click the "Upload File" button and upload the configuration files you have downloaded.
The required configuration files for the Creality Ender 3 V3 KE are as follows:
- printer.cfg
- sensorless.cfg
- gcode_macro.cfg
- moonraker.conf
- kcm.cfg
- chroma_head.cfg
- cp_macro.cfg
- input_shaper.cfg
- bed_mesh.cfg
After making sure that none of these files are missing, we can now proceed to configure the serial connections for the KCM module and the ChromaHead.
¶ 3.2) Setting Up Serial Paths
Do not plug in the power cable to the KCM module while the KCM and ChromaHead cables are disconnected!
Also, do not disconnect the KCM or ChromaHead cables while the power is connected!
- For a more stable and reliable setup, first connect the KCM module to the printer using a Type-C to USB cable.
- Next, connect the ChromaHead cable to the KCM module as well.
- While the KCM module is connected to the printer via USB and the ChromaHead cable is properly connected between the KCM and the ChromaHead, plug in the power cable to the KCM module.
- From the Mainsail interface, click on "MACHINE" and then open the kcm.cfg file from the config files section.
- Click the "DEVICES" button to identify the serial path of the KCM. Copy the correct path and paste it into the "serial:" field. Then, click "SAVE & RESTART" and exit the file.
- Click on the "chroma_head.cfg" file. Then click the "DEVICES" button to identify the ChromaHead’s serial path. Copy the correct serial path and paste it into the "serial:" field. After that, click "SAVE & RESTART" and exit the file.
- Once the system is powered on, check the "Extruder" temperature. If it displays a value over 100°C, it means the serial paths have been entered incorrectly.
⚠️ Two different serial paths must appear for the ChromaHead and the KCM. Make sure they are not the same — otherwise, the system will fail to start.
- Paste the newly identified serial path into the serial: field inside the chroma_head.cfg file.Then click "SAVE & RESTART" and exit the file.
¶ 4) Post-Installation OrcaSlicer Configuration
After completing the installation, you also need to configure OrcaSlicer. We recommend downloading the latest version of OrcaSlicer for optimal compatibility. You can use the link below to get the most recent release.
OrcaSlicer Download Link - Download
-
After downloading OrcaSlicer, click on “New Project”.
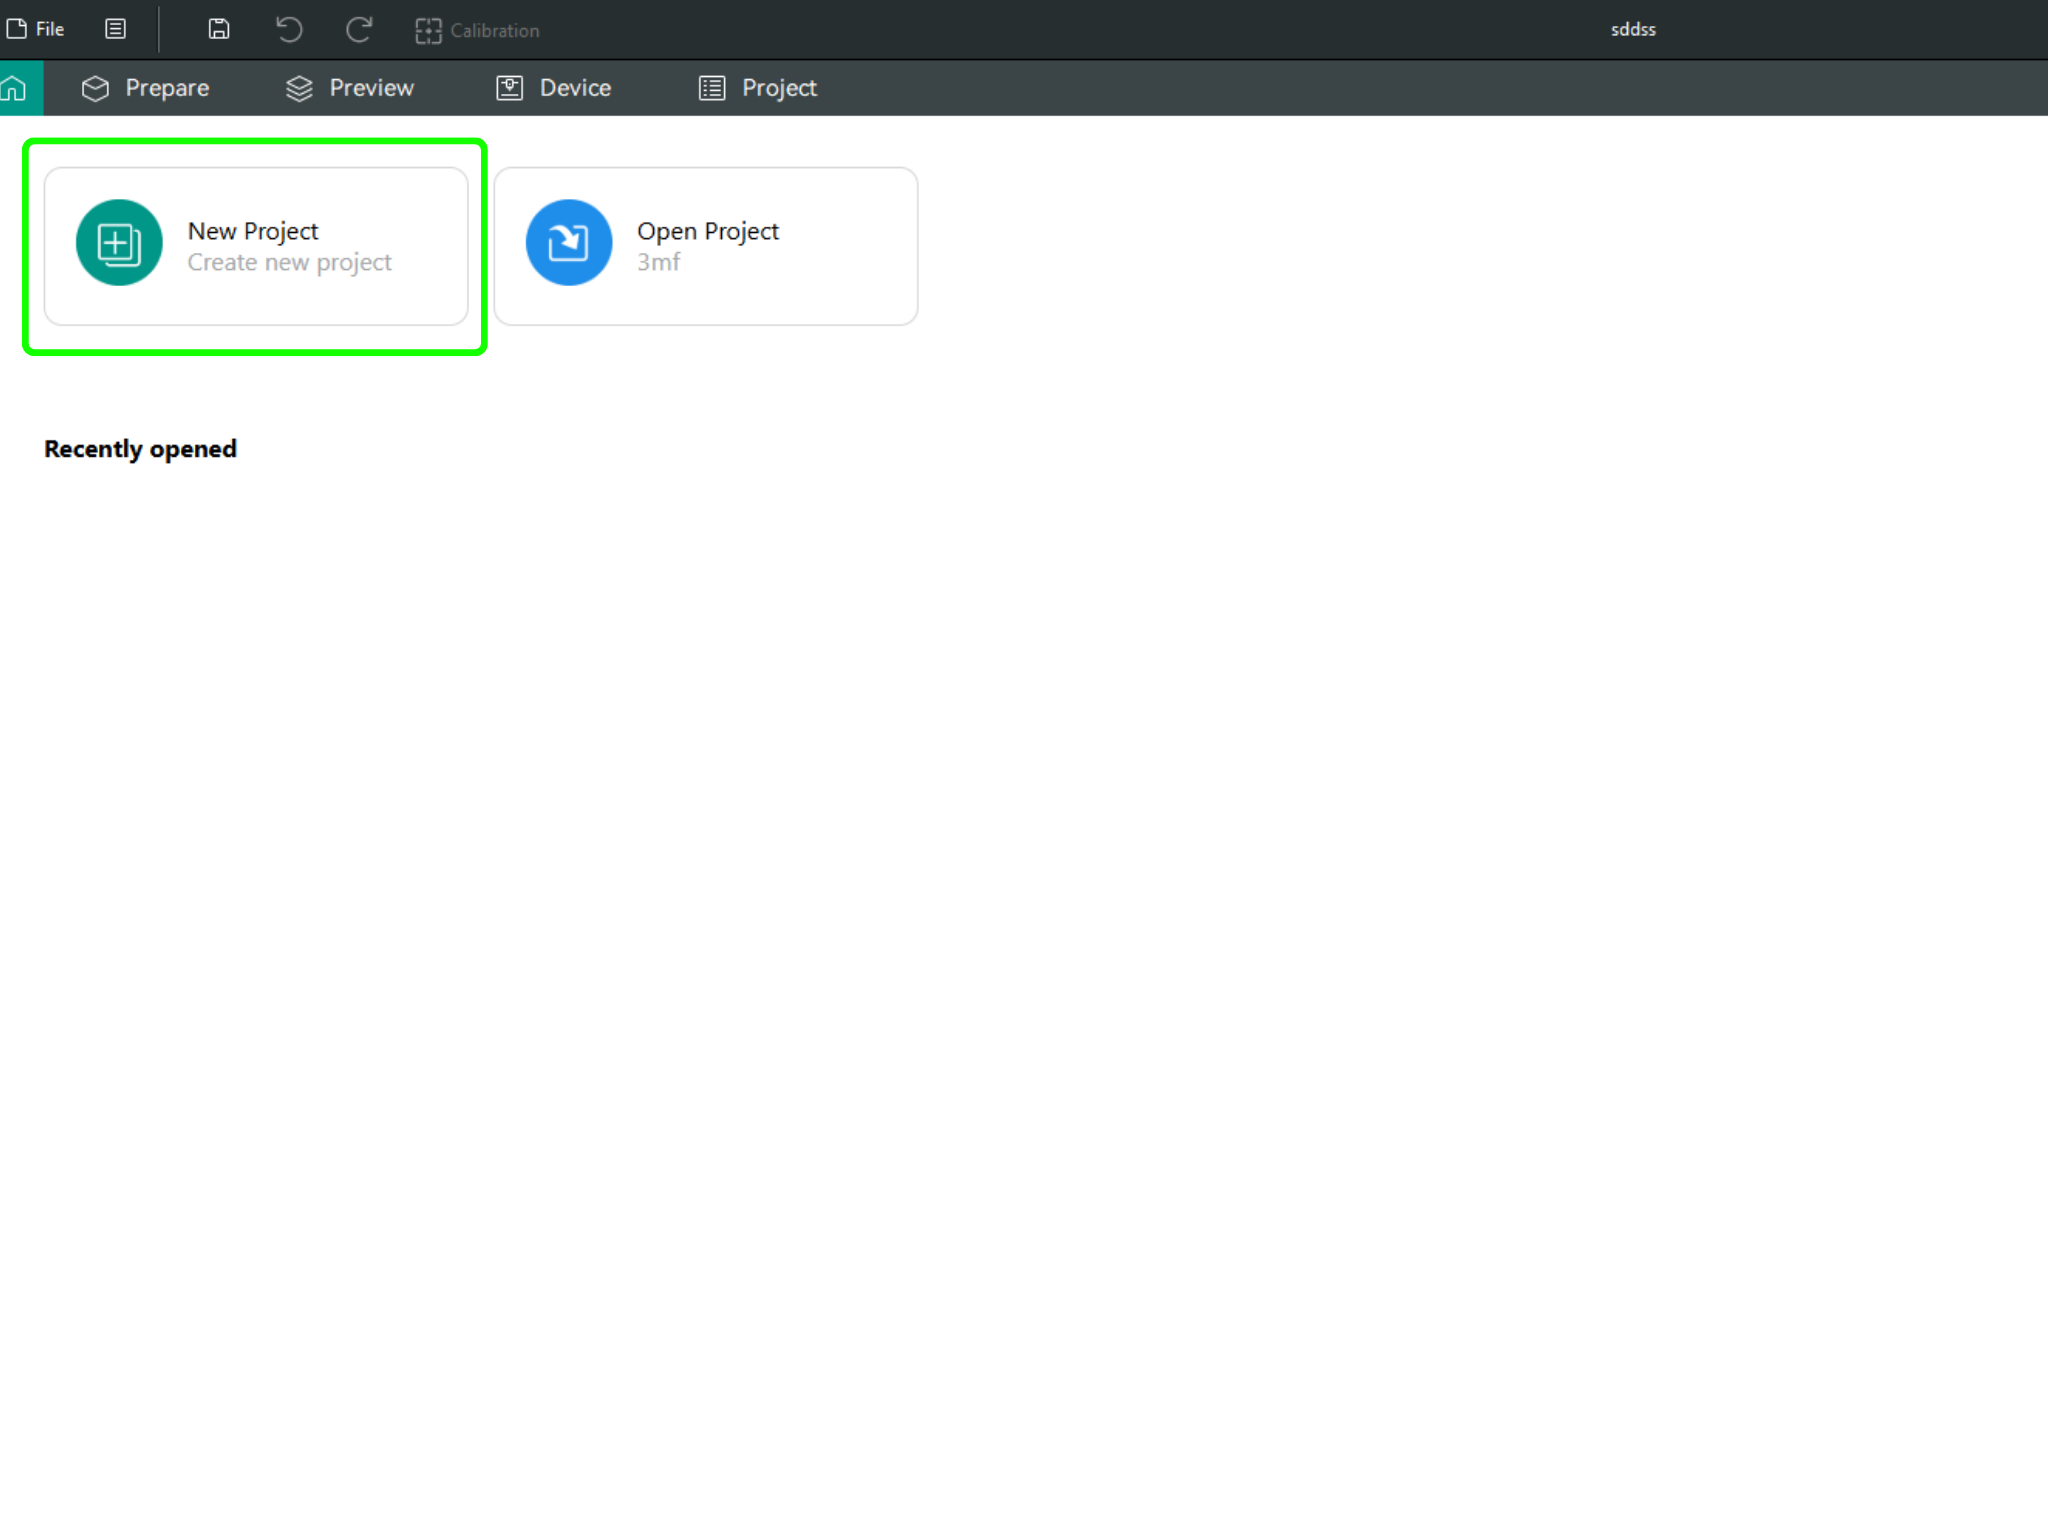
-
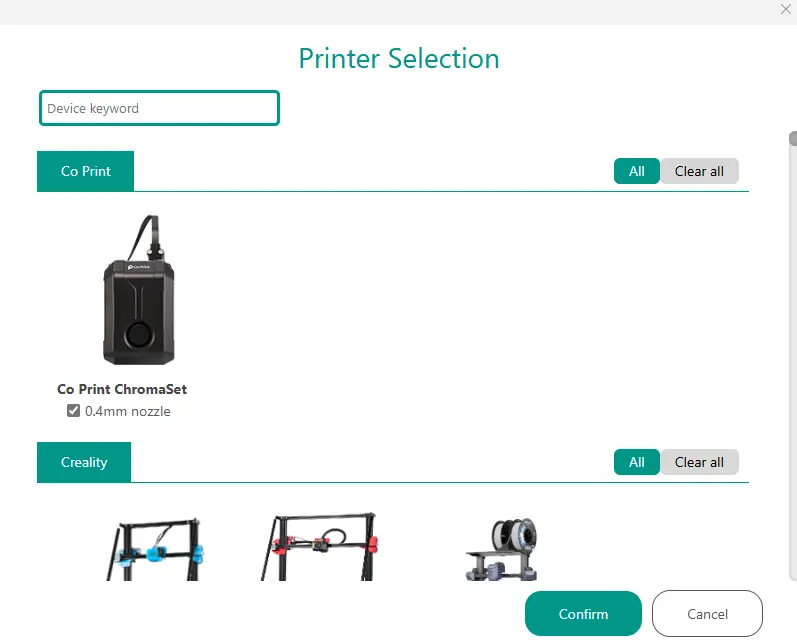
In the left menu, go to the Printers section and click on “Select/Remove printers”.
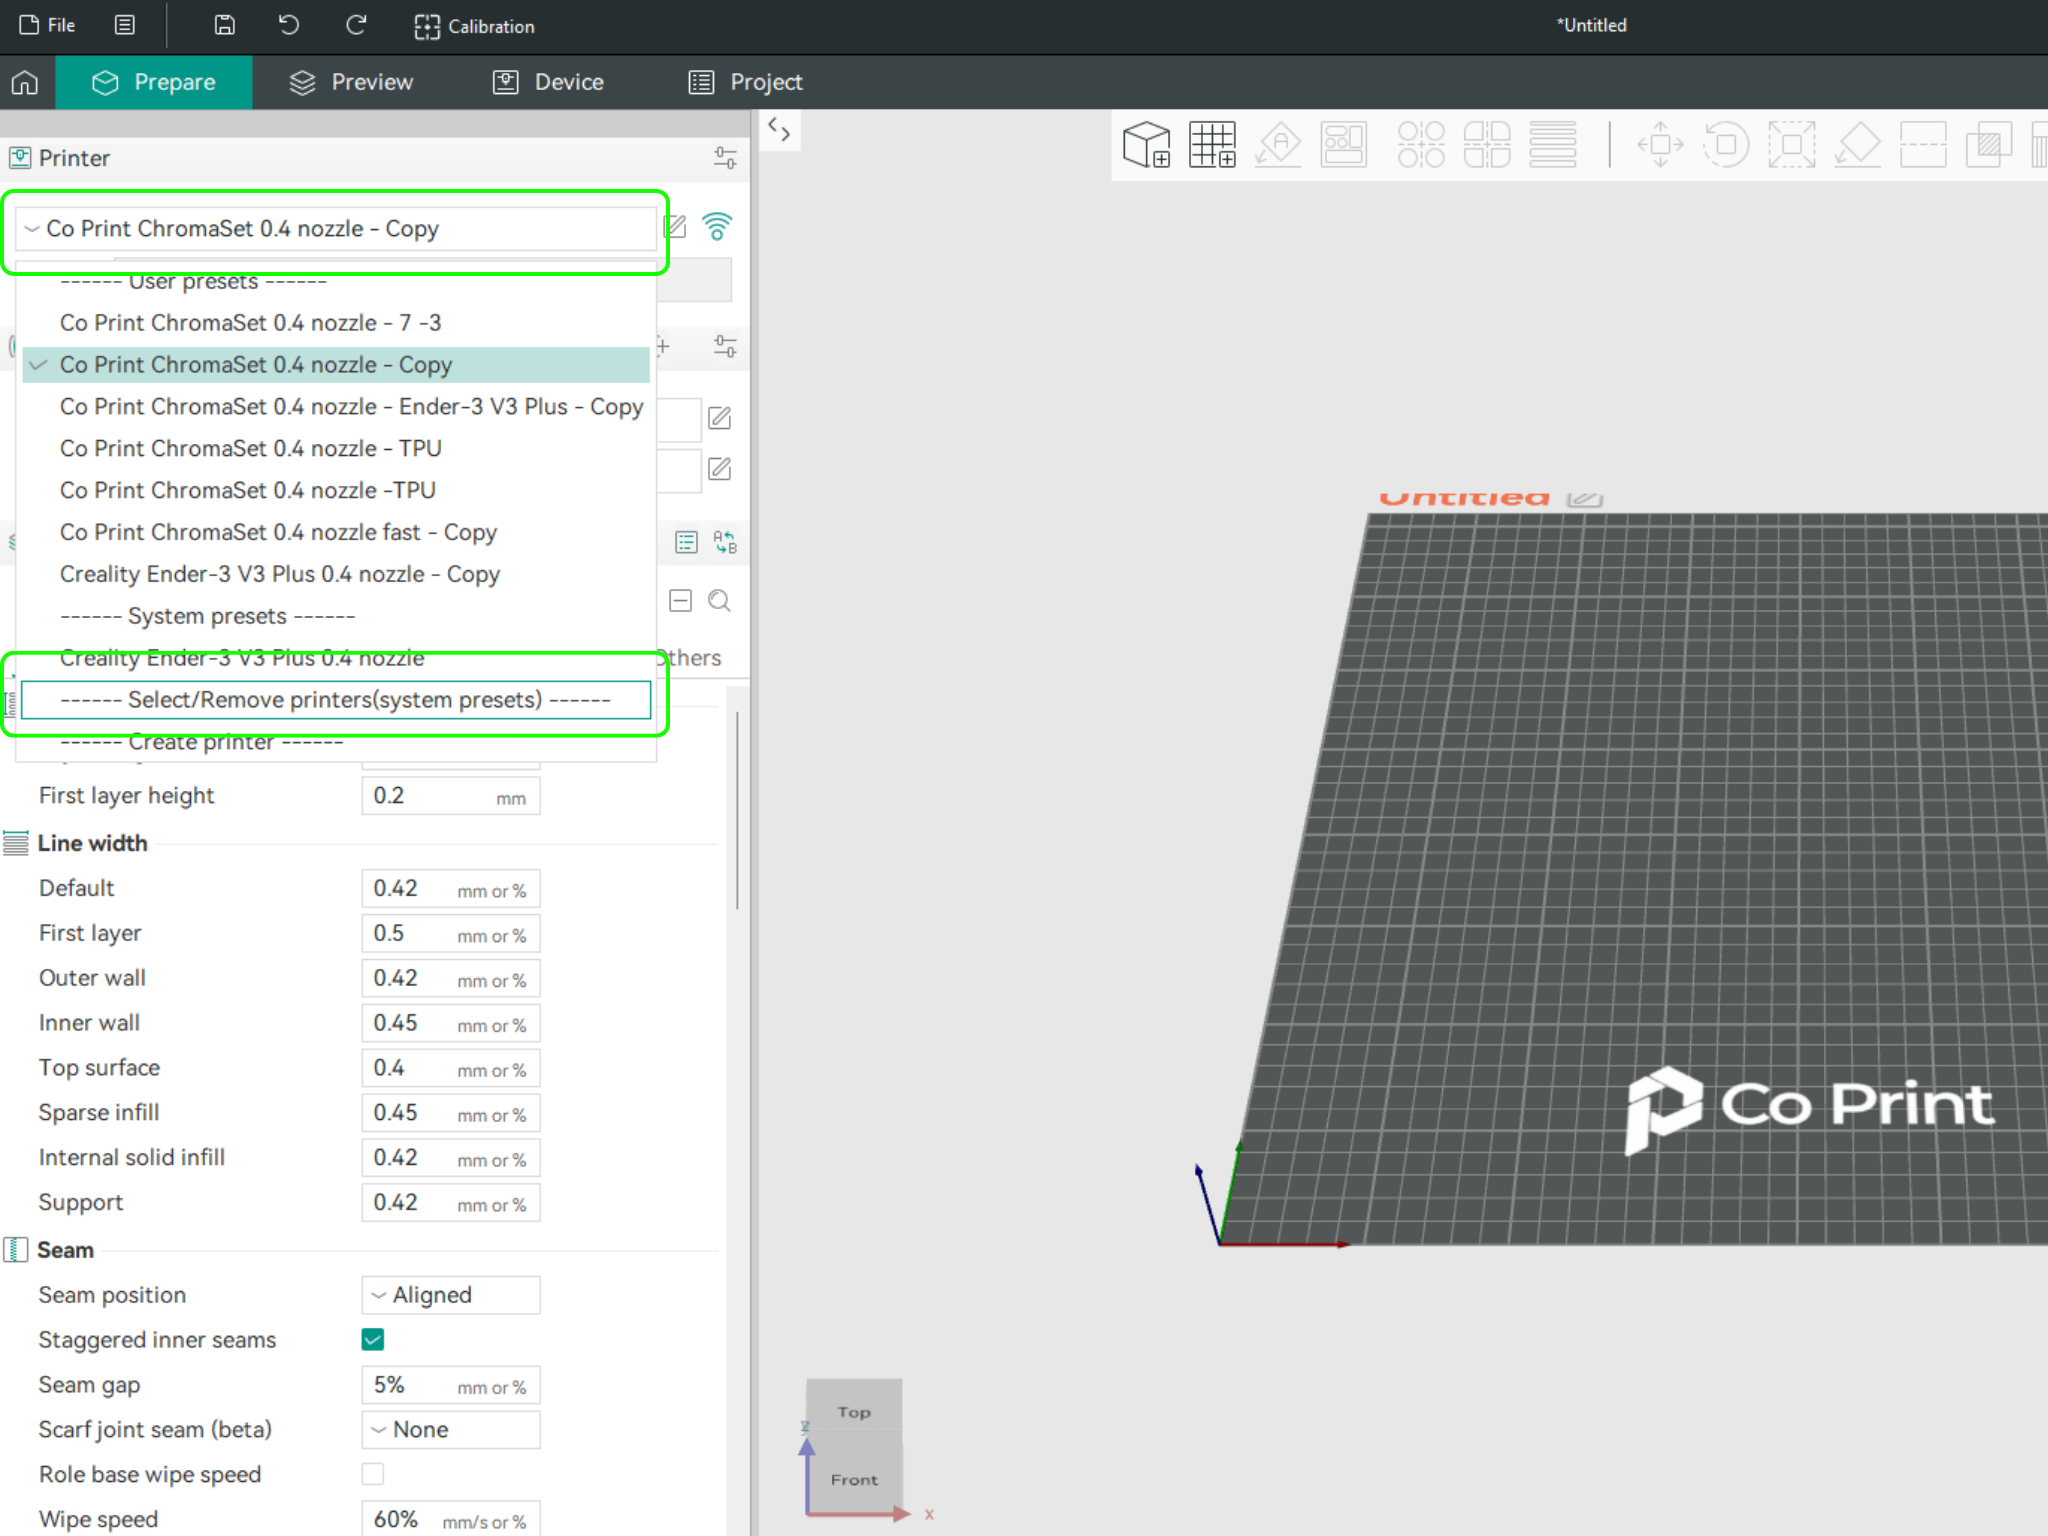
- In the opened menu, find and select Co Print. Then click "Confirm".
- After loading the settings, you need to adjust them in OrcaSlicer according to your printer’s bed size.
- You can import your model into OrcaSlicer as shown in the videos below, paint it, and start your print directly from within OrcaSlicer.