¶ Sovol SV08 - KCM Set Upgrade Guide
| Image | Information |
|---|---|
 |
Welcome to the installation page for Sovol SV-08. This guide will help you update your printer's firmware to ensure compatibility with KCMSet, download and print the required .STL files for mechanical assembly, complete the mechanical setup, and configure the Klipper settings. By following these steps, you will successfully complete the installation process. |
¶ Downloadable parts required for the installation
Before starting the installation, please download all the printable .stl files below and complete their printing.
¶ Klipper Config Files for Creality K1 - KCM Set
- Sovol SV-08 Config Files | Download
¶ Mechanical Setup
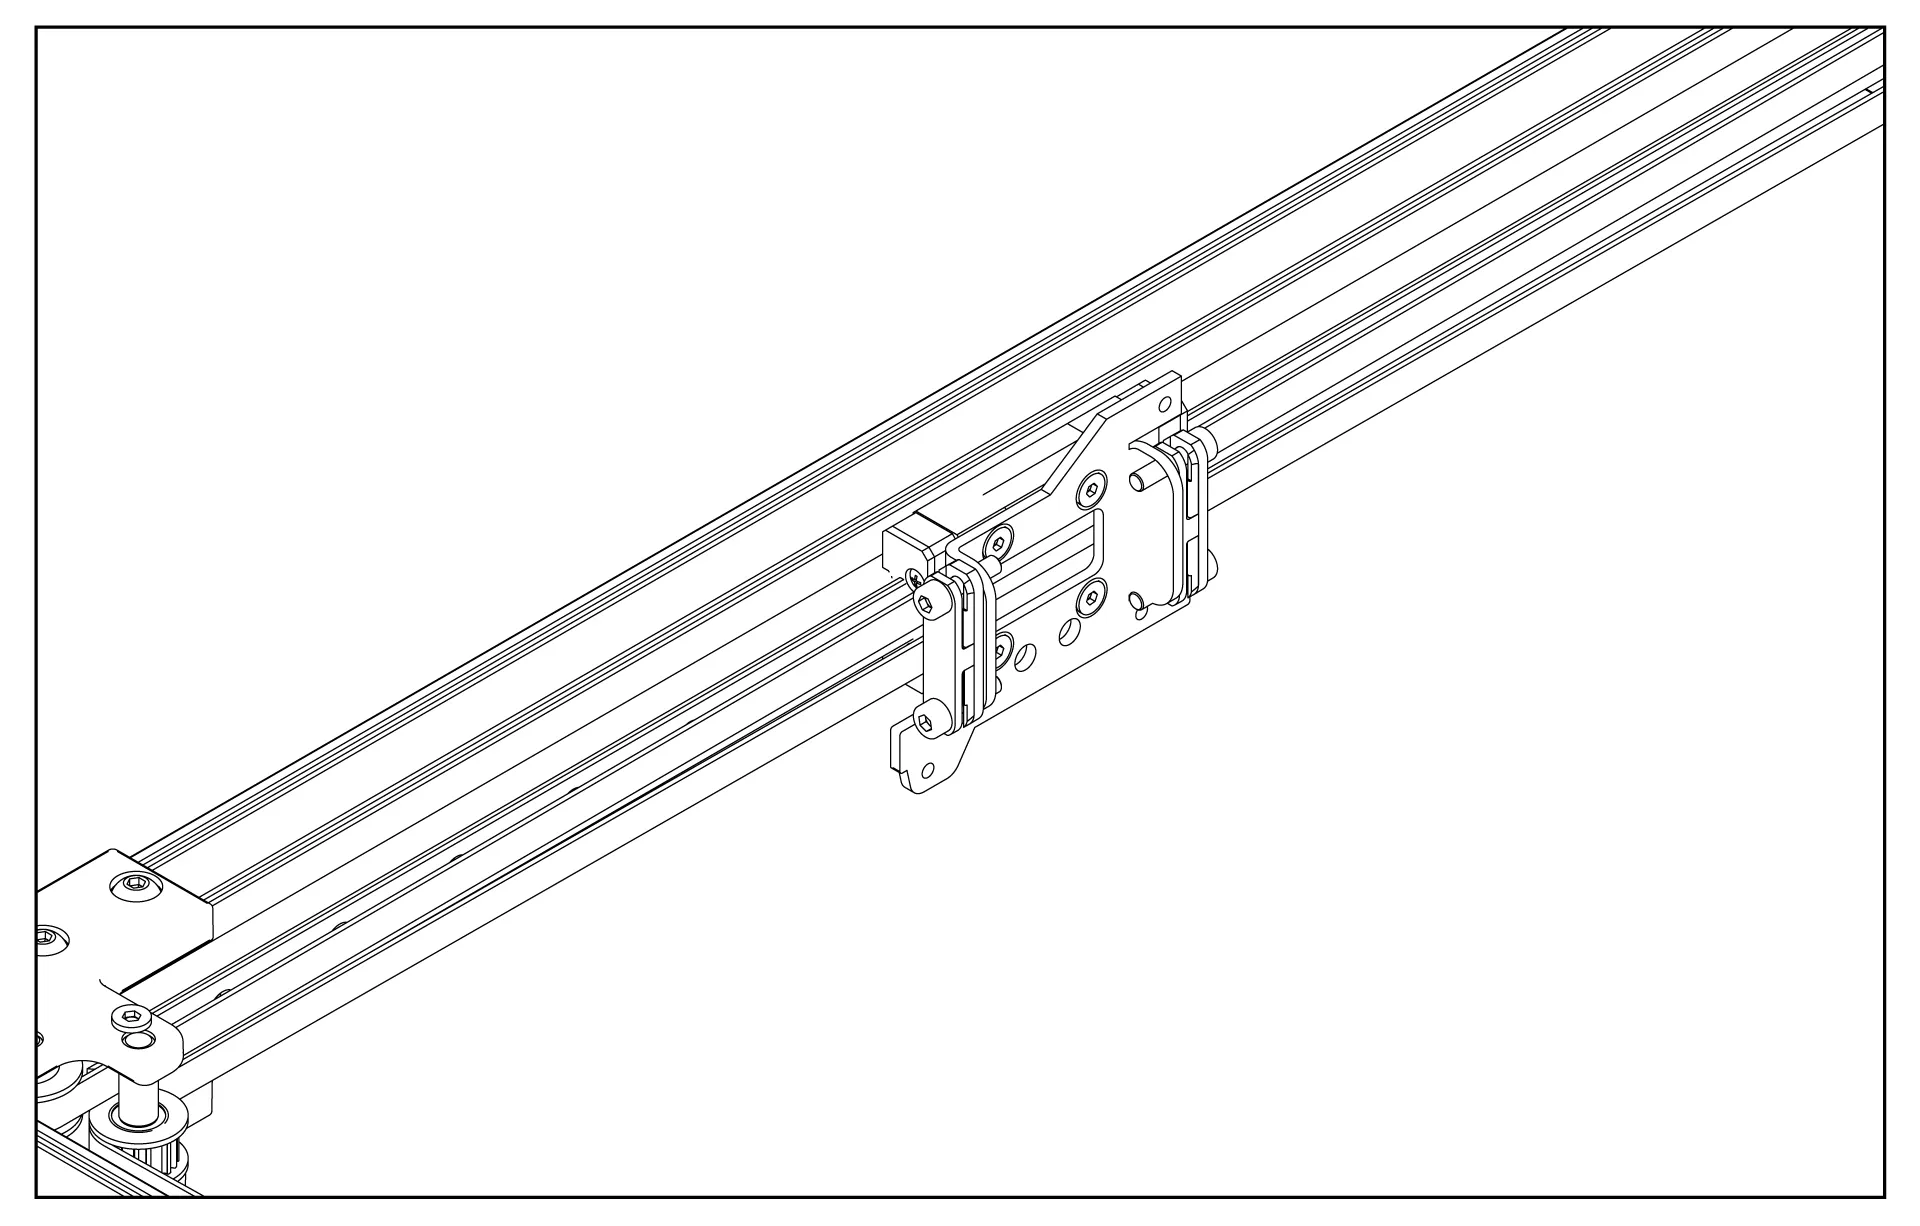
¶ 1- Remove the Stock Print Head
Before starting the installation of the ChromaHead, please remove the stock print head on the Sovol SV08. Only the part holding the belts should remain on the carriage.
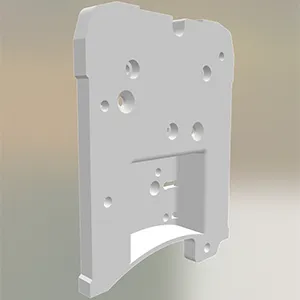
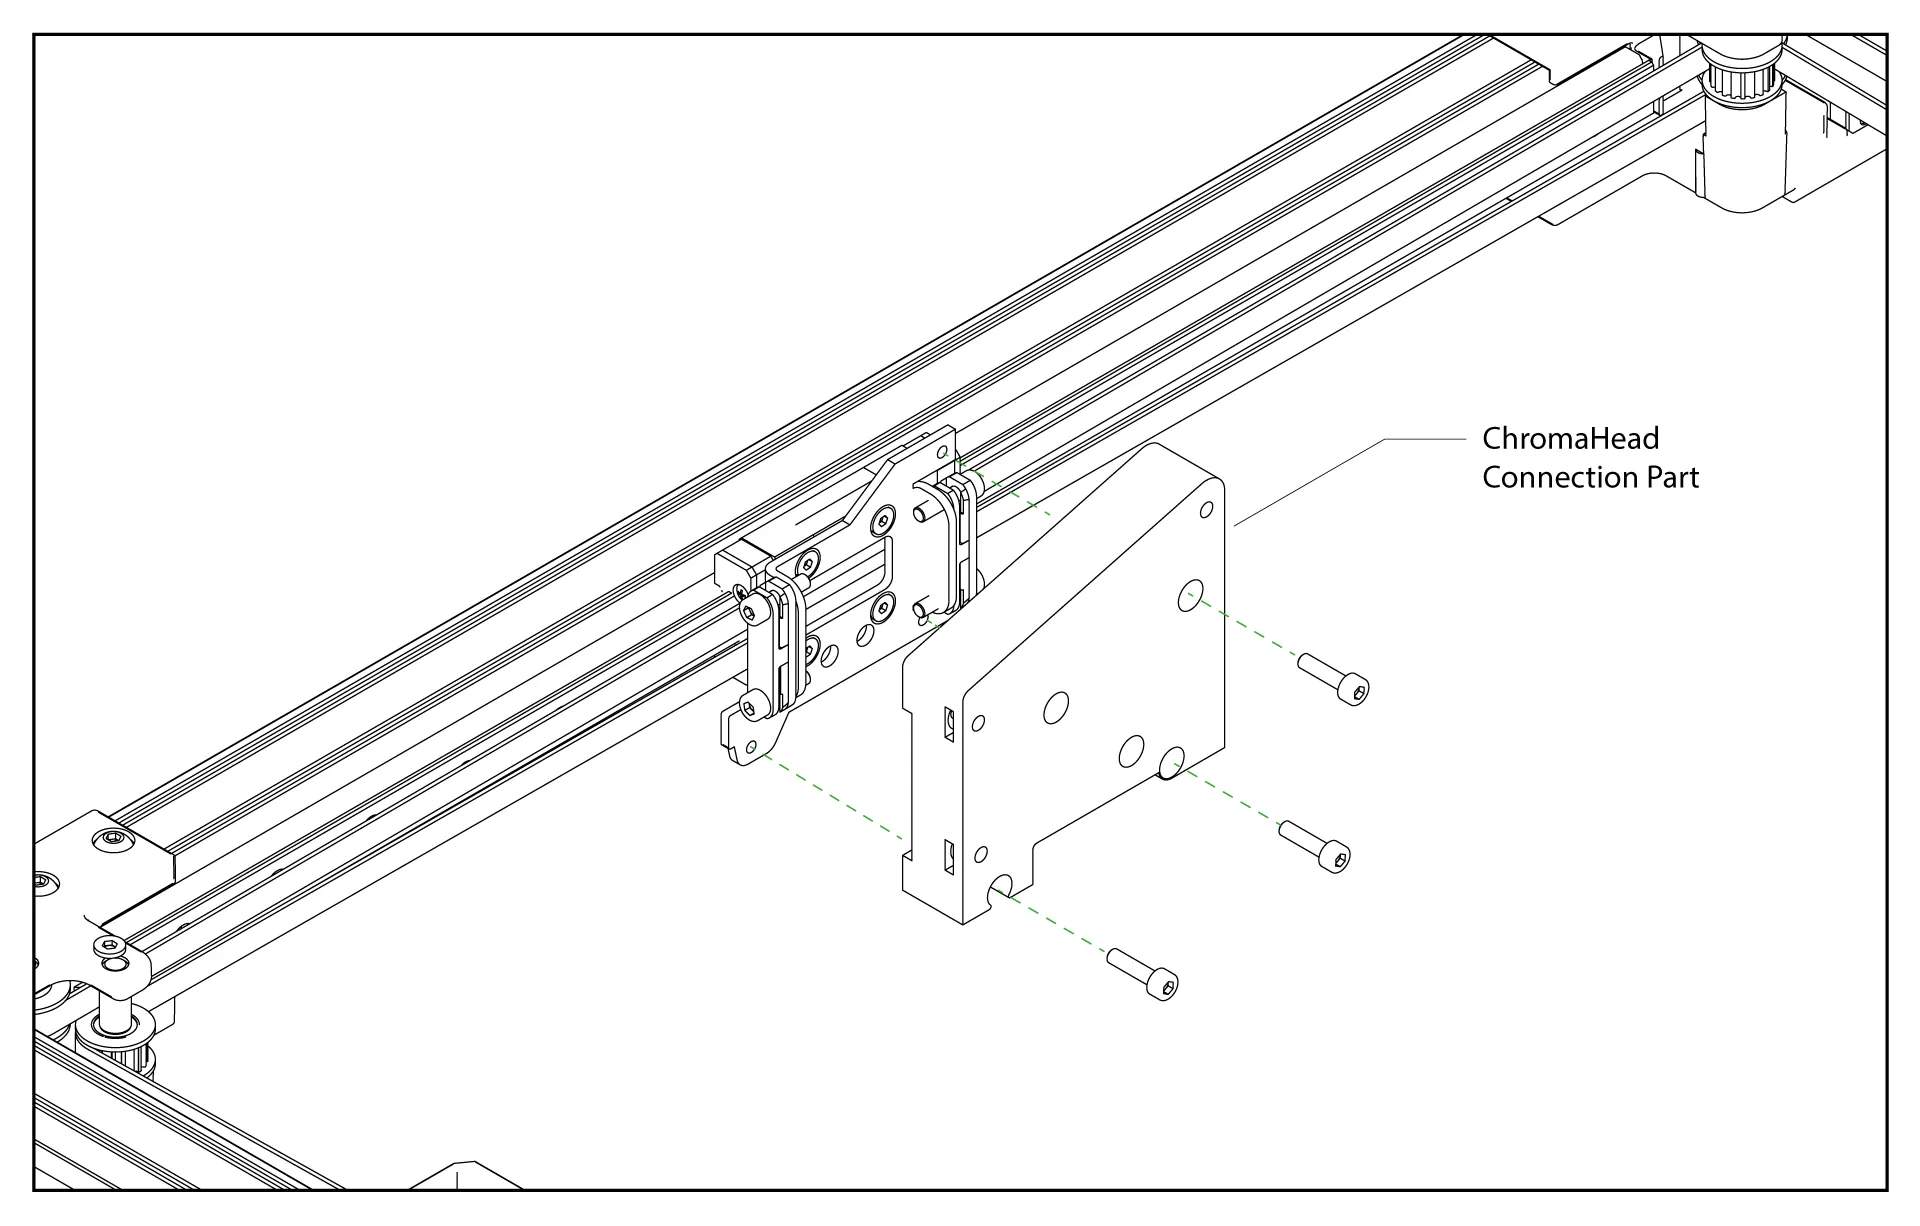
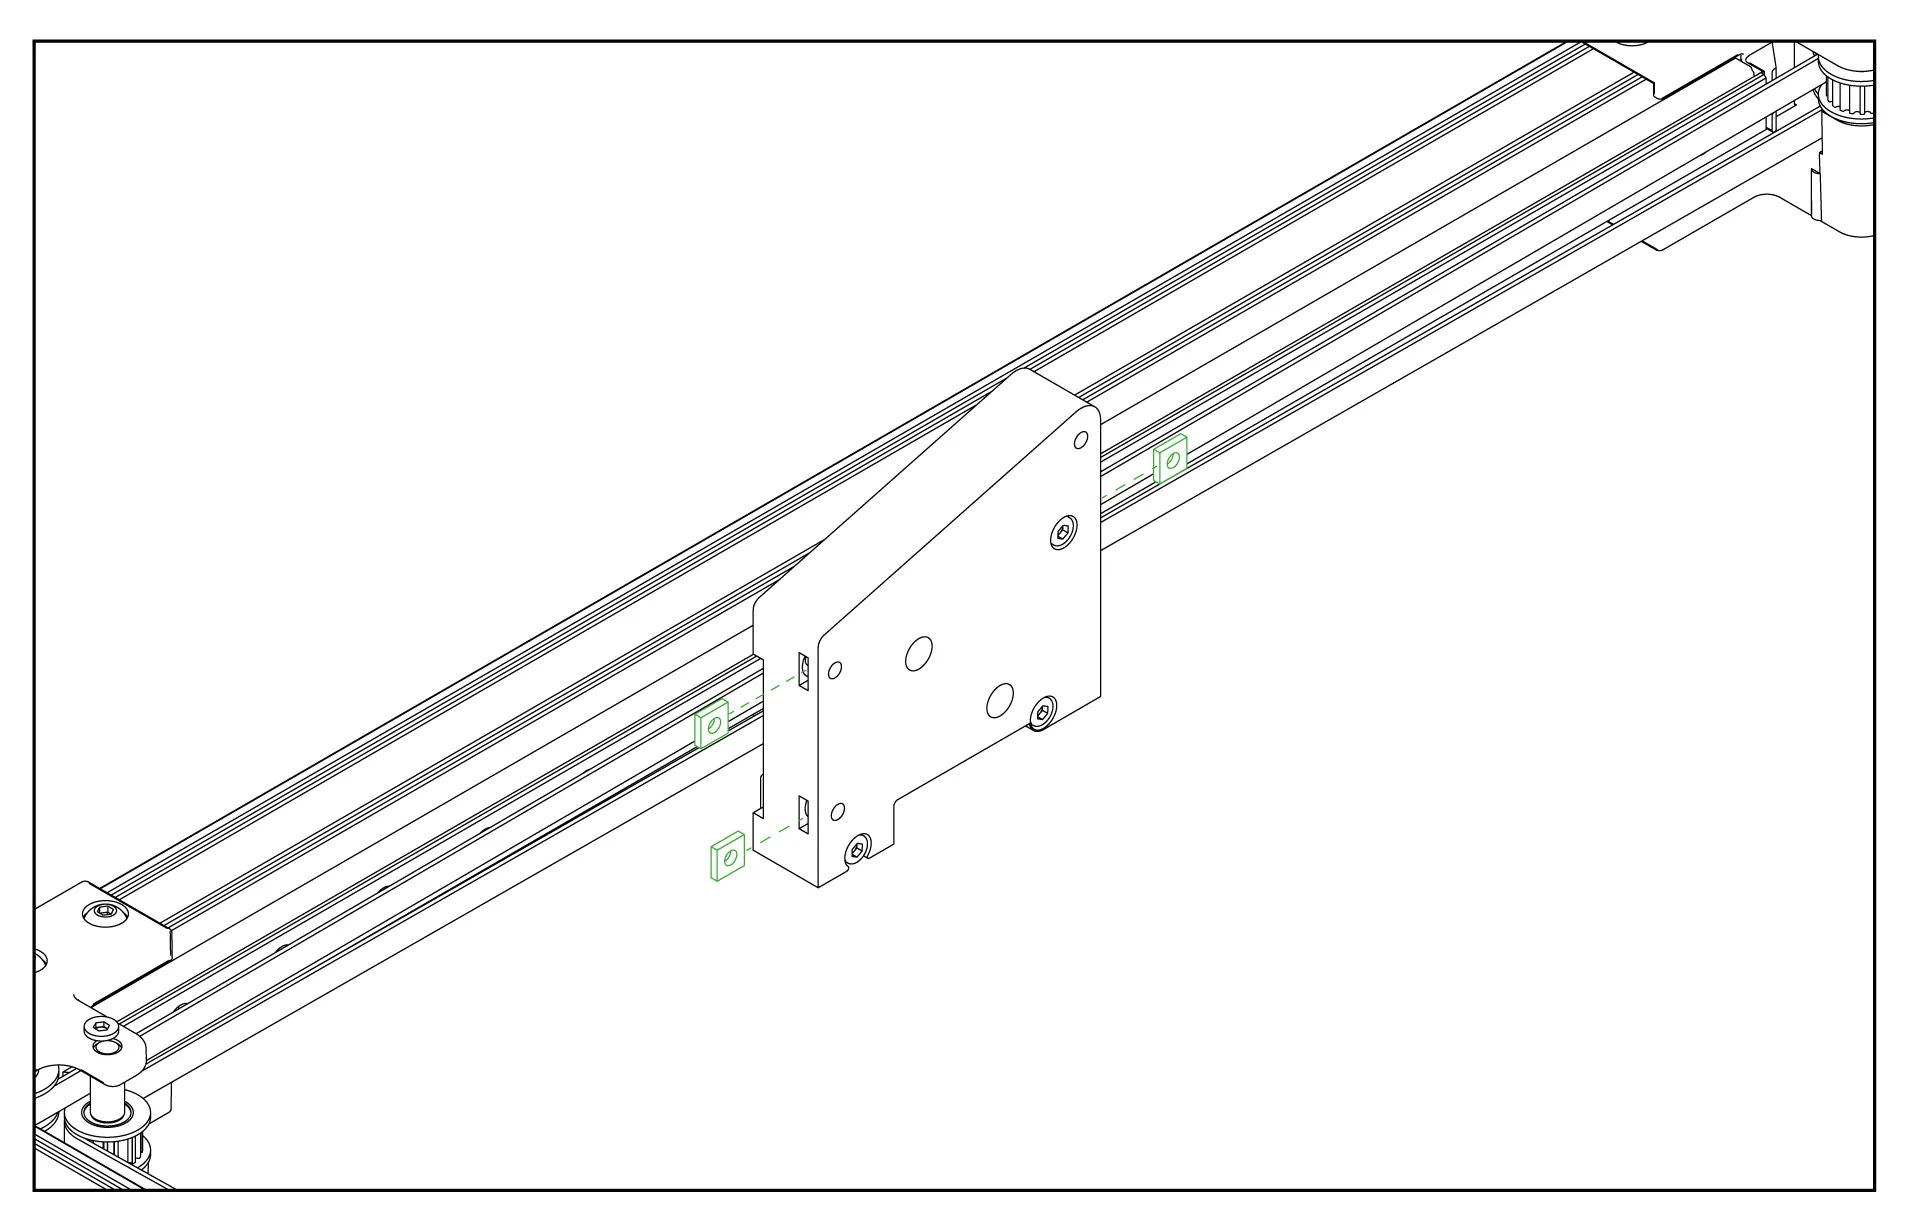
¶ 2- Attach the ChromaHead Mounting Part
Using 3 M3 screws, attach the ChromaHead mounting part by screwing it into the indicated positions.
¶ 3- Insert the Square Nuts
Before attaching the ChromaHead, insert the square nuts on both the right and left sides to hold the screws. The square nuts and screws will be included in the package.
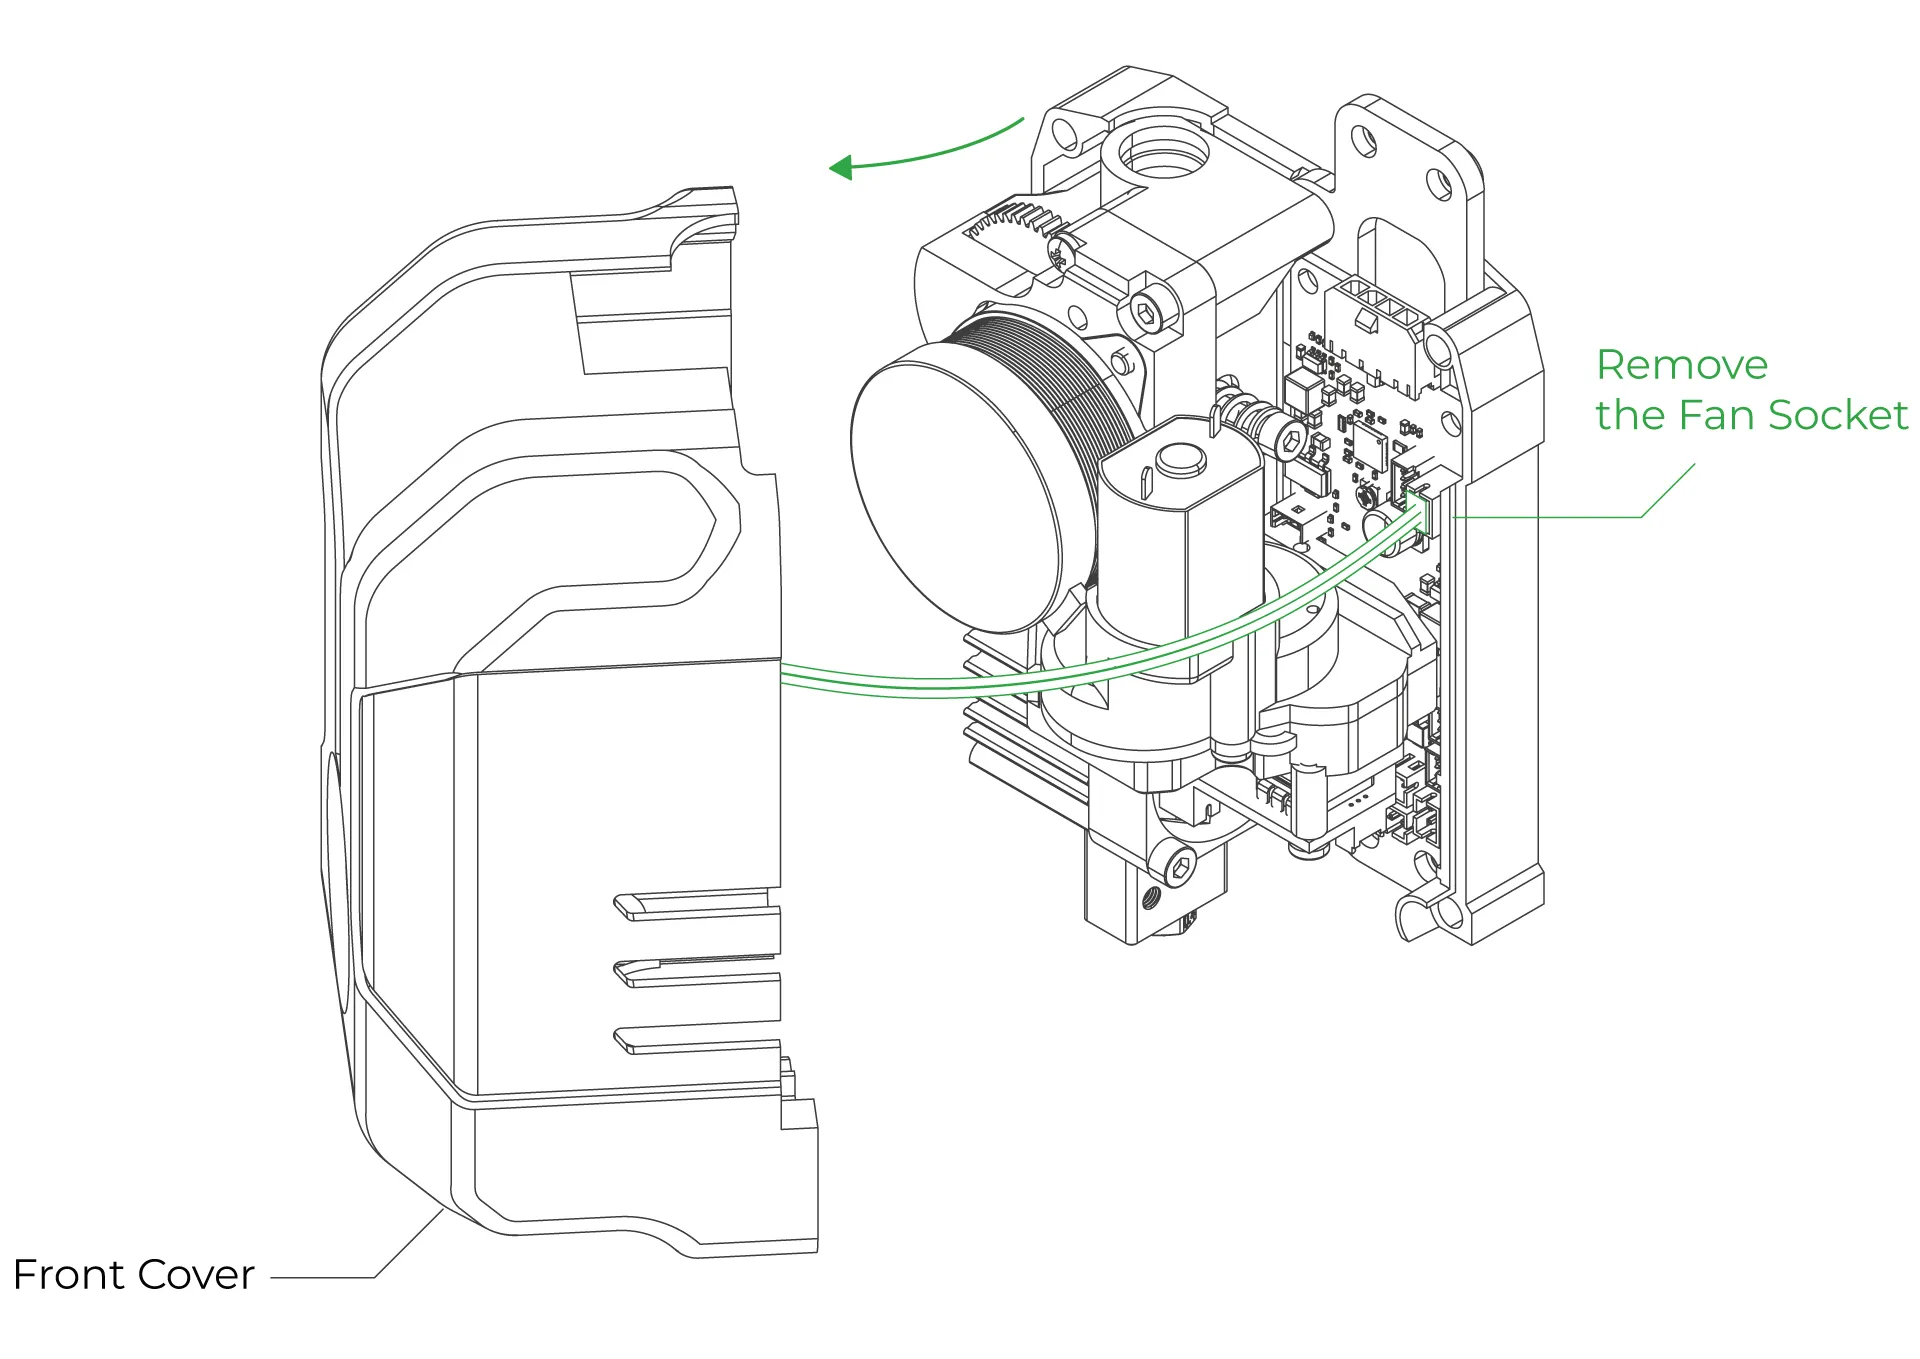
¶ 4- Remove the Front Cover of the ChromaHead
The connection screws for the ChromaHead's adapter part are located inside the front cover. Therefore, the front cover needs to be removed for installation.
¶ 5- Attach the ChromaHead
Using the M3 screws included in the package, secure the ChromaHead in three places so that the square nuts hold it firmly.

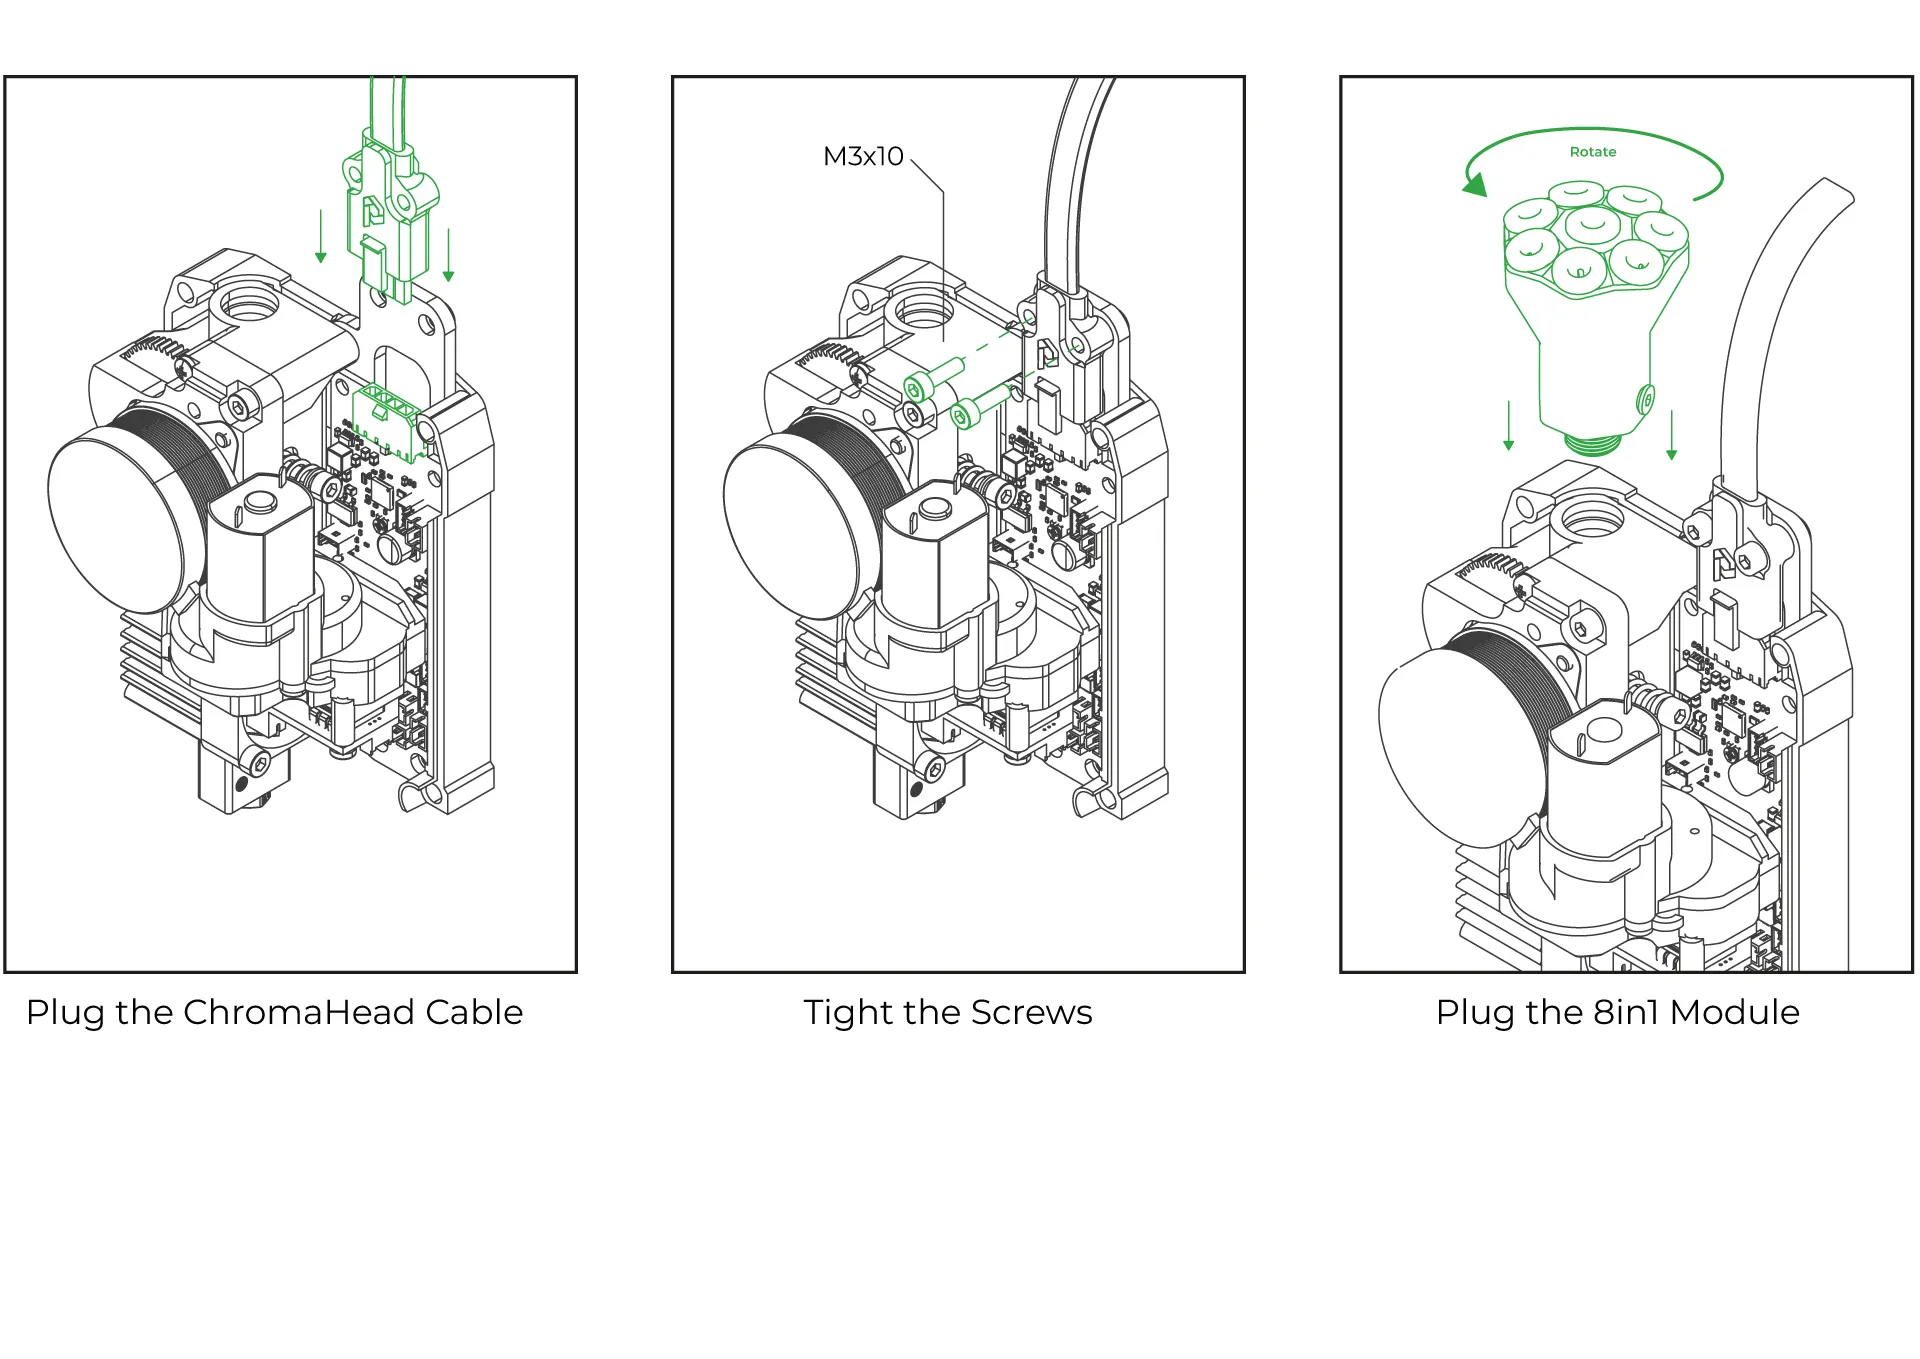
¶ 6-Head connection cable and the 8-in-1 kit mounting
Connect the head connection cable as shown in the image and make sure it is secured in place using the fastening screws. Then, rotate the 8-in-1 module and install it as shown in the image. Ensure it is tightly secured and doesn't move.
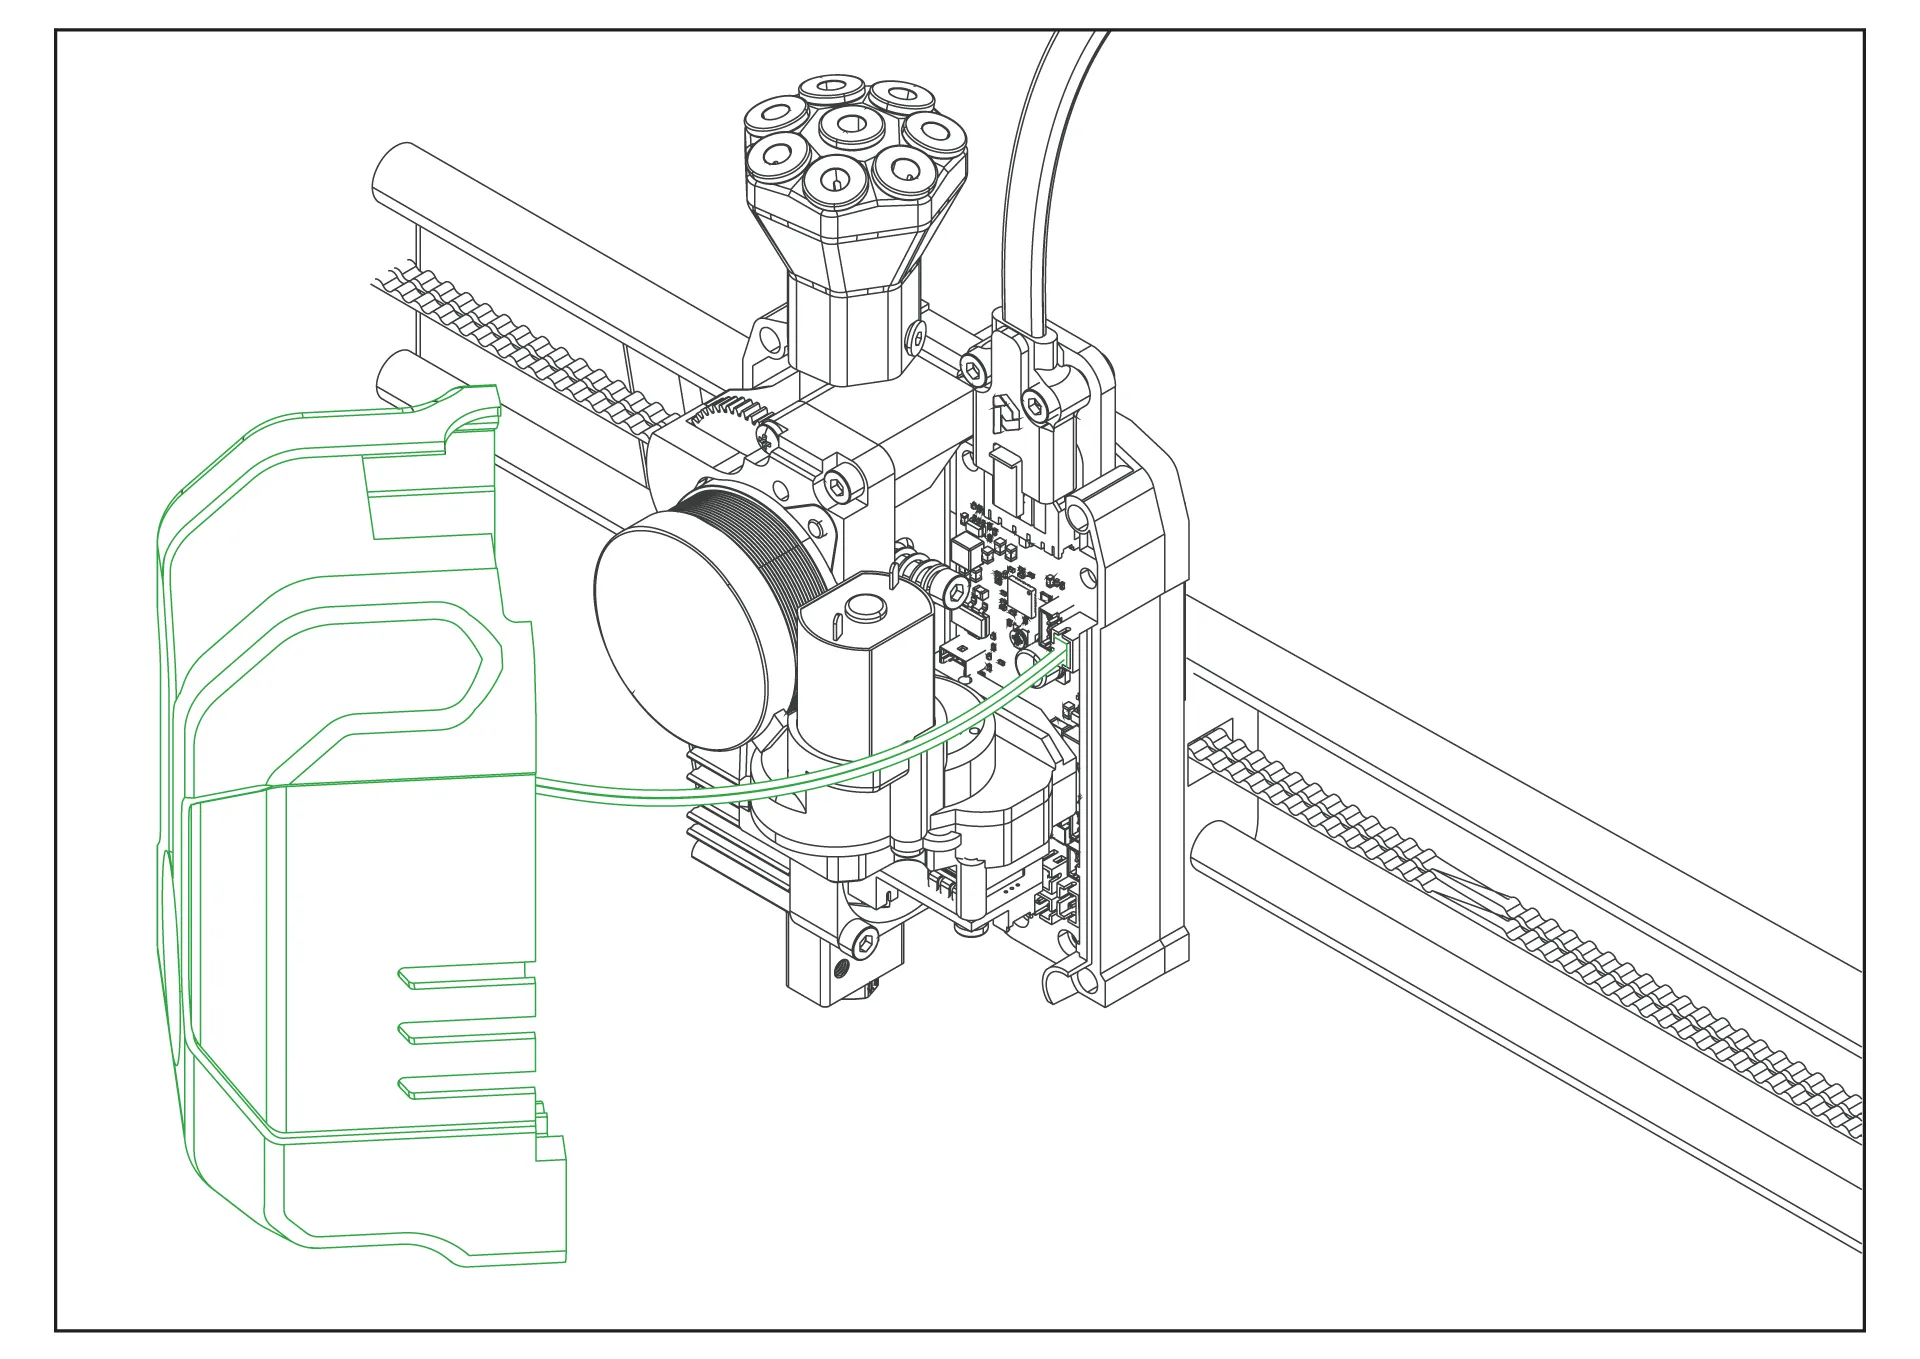
¶ 7-Close the front cover of the ChromaHead
The ChromaHead installation is complete. Reconnect the cooling fan cable from the front cover to the designated spot on the control board, and then close the cover.
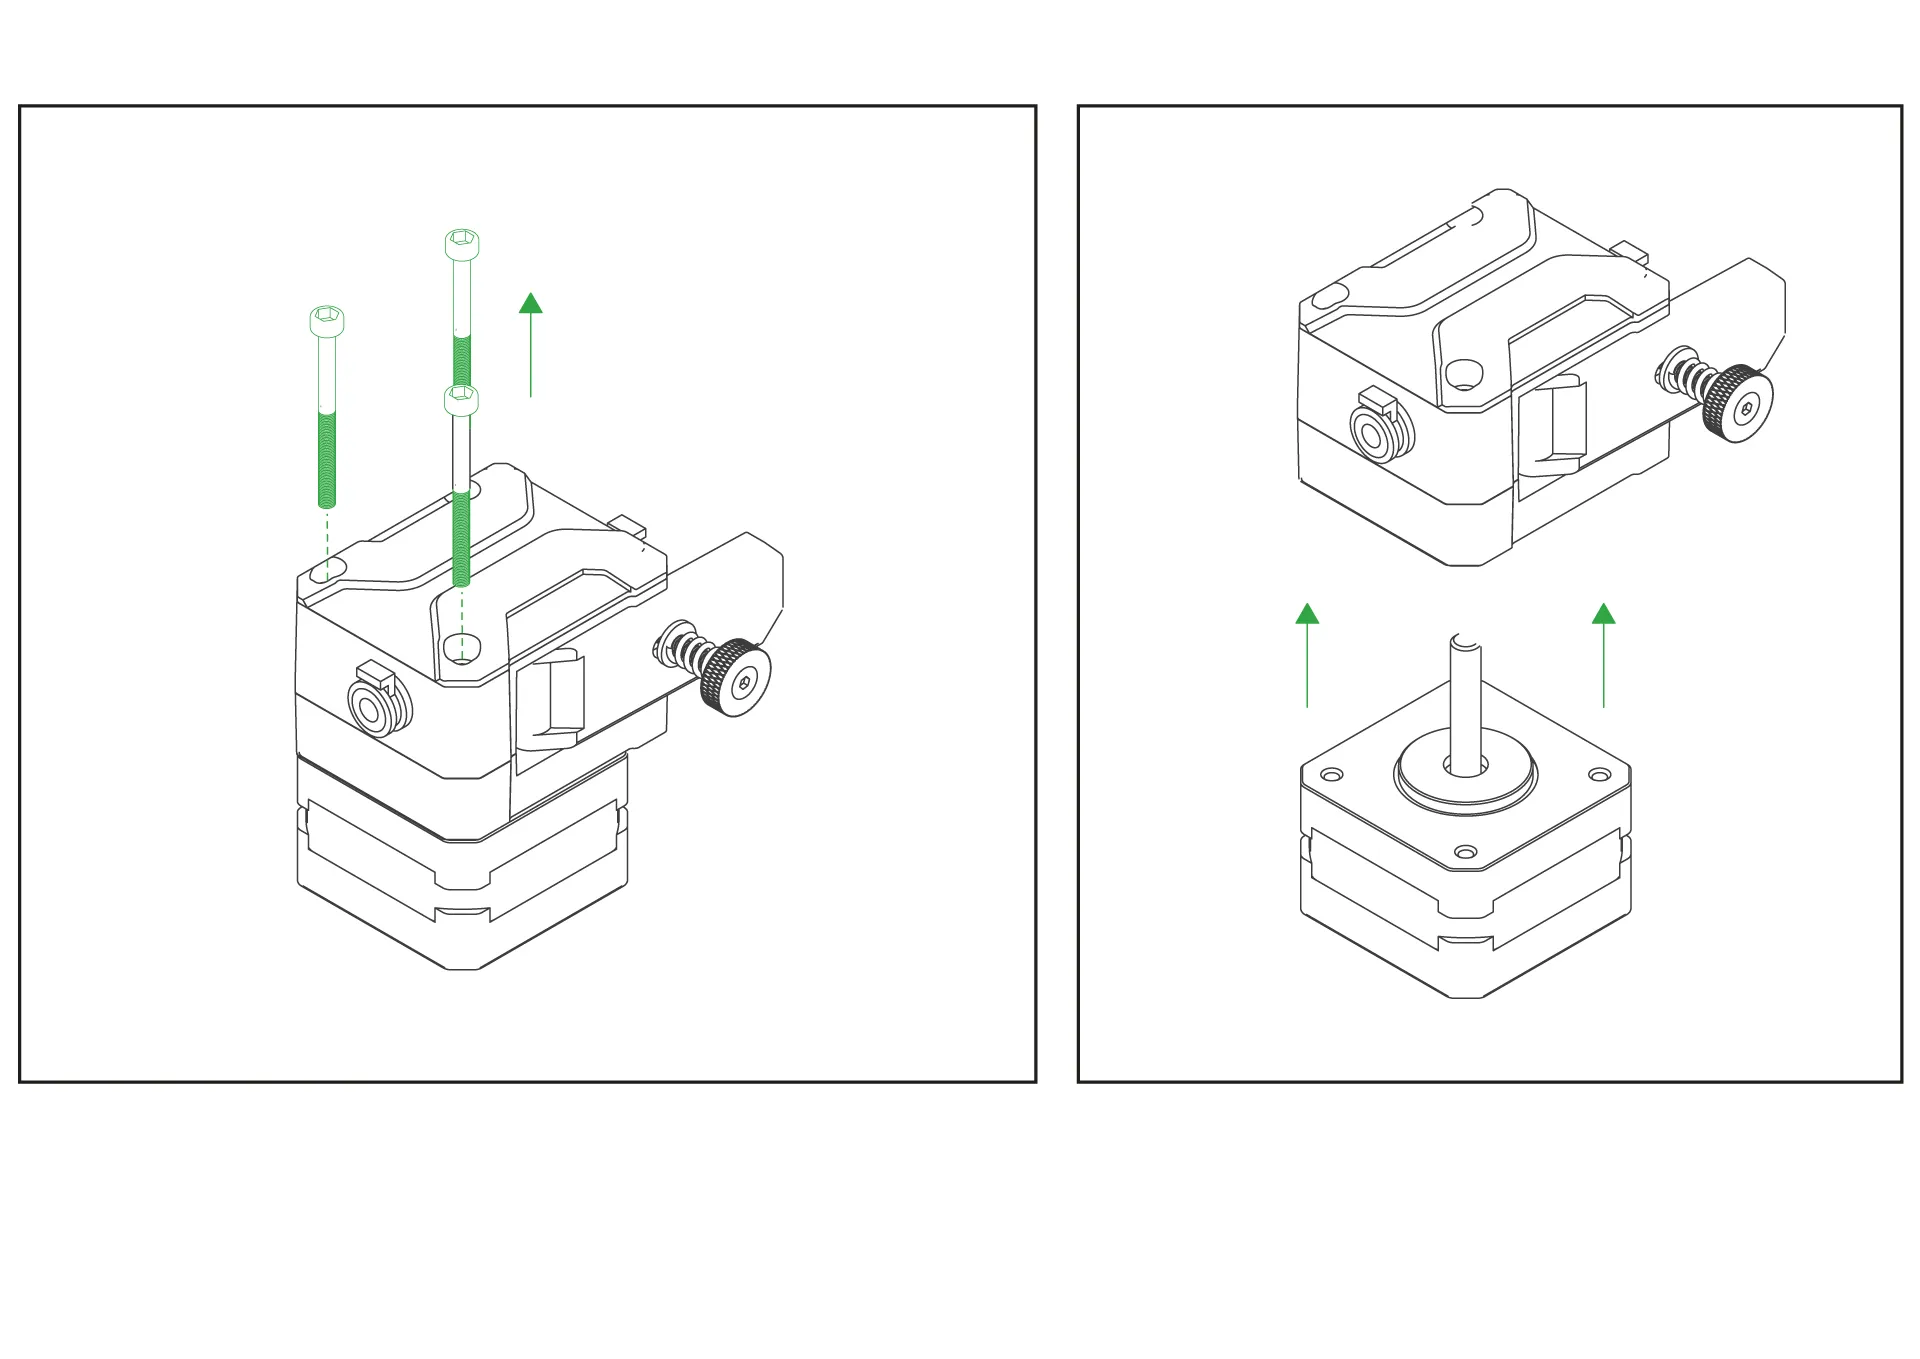
¶ 8-CX-I Extruders Installation
The CX-I Extruders come pre-assembled with the motor and plastic components inside the box. However, in order to mount them onto the 4-in-1 extruder holder, the motor and extruder sections need to be separated. To do this, remove the 3 screws on the top of the extruder and separate the motor from the extruder section.
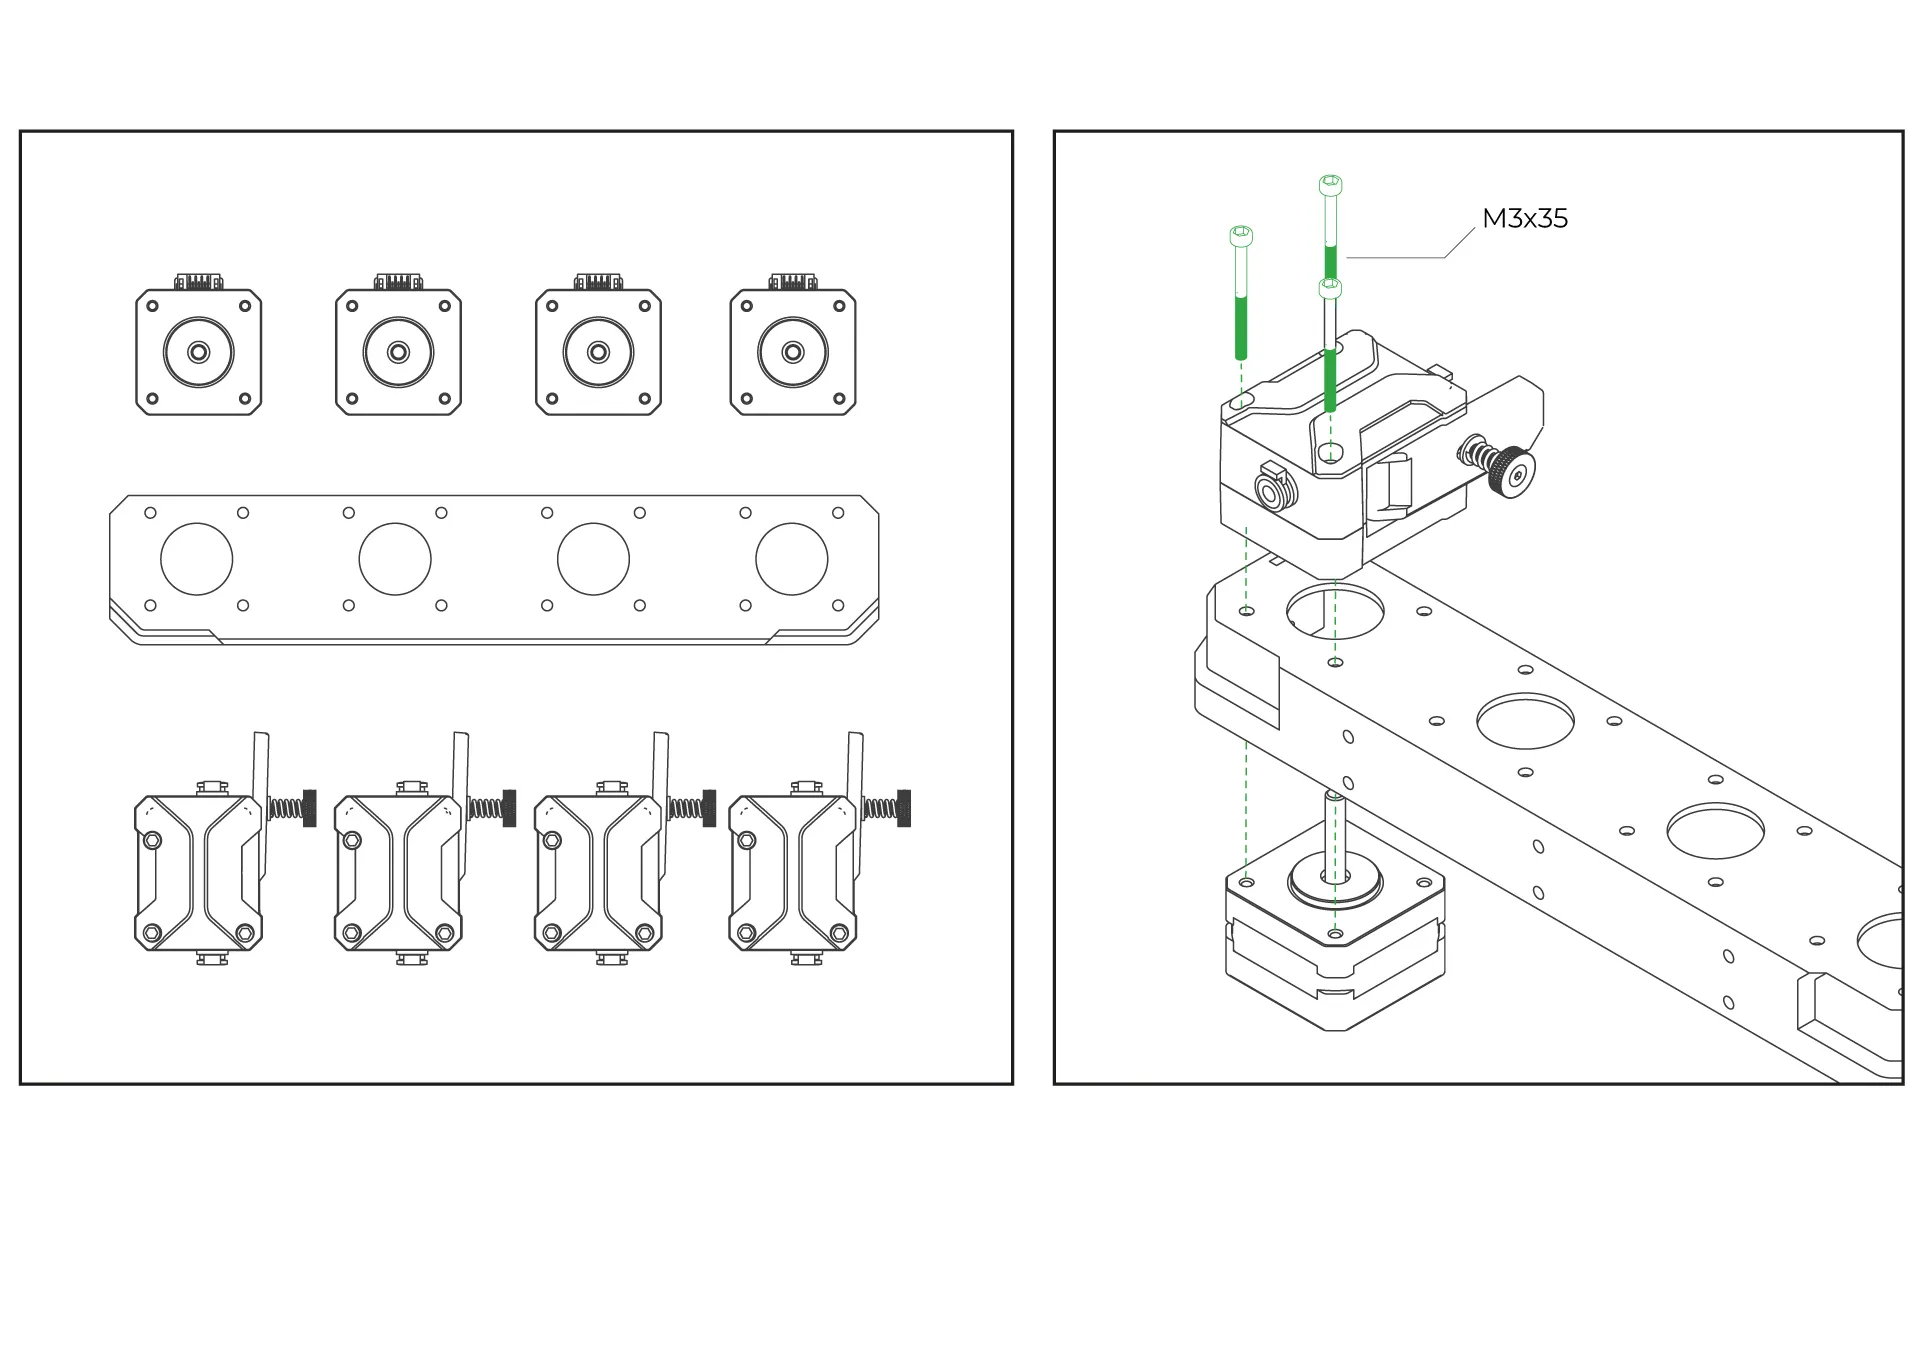
¶ 9- Place the extruders onto the 4-extruder holder.
Place the extruder on the top side of the printable 4-extruder holder you downloaded. Position the stepper motor on the bottom side, and then securely fasten the extruder using the three screws on it to complete the assembly.
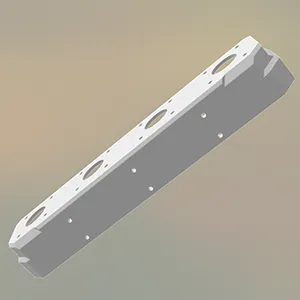
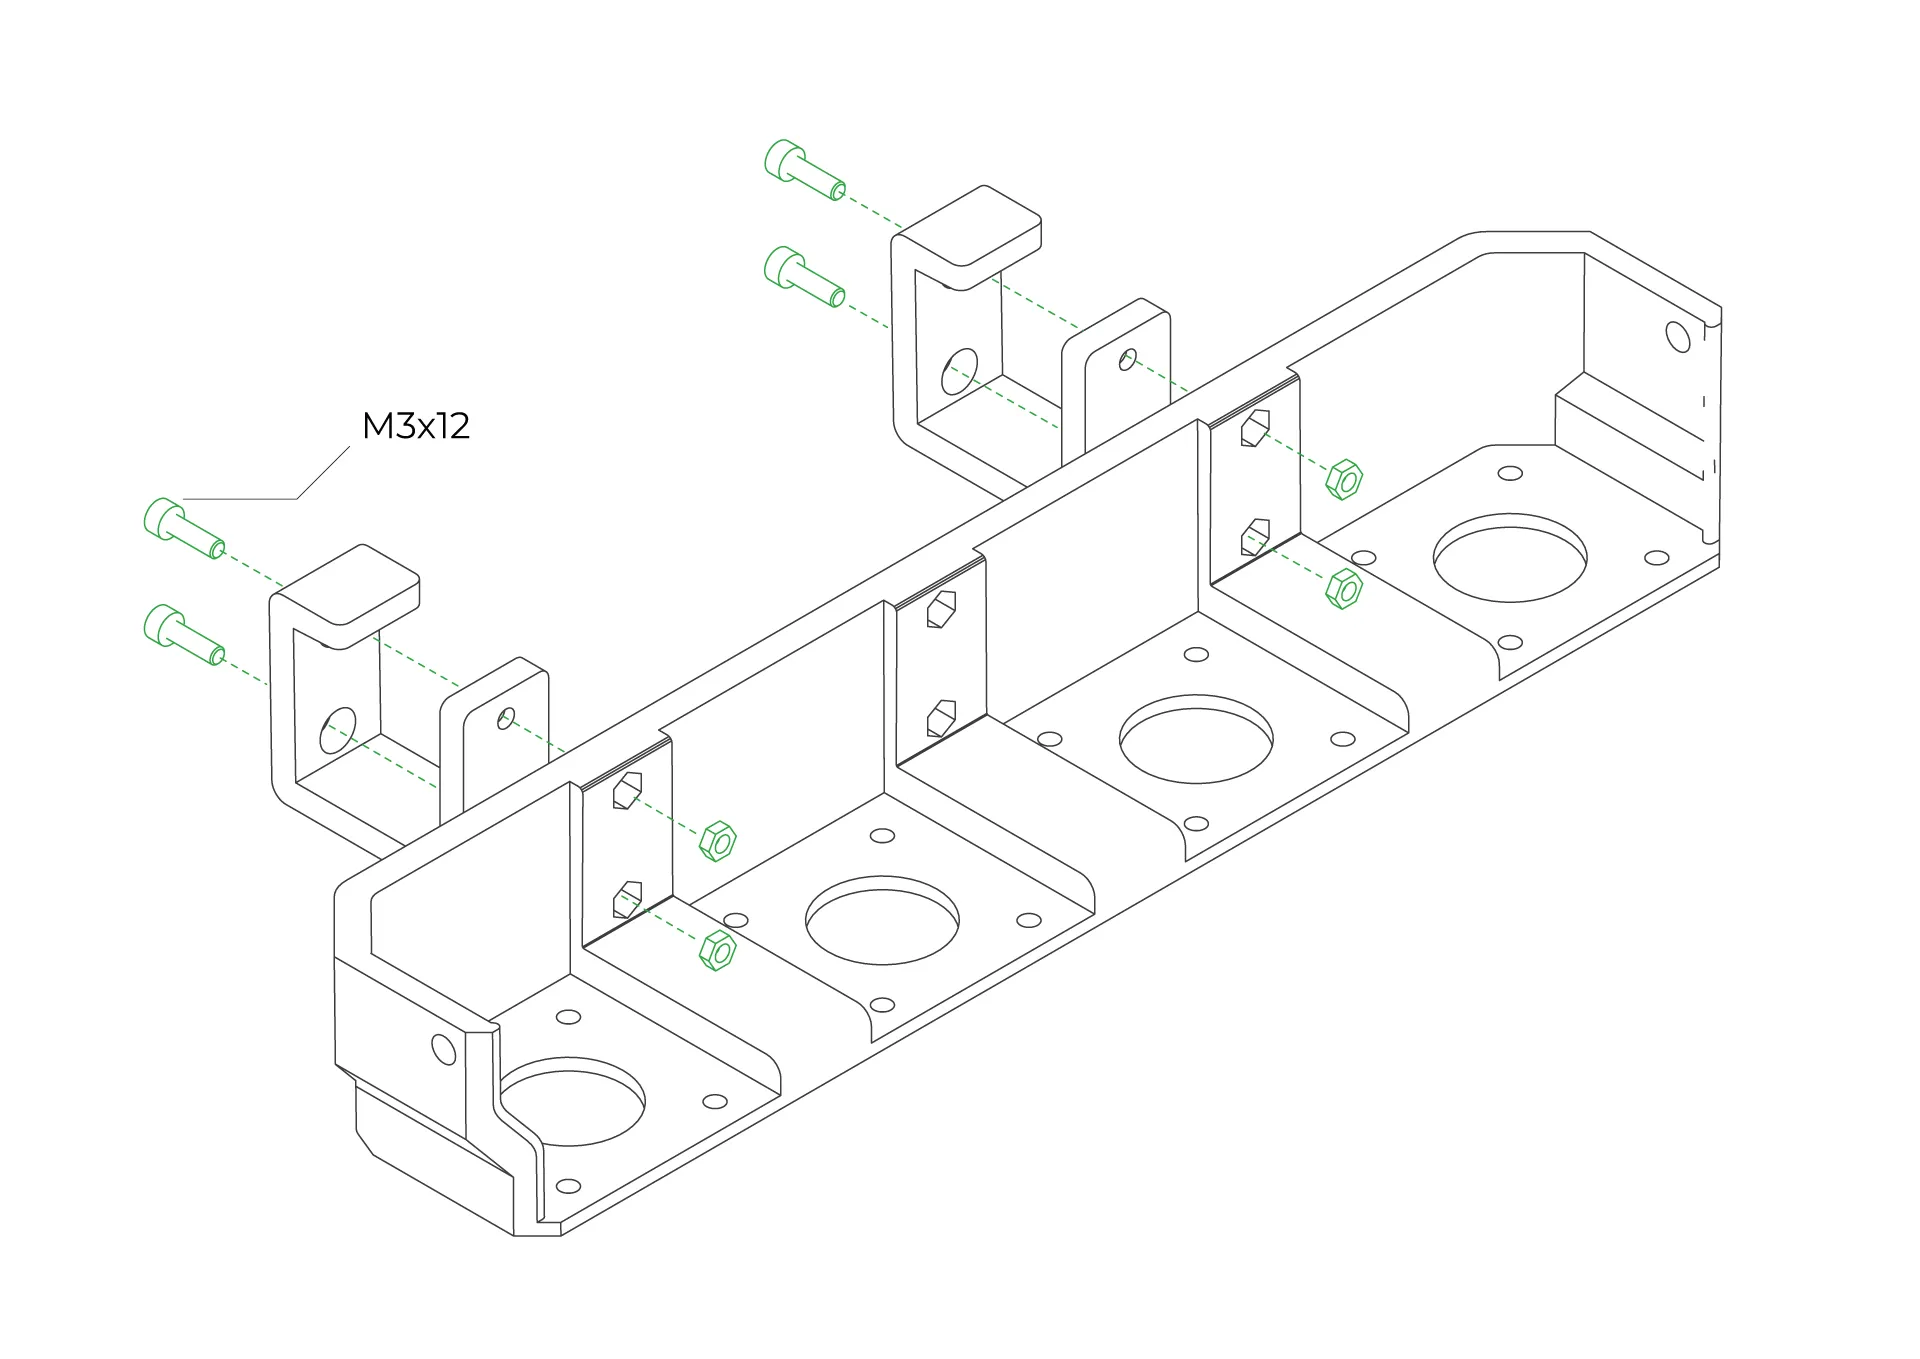
¶ 10-Attach the Mounting Feet to the 4-Extruder Holder
Secure the feet to the 4-extruder holder using M3-12mm screws and nuts.
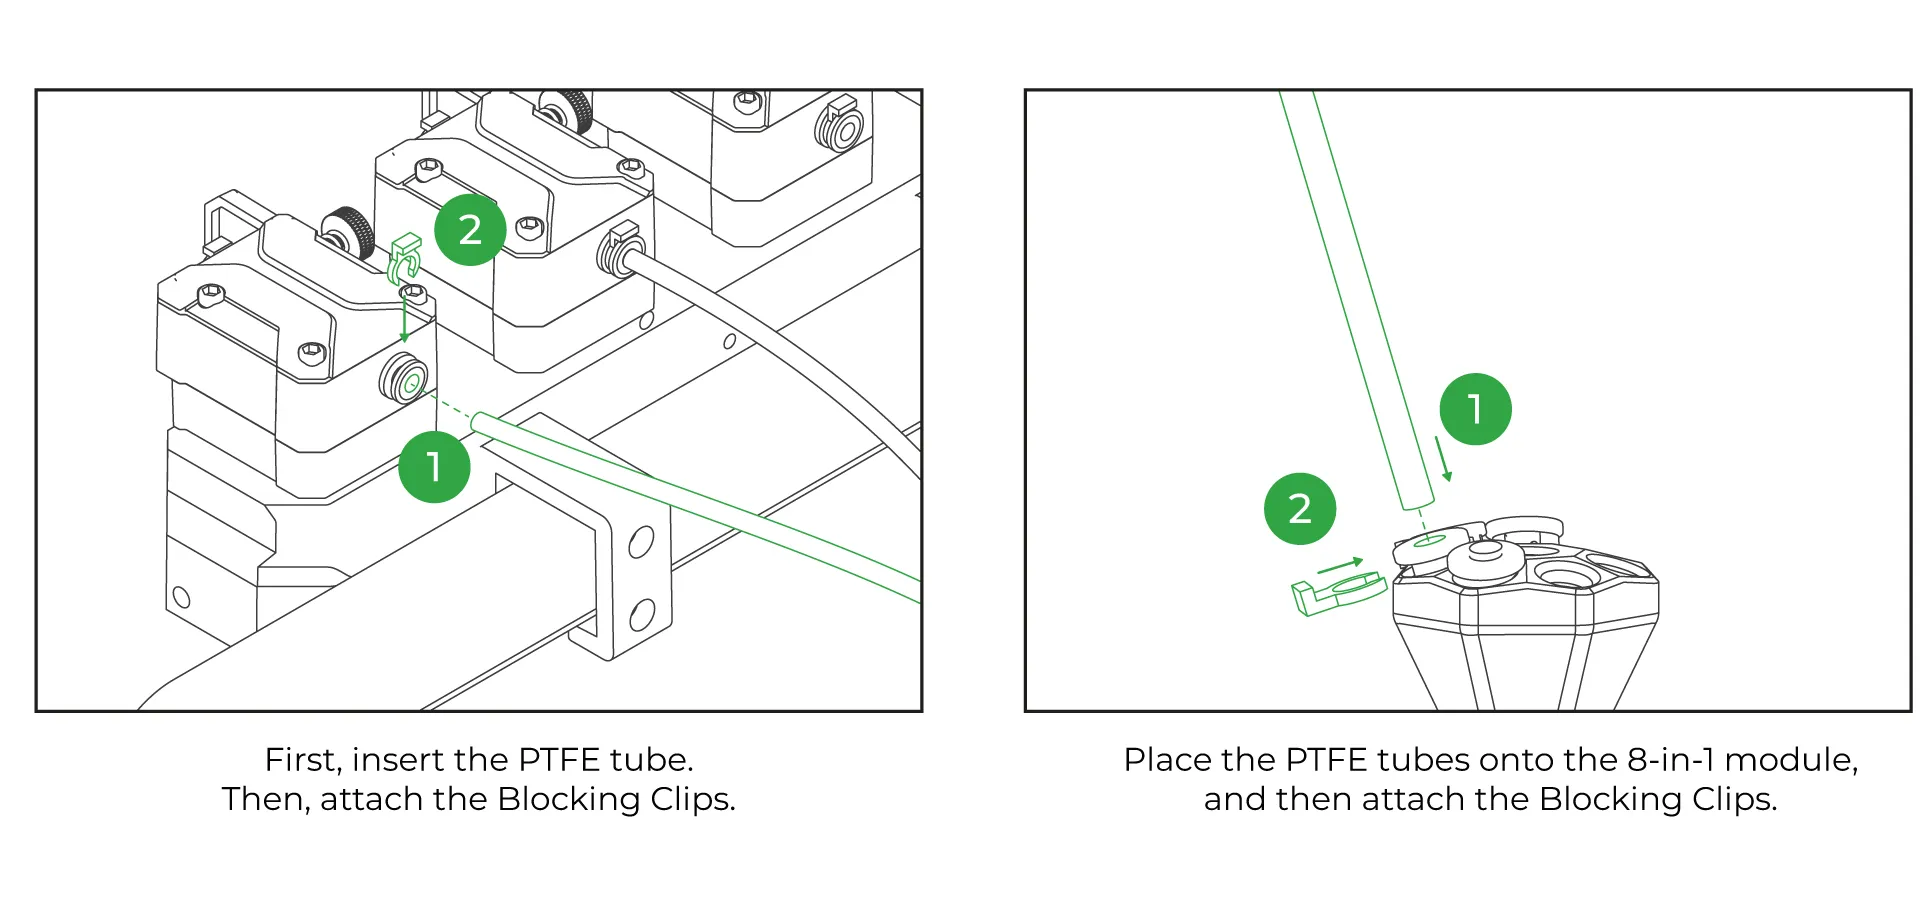
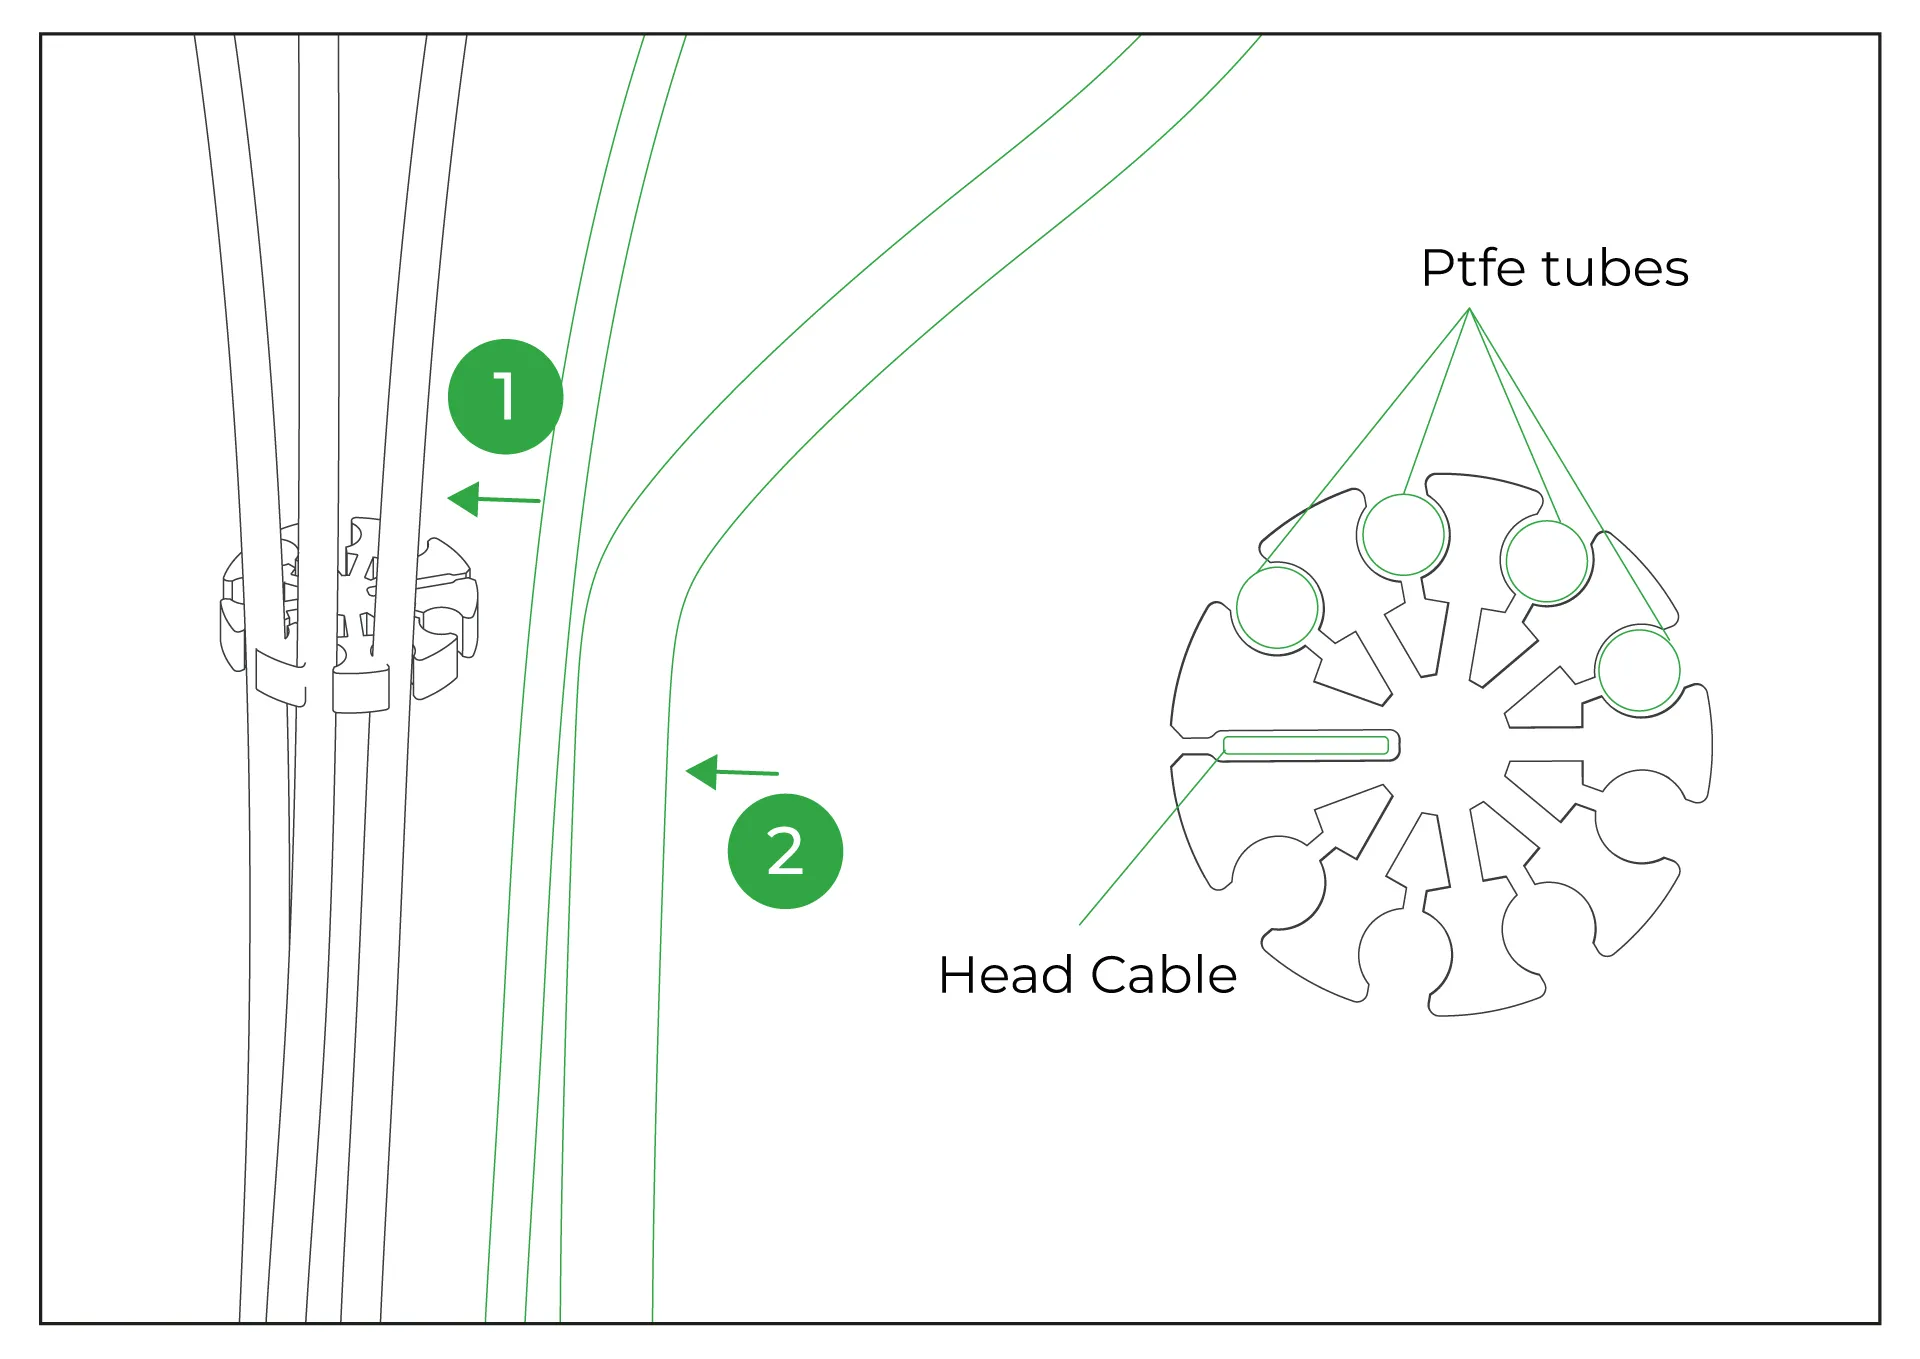
¶ 11-Install the PTFE Tubes
First, insert the PTFE tube into the CX-I extruder and secure it tightly using the blue retainers. Then, choose a nearby hole on the 8in1 and connect the other end of the PTFE tube to it, securing it firmly.
¶ 12-Place the PTFE Organizer
The PTFE organizer, provided as a printable 3D part, is designed to hold PTFE tubes together. You can secure the PTFE tubes by passing them through the slots on the organizer.
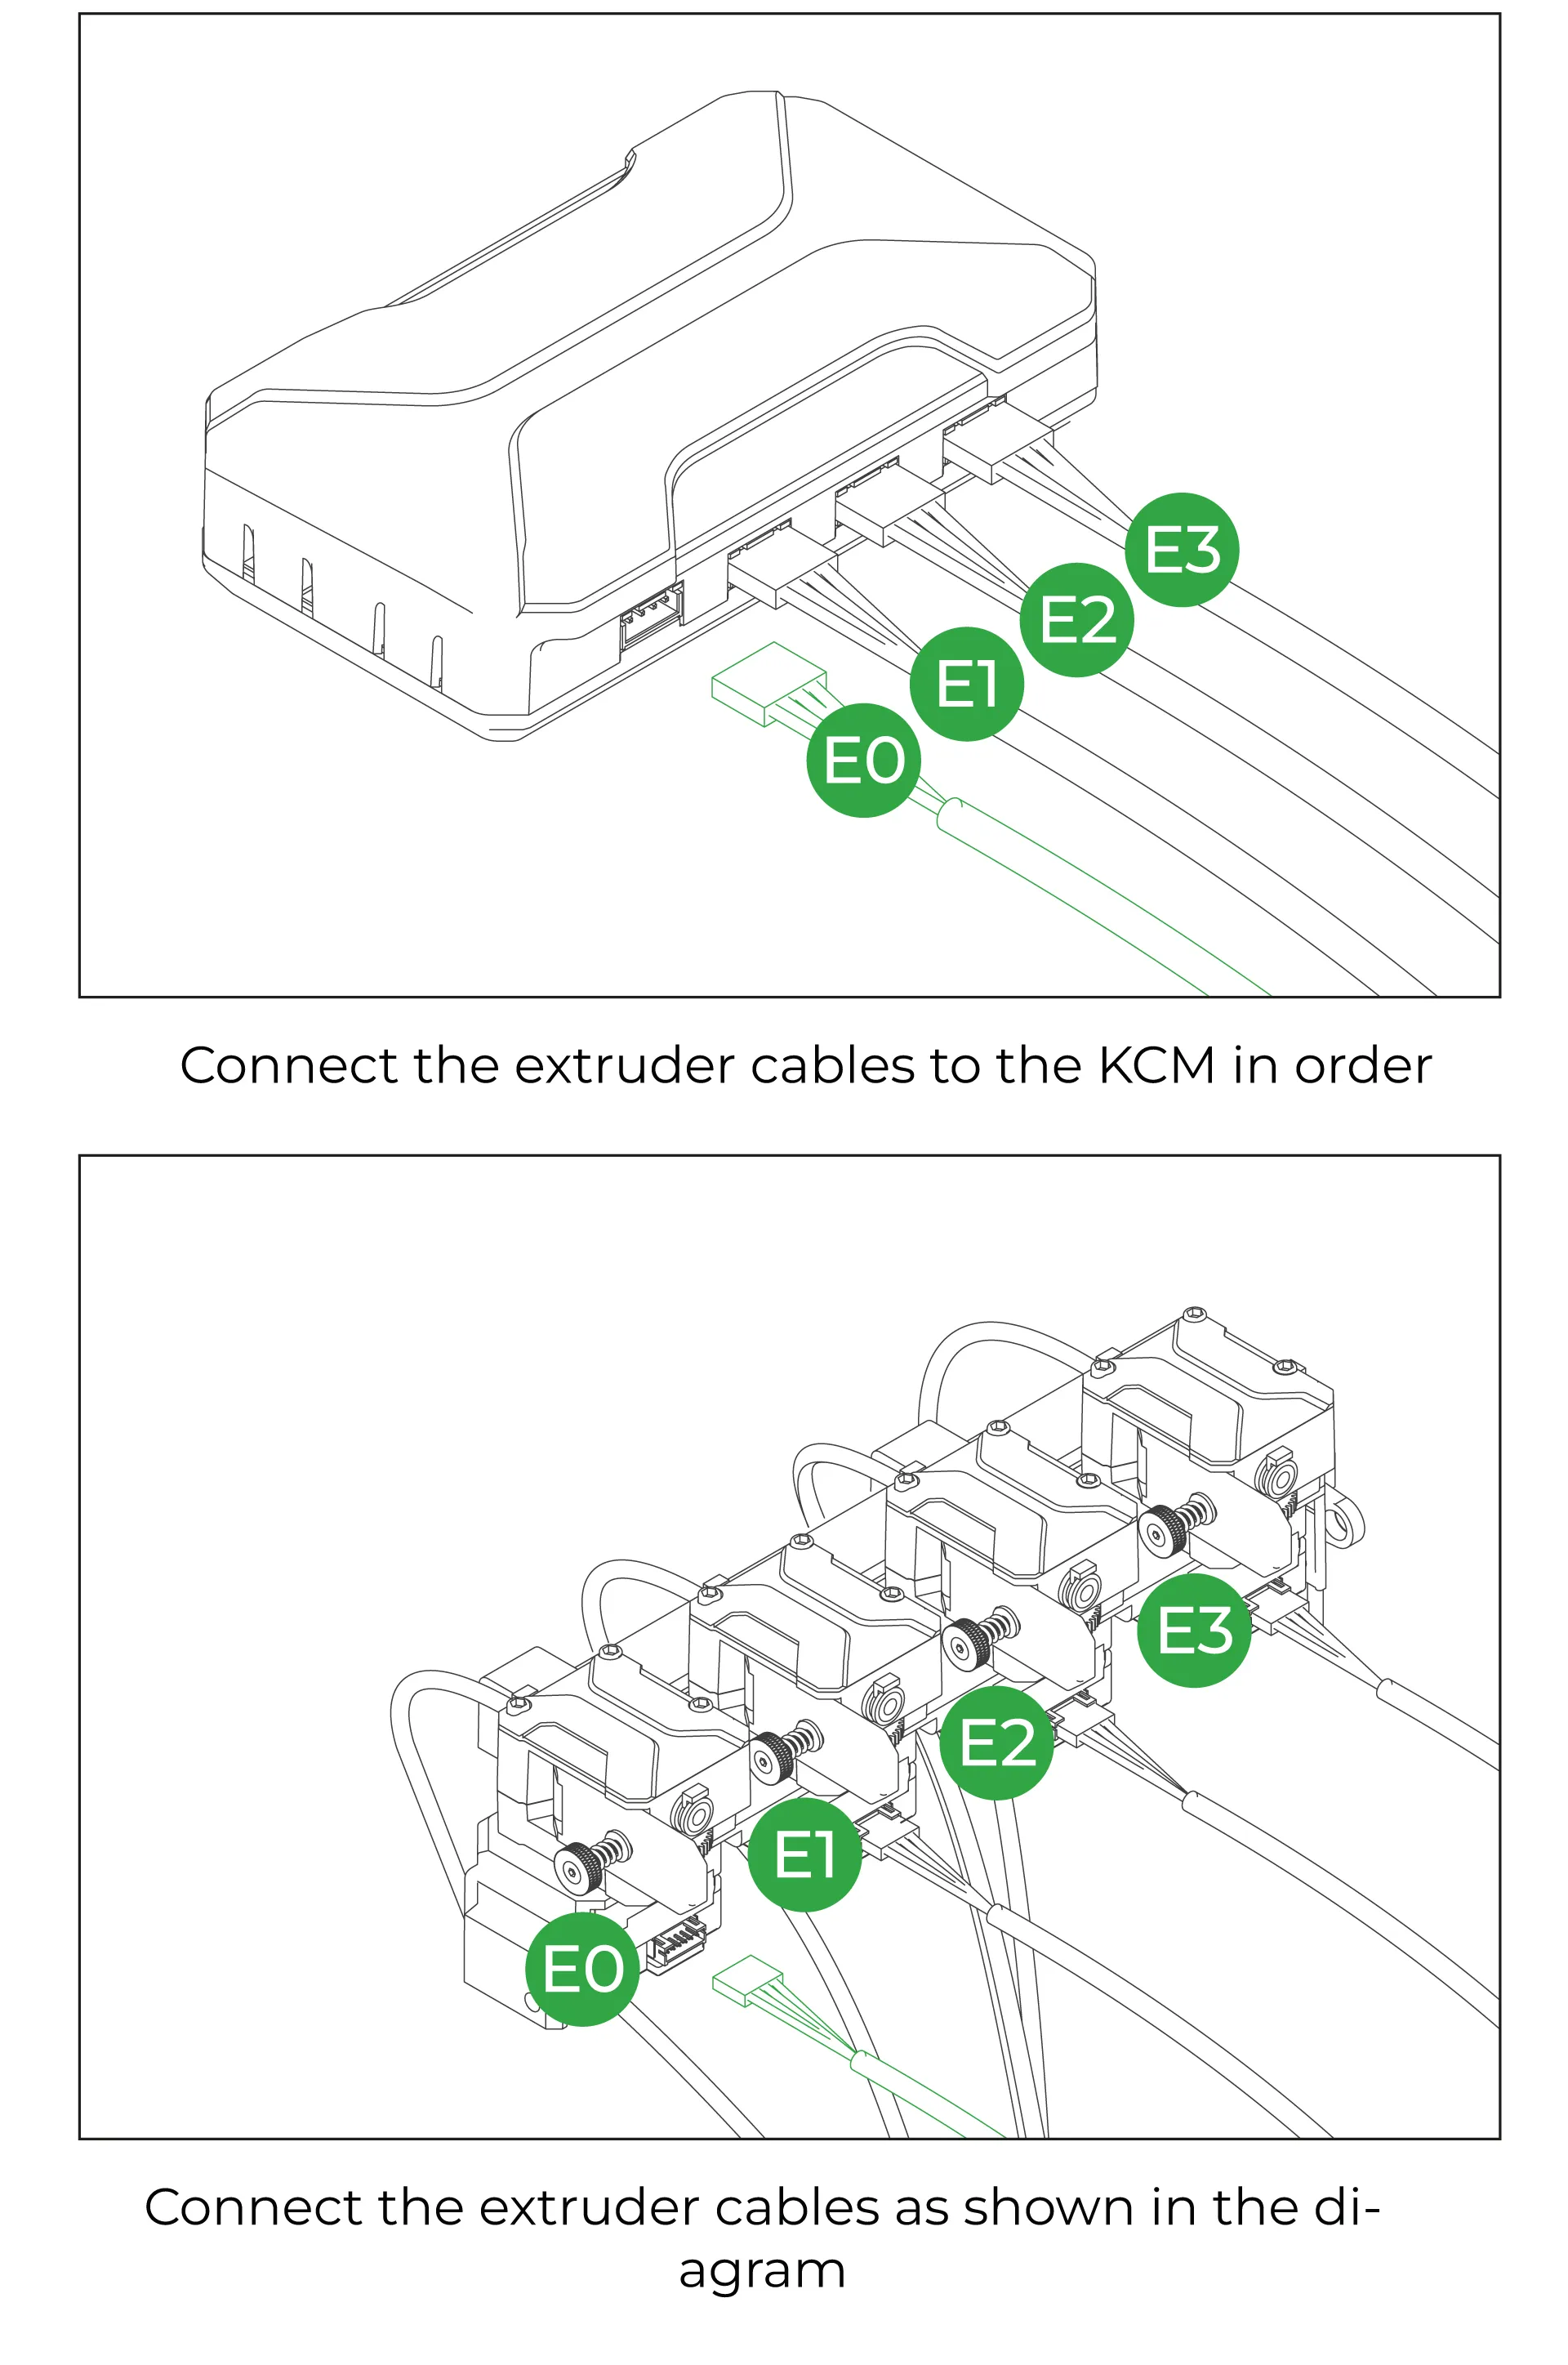
¶ 13-Plug the Extruder Motor Cables
The order of the extruder motor cables is crucial. Position the KCM with the extruder slots on the right-hand side. In this orientation, connect the first cable to the bottom-most socket. Then, proceed to connect the remaining cables in order, ensuring they are not mixed up. Connect the other ends of the cables to the extruders, starting from the left when viewed from the back of the extruders. Ensure the cables are connected in the correct order.
¶ 14-Plug the KCM to 3D Printer
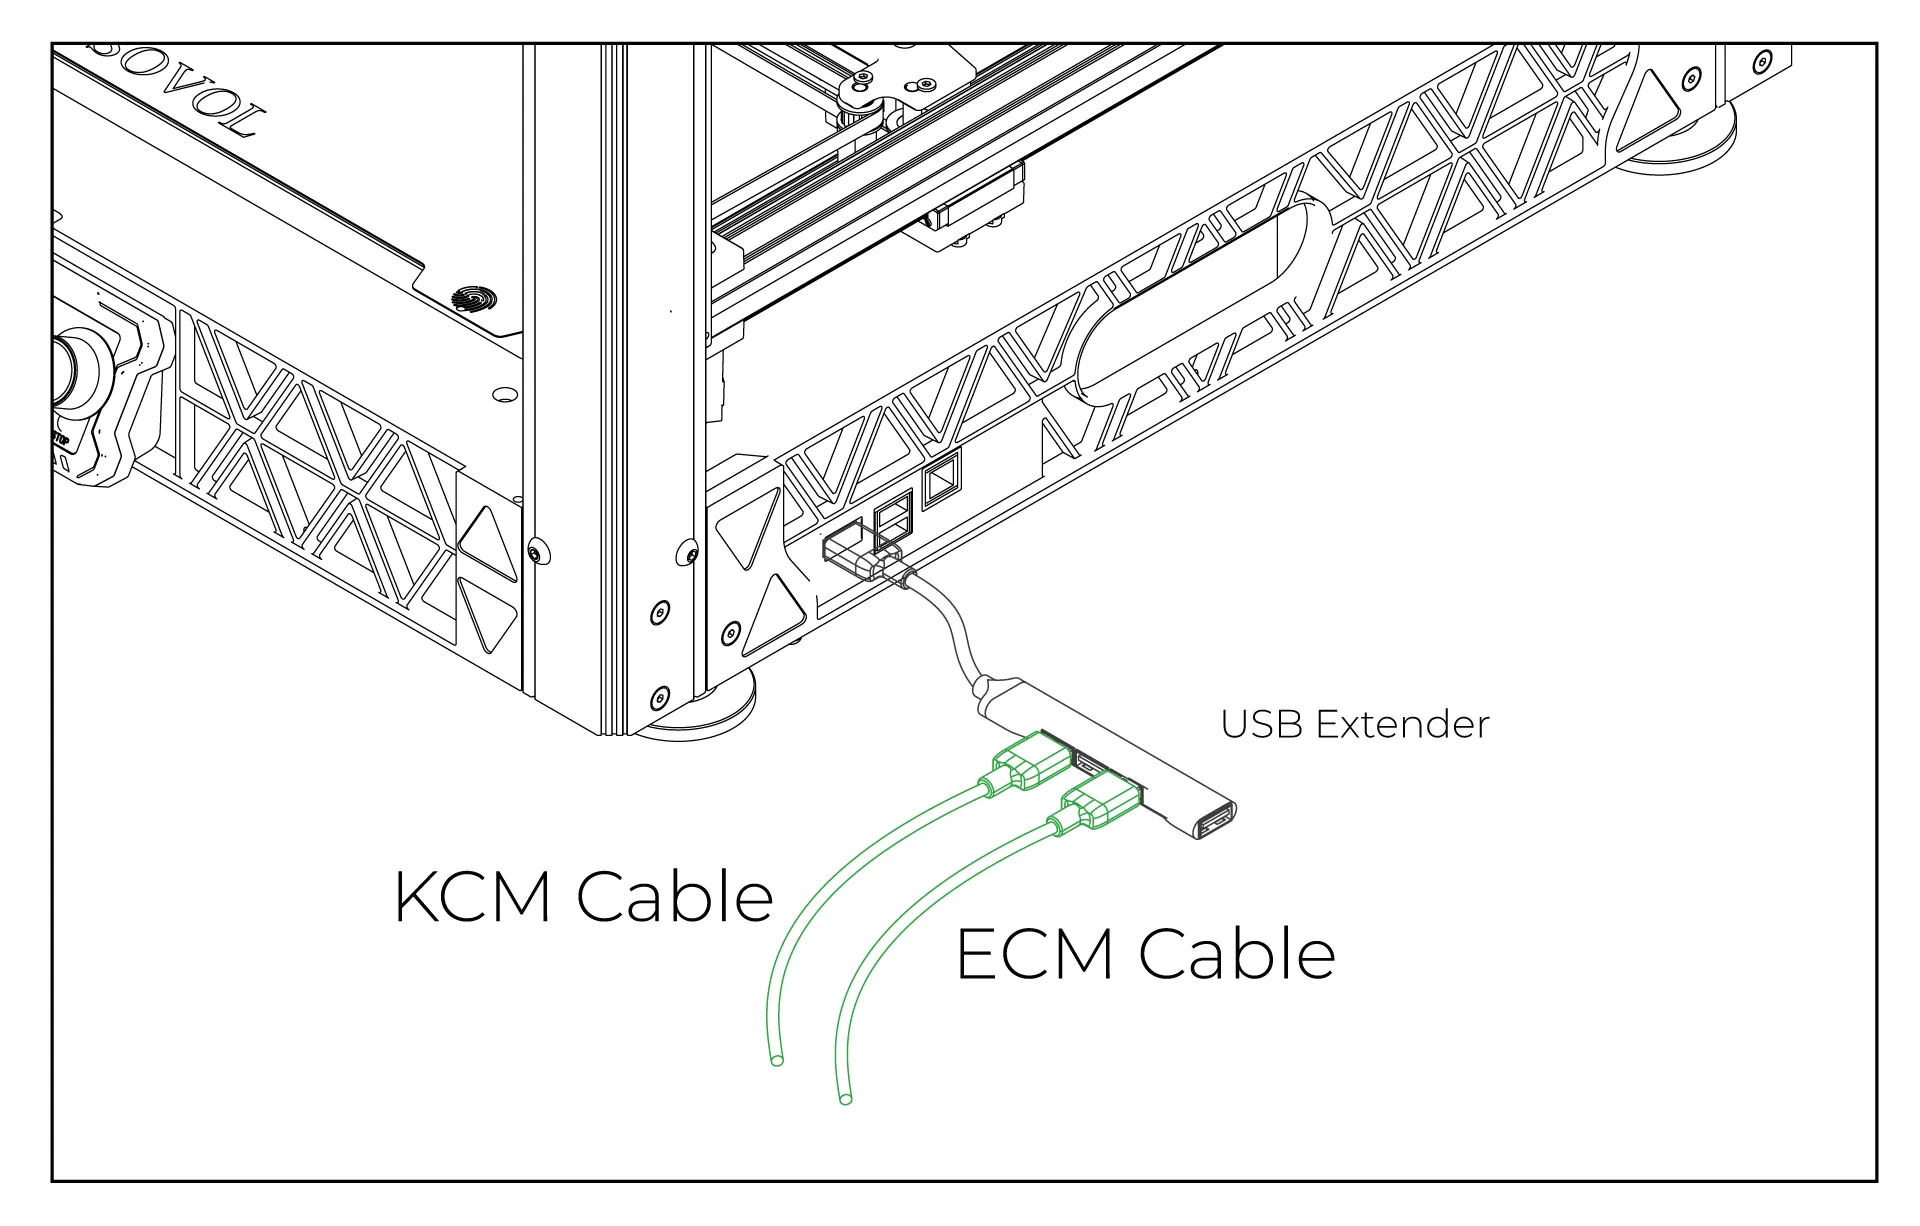
Use the USB to Type-C cable included in the box to connect the KCM to the 3D printer. If you plan to use an ECM or multiple accessories, you can use a USB hub. However, if you use a USB hub, remember that you will need to reconfigure the USB paths in the Config file.
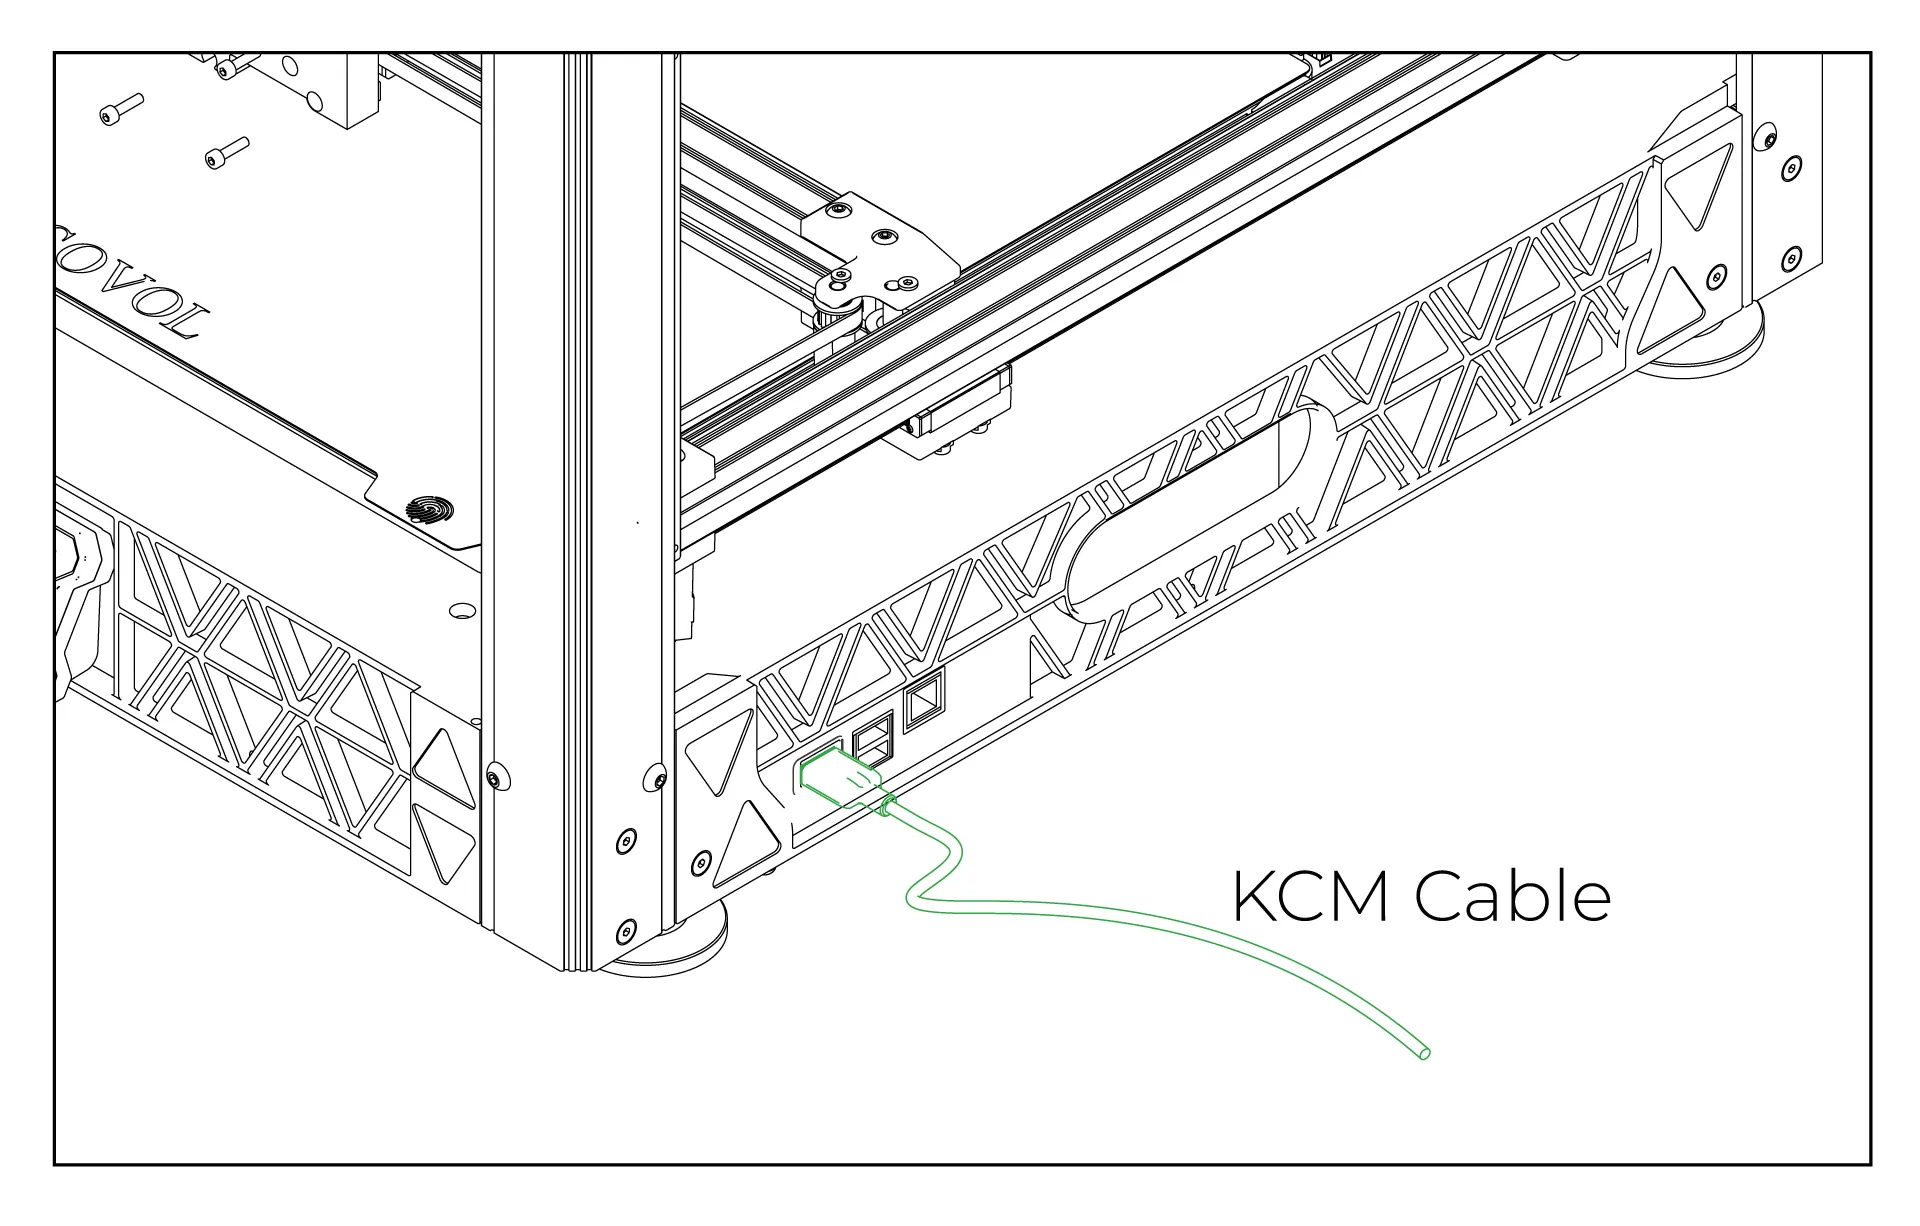
A USB hub is not required, as the Sovol SV08 has enough USB slots. However, if you want to connect multiple ECMs, you can use a USB hub. For 8 Color:
¶ Software Connection
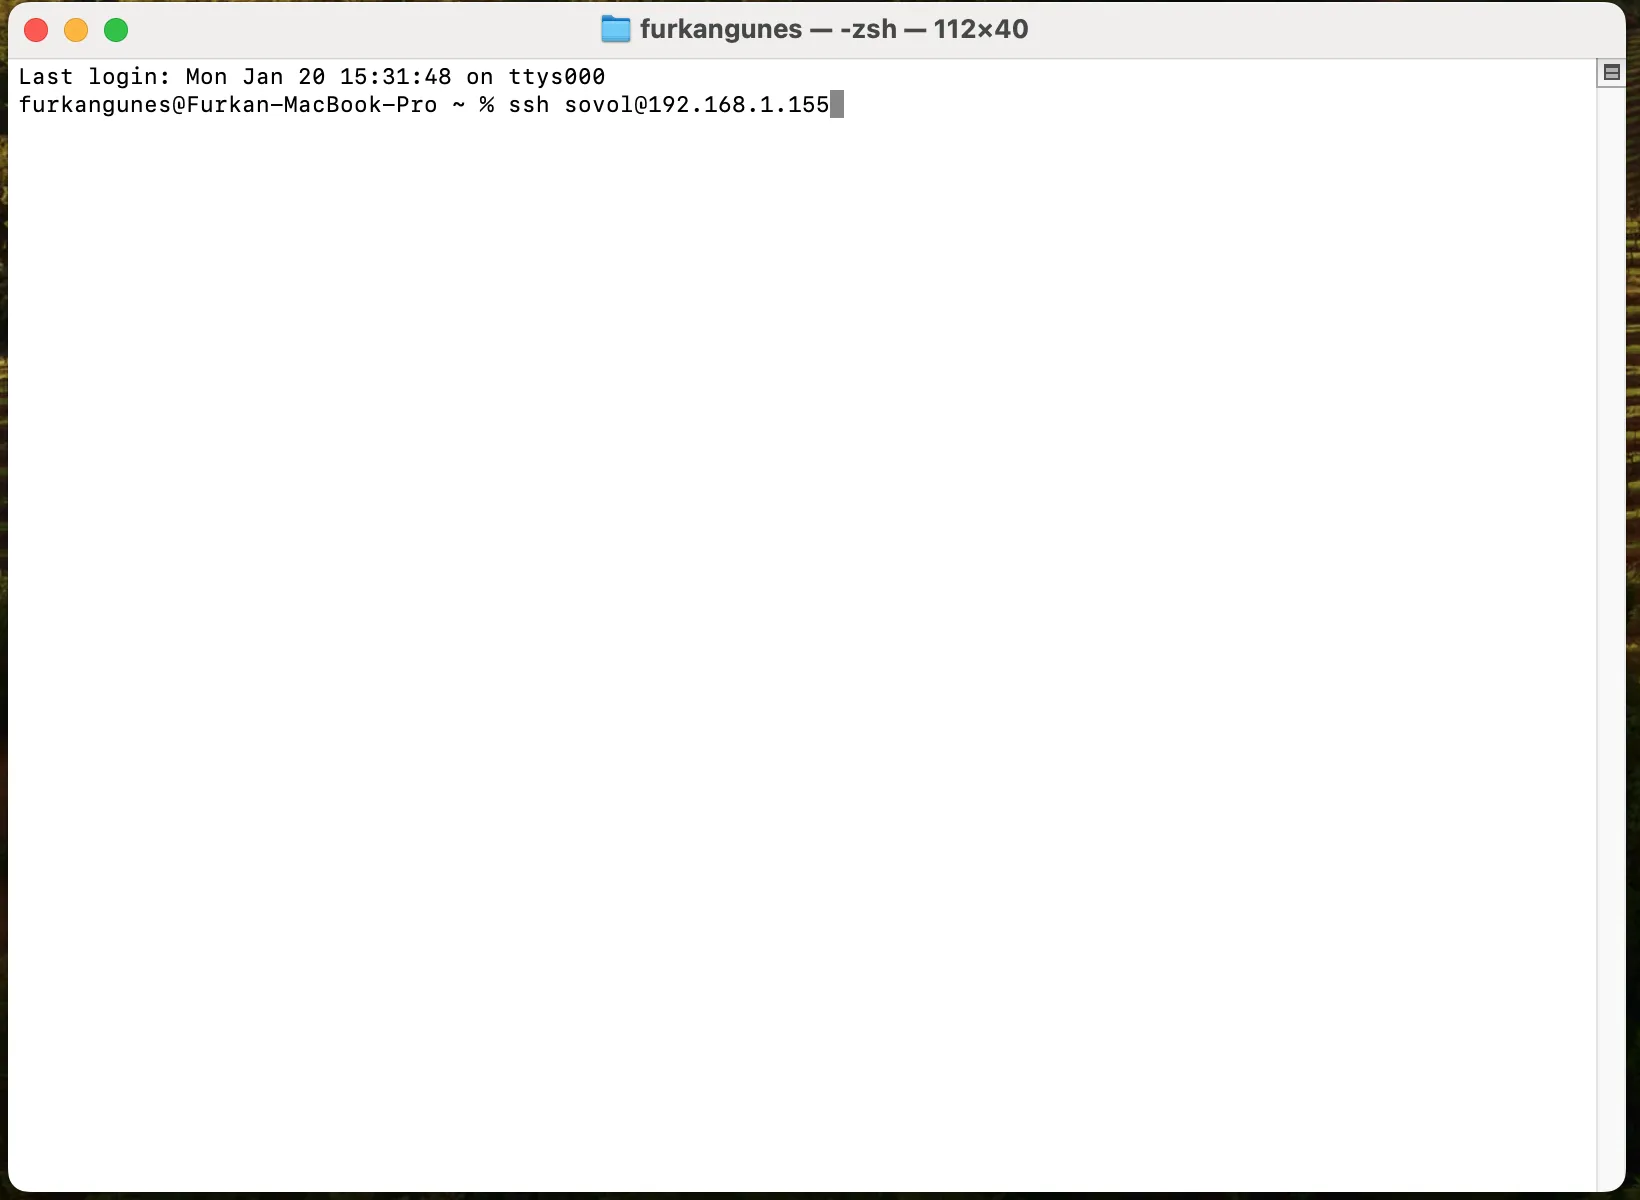
¶ 1- Establish an SSH Connection
Obtain the IP address of your Sovol SV08 printer. In this example, the IP is 192.168.1.155. To connect via SSH, open the Windows Command Prompt or macOS Terminal and type: ssh sovol@192.168.1.155
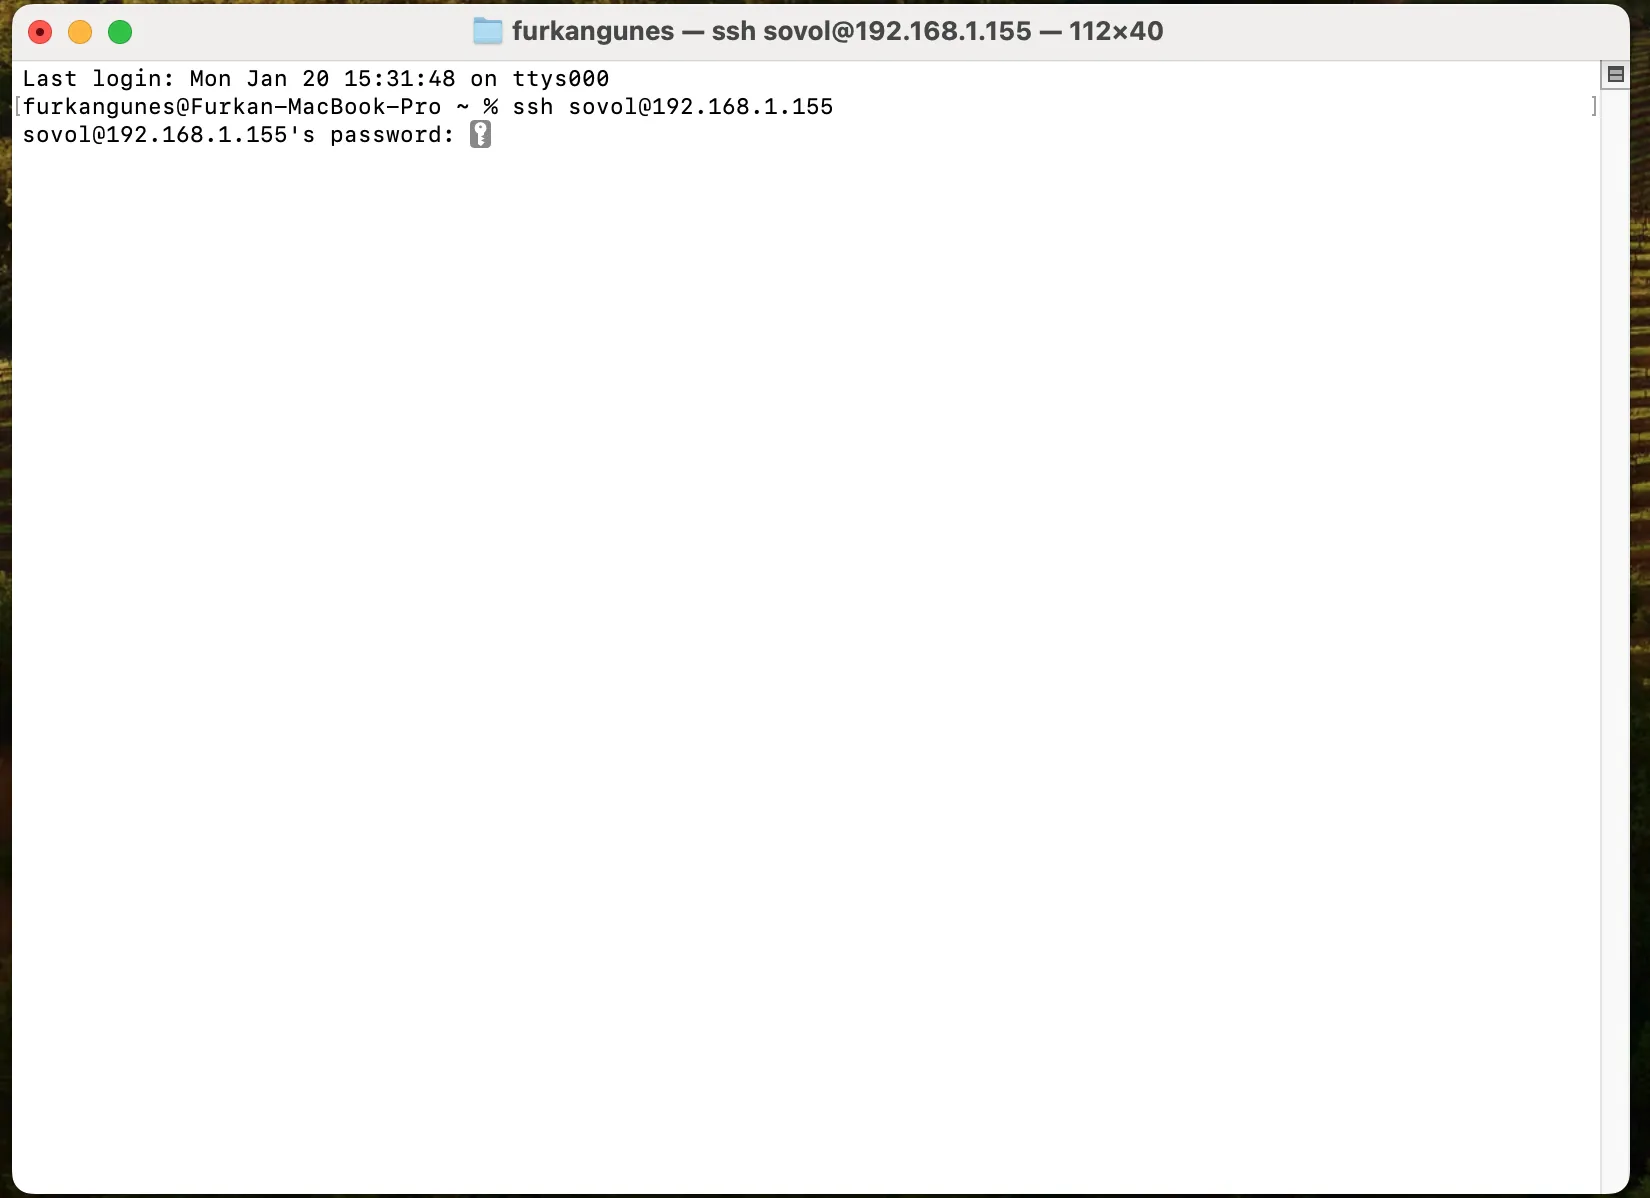
¶ 2- Enter the SSH Password
For Sovol SV08 printers, the default root password is sovol. Enter sovol in the password field to proceed.
¶ 3- Change klippy File
After accessing the printer’s terminal, please enter these commands in order.
Navigate to your home directory:
cd ~
Clone the repository:
git clone https://github.com/erendabn/SovolSv08Klippy.git
Backup the current klippy folder:
mv klipper/klippy/ klipper/klippy-backup
Replace it with the new klippy folder:
mv SovolSv08Klippy/klippy klipper/klippy
Restart the Klipper service:
sudo service klipper restart
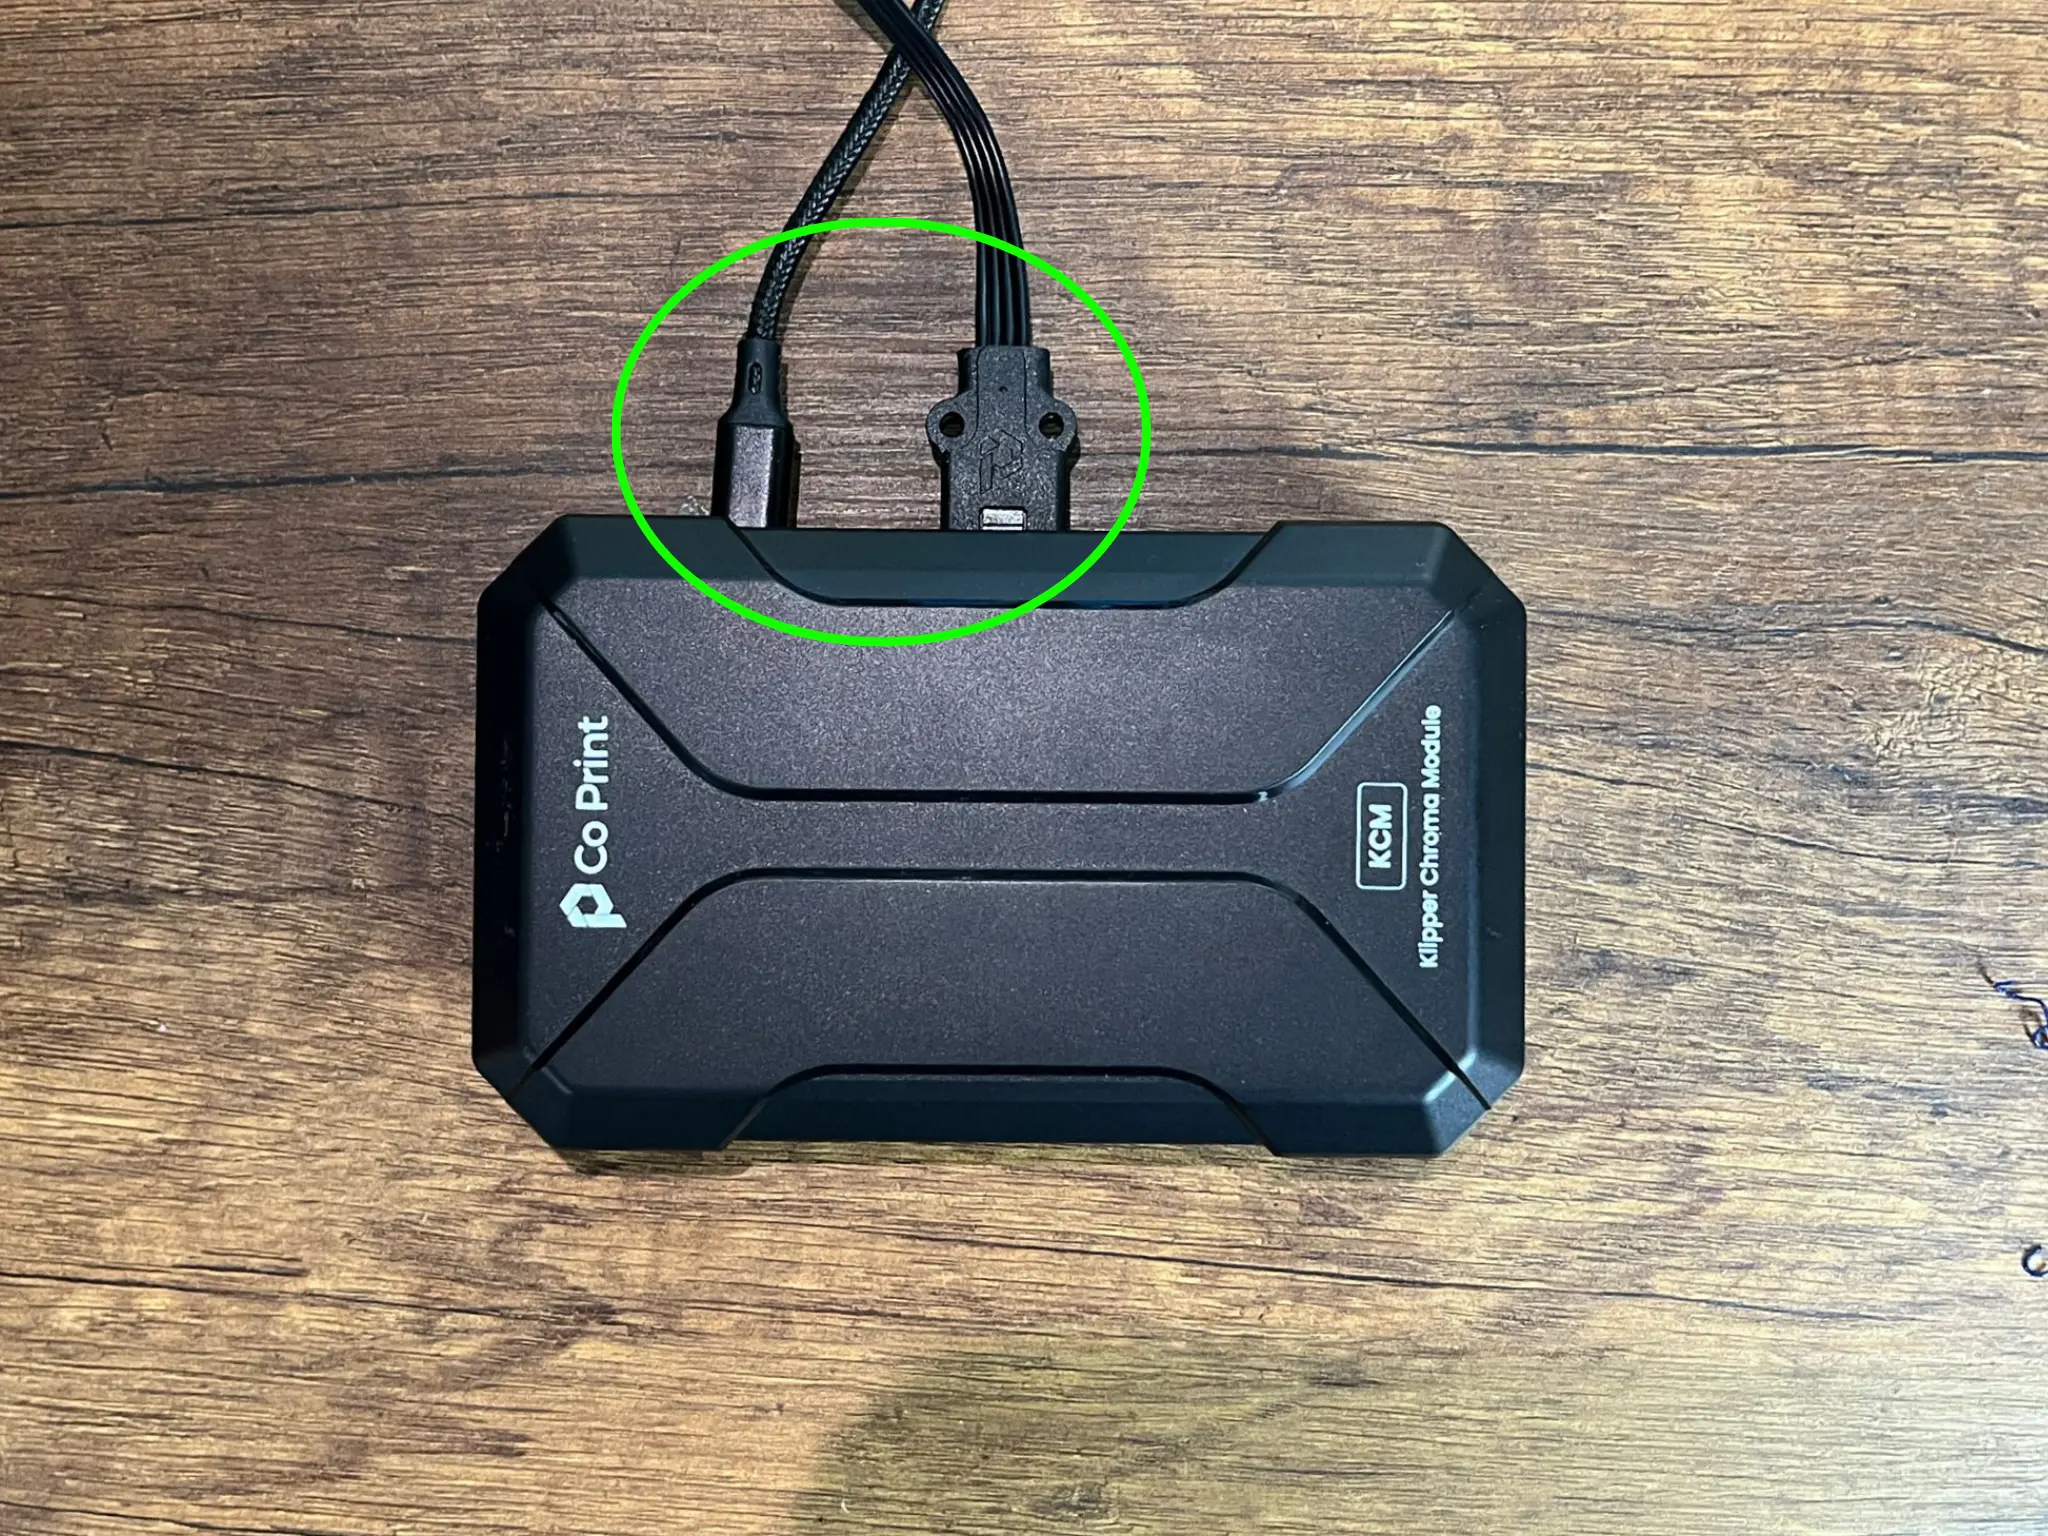
¶ 4- Connect ChromaHead and KCM Module While Power is Not Connected
Do not plug in the ChromaHead cable and KCM USB-C to the KCM module while the KCM is powered on!
Also, do not disconnect the KCM or ChromaHead cables while the power is connected!
Always make sure that the KCM power is off.
To complete the installation successfully, connect the ChromaHead cable between the KCM and the ChromaHead, and the KCM cable between the KCM and the Sovol SV08. Then, plug in the KCM power cable.
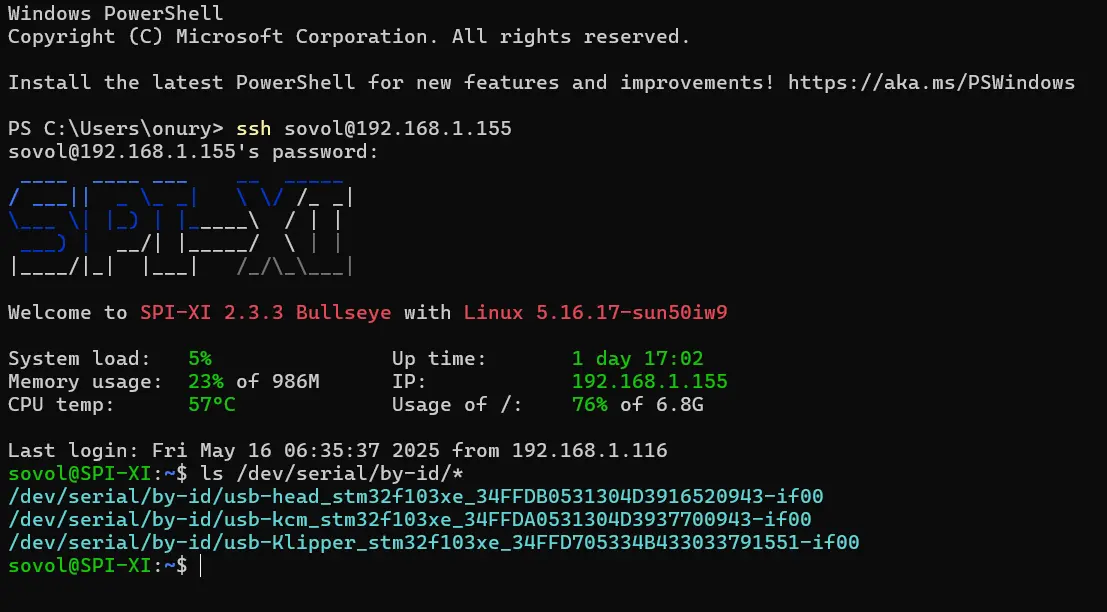
In the CMD, type the command ls /dev/serial/by-id/* and press ENTER. You should see three serial paths listed.
¶ 5- Upload the Configuration Files via Mainsail
Download the necessary config files for the Sovol SV08 from here. Then, access the Mainsail interface by entering the printer's IP address into your web browser. In this example, the IP address is 192.168.1.155 Next, click on the 'Machine' tab.
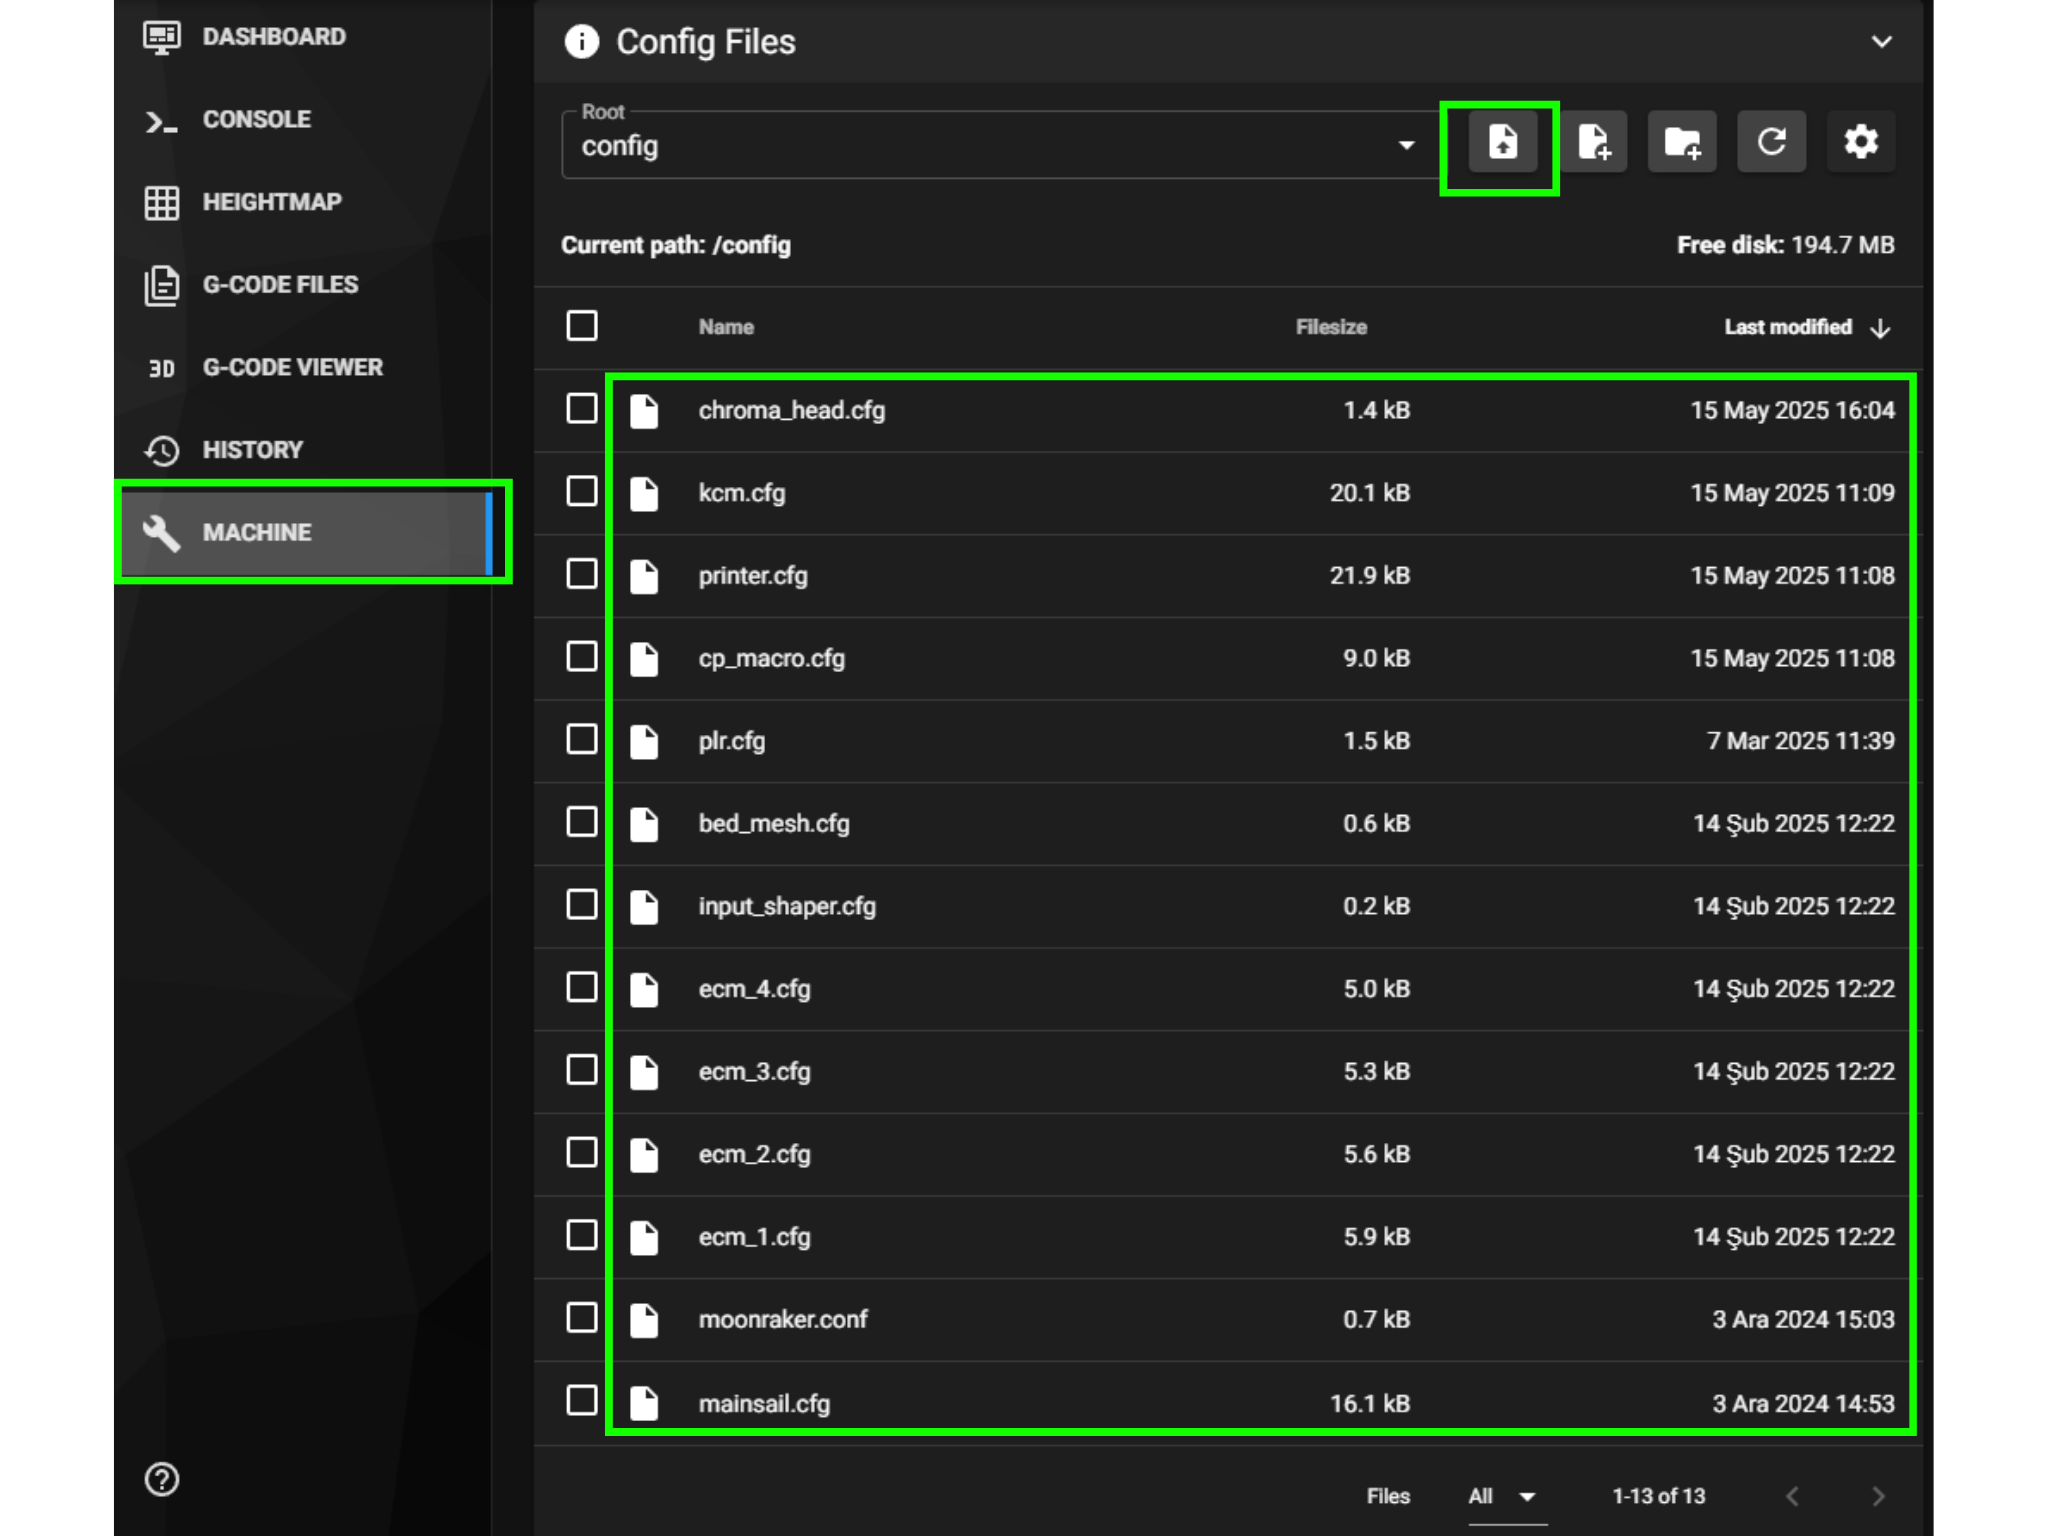
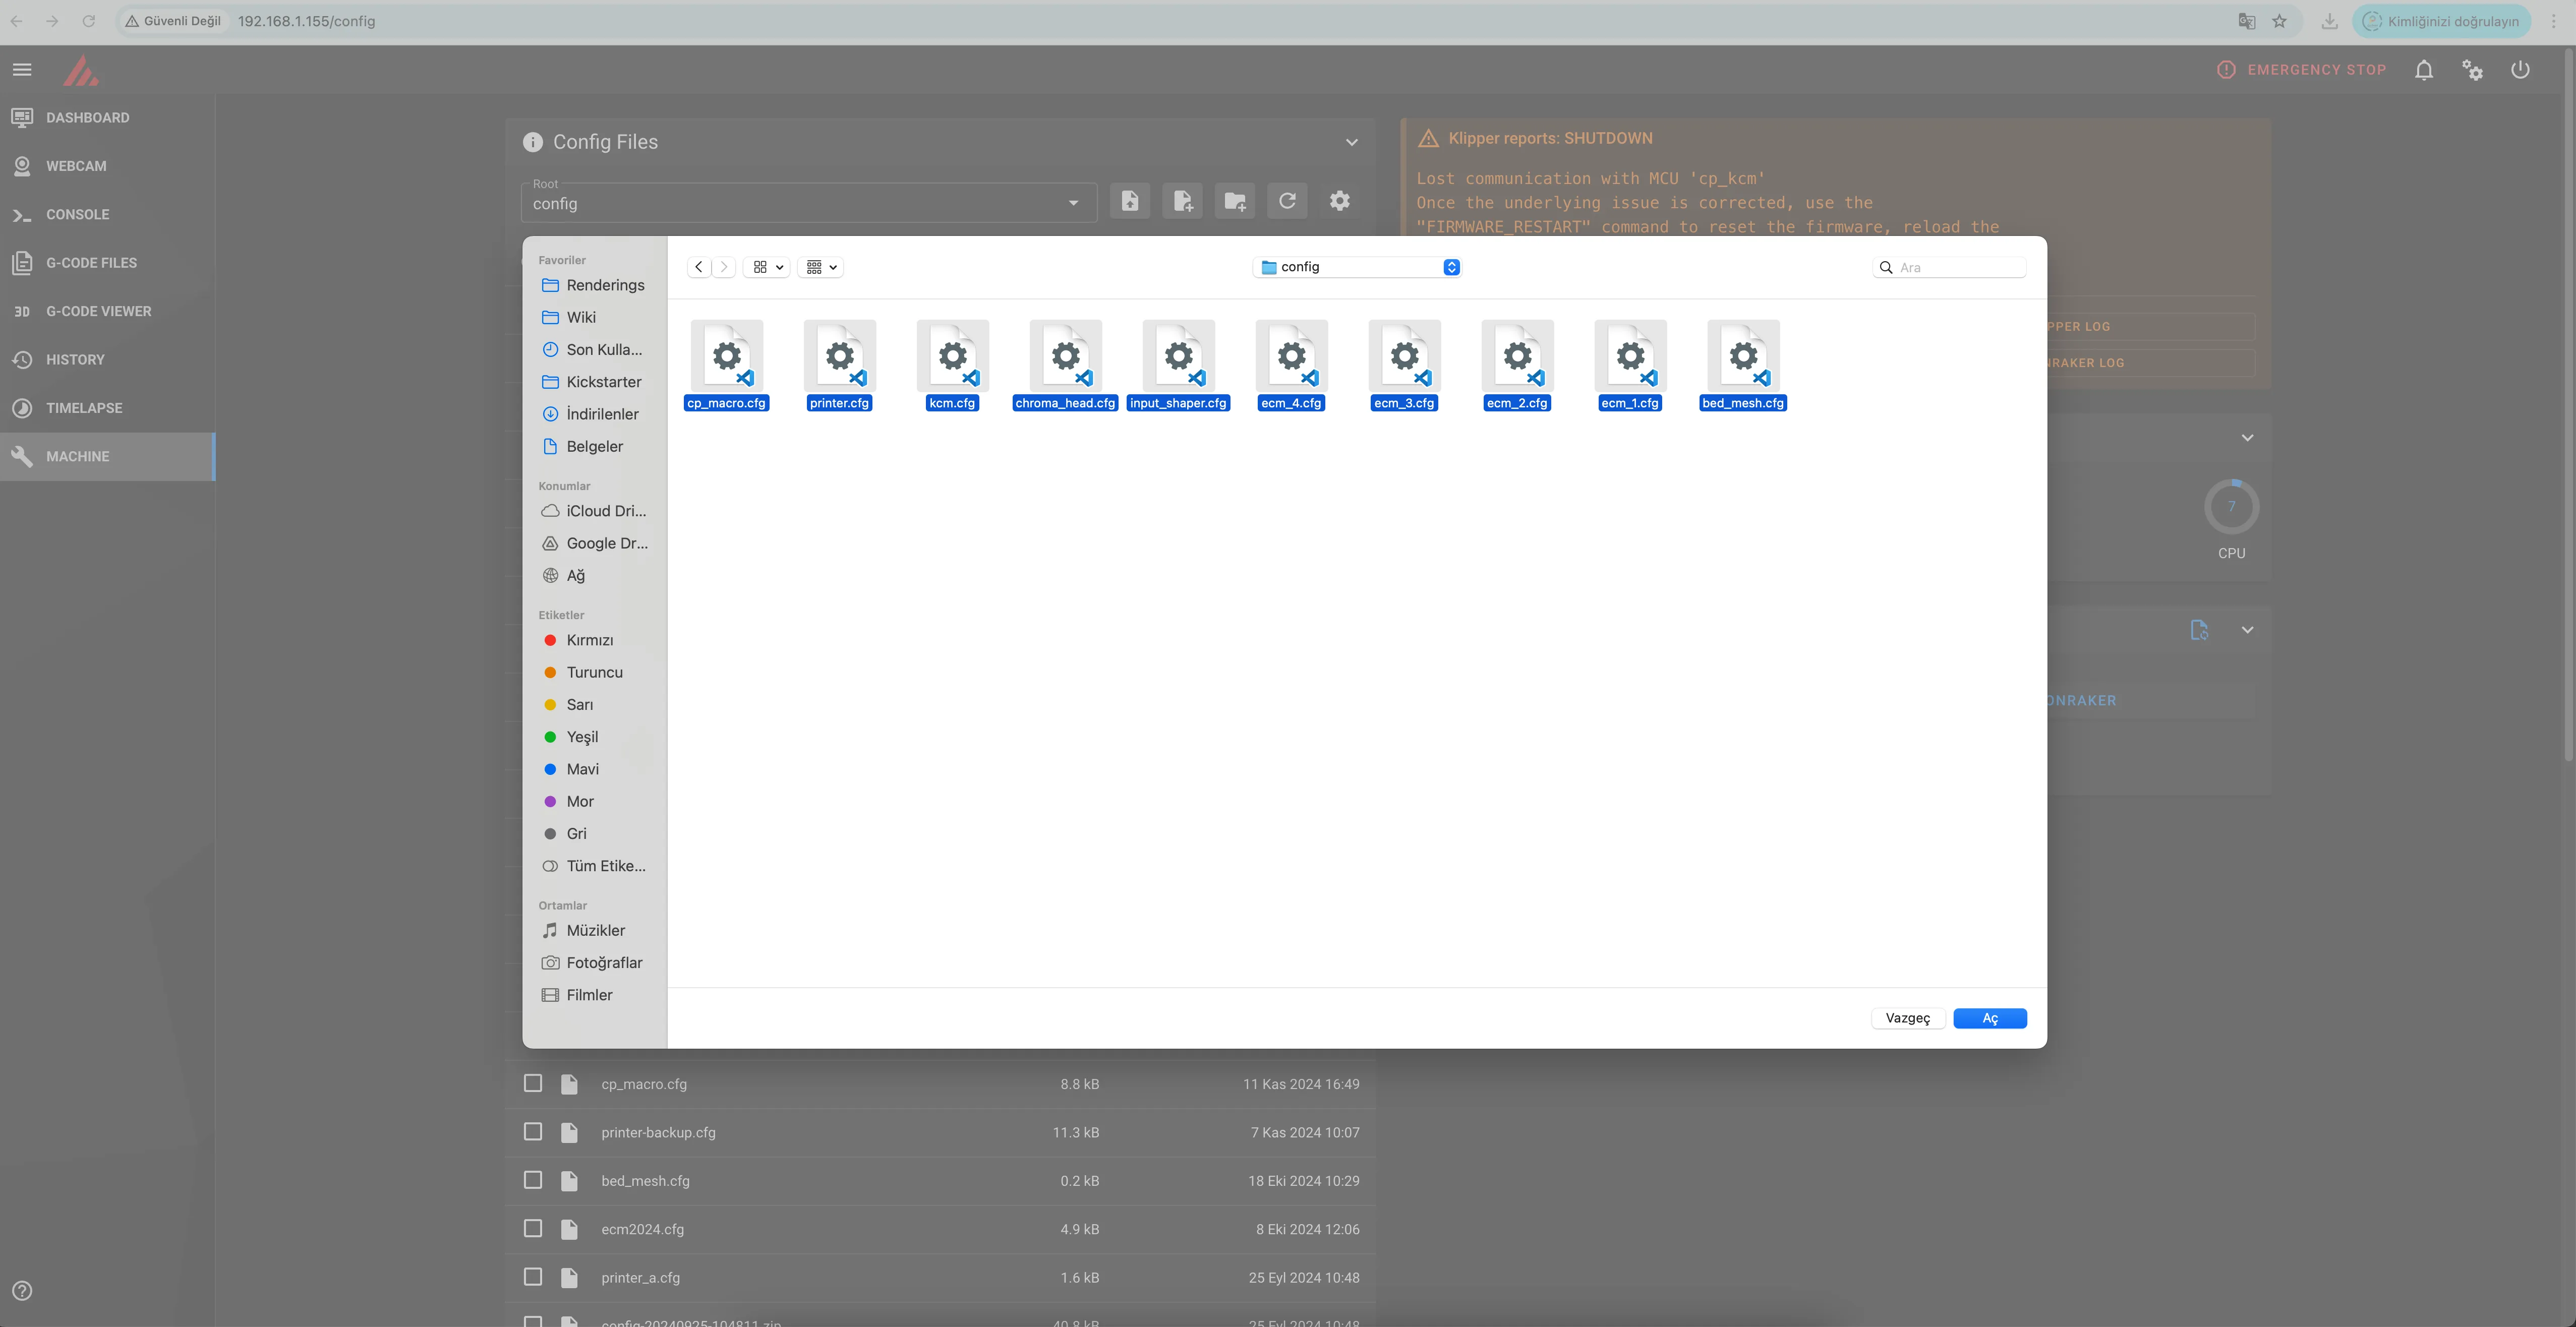
¶ 6- Upload the Downloaded Config Files
Upload the latest configuration files you downloaded from the wiki page to the system.
¶ 7- Editing KCM and ChromaHead Serial Paths
As shown in the image below, after running the command ls /dev/serial/by-id/*, three serial paths are displayed. Among them:
-
/dev/serial/by-id/usb-Klipper_stm32f103xe_34FFD705334B433033791551-if00for Sovol SV08 (printer.cfg) -
/dev/serial/by-id/usb-kcm_stm32f103xe_34FFDA0531304D3937700943-if00for KCM Module (kcm.cfg) -
/dev/serial/by-id/usb-head_stm32f103xe_34FFDB0531304D3916520943-if00for ChromaHead (chroma_heac.cfg)
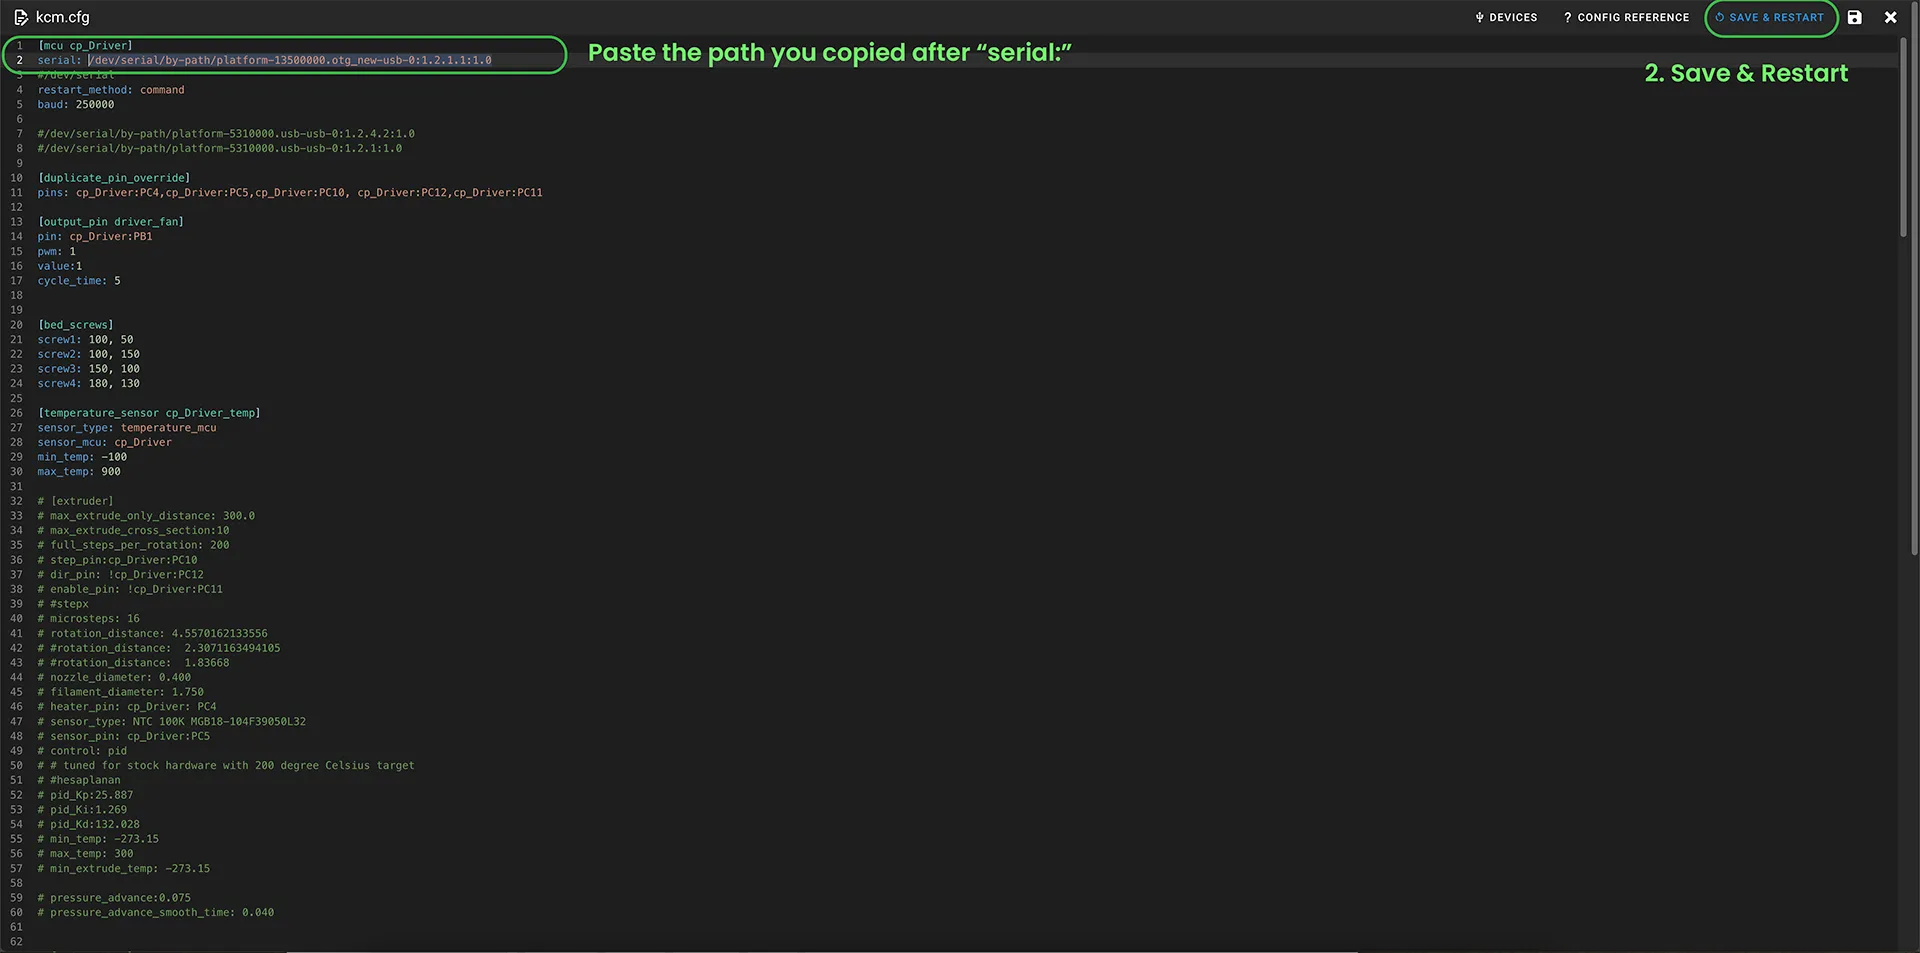
¶ 8- Locate the kcm.cfg File and Open It
Copy the path
/dev/serial/by-id/usb-kcm_stm32f103xe_34FFDA0531304D3937700943-if00
and open the kcm.cfg file.

In the kcm.cfg file, under the [mcu cp_Driver] section, paste the serial path into the serial: field. Then click the SAVE & RESTART button.
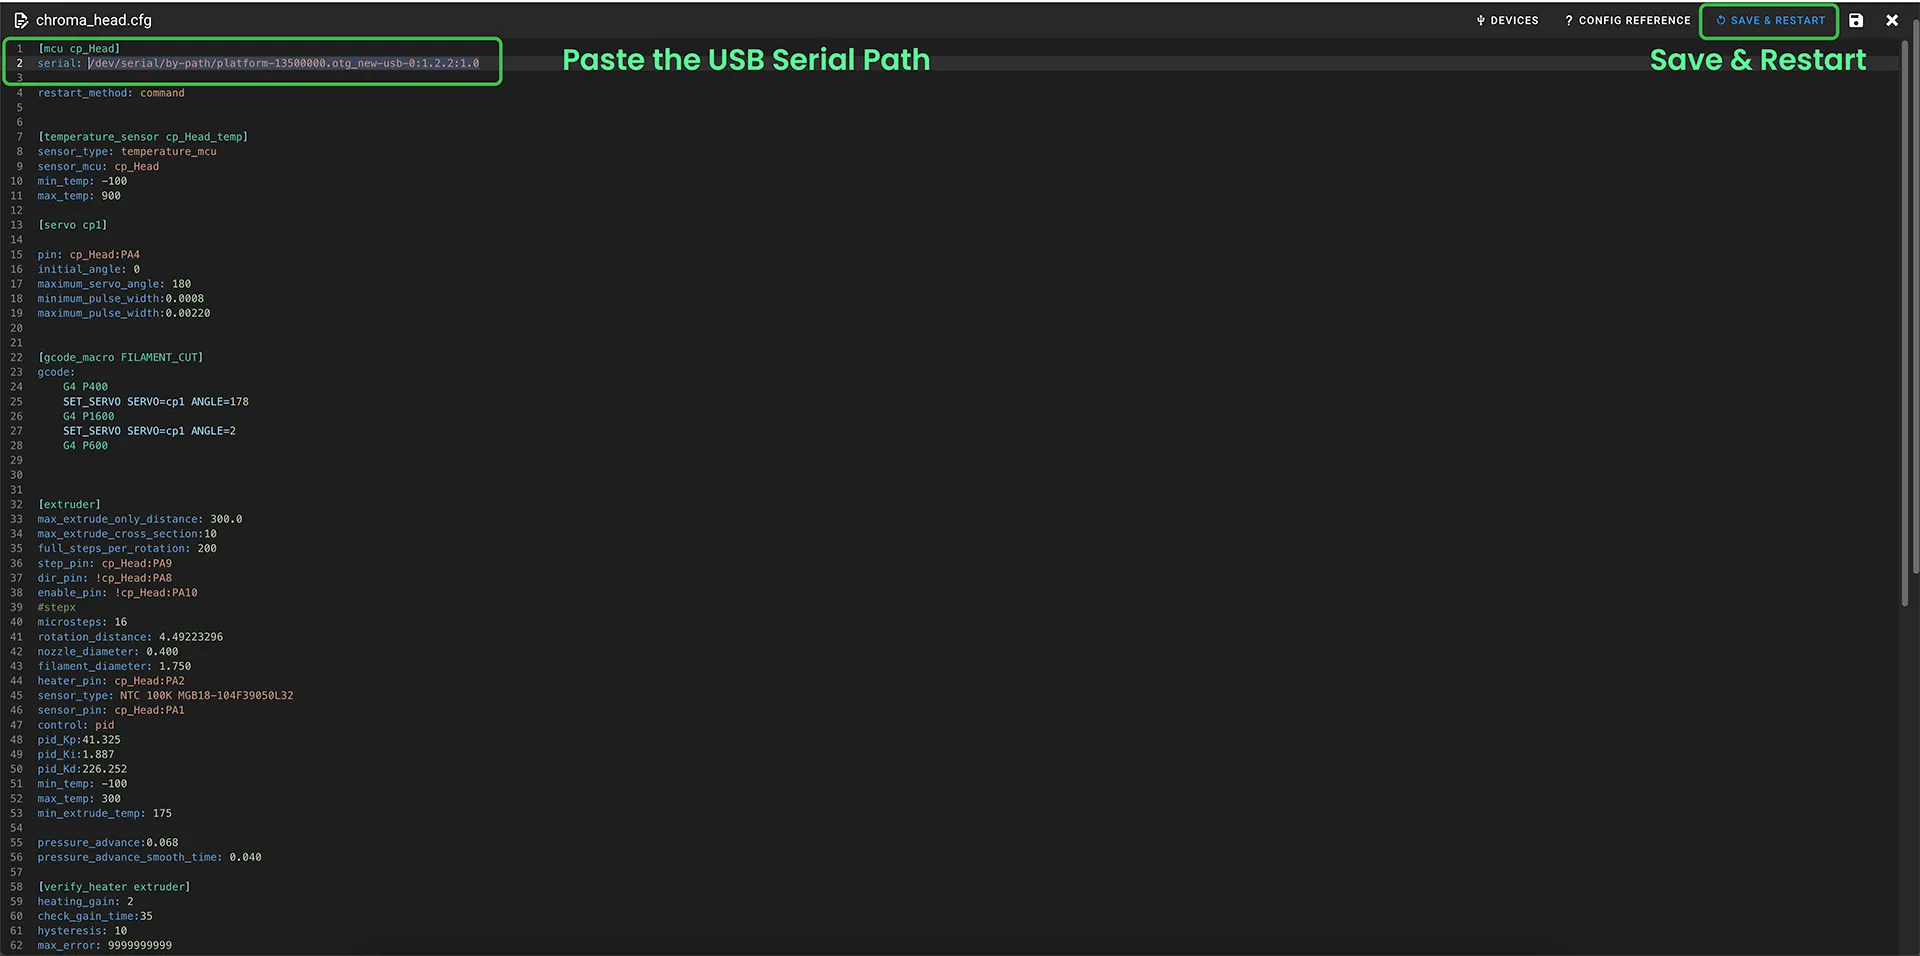
¶ 9- Edit the Serial Path in the chromahead.cfg File
In the chroma_head.cfg file, copy the /dev/serial/by-id/usb-head_stm32f103xe_34FFDB0531304D3916520943-if00 path and paste the ChromaHead path found via SSH under [mcu cp_Driver] after serial:. Save the changes and exit.
¶ The installation is complete
If you encounter any issues with the installation, please contact our support team at support@coprint3d.com for assistance. Do not hesitate to reach out for help.